


+15 More
Digital Aura Portal - FZCO
Building A1, Dubai Digital Park, Dubai Silicon Oasis, Dubai, United Arab Emirates Premises Number 72647 - 001
Business registration number: 70647
gamer-choice.com © 2026
Digital Aura Portal - FZCO
Building A1, Dubai Digital Park, Dubai Silicon Oasis, Dubai, United Arab Emirates Premises Number 72647 - 001
Business registration number: 70647
In our WoW Season of Discovery Molten Core raid guide, we will help you get prepared for the legendary comeback of this instance. Being one of the first raids ever added to the game, players have a chance to complete it once more. Returning in Phase 4 of WoW SoD, this activity brings this challenge to a higher level and introduces new loot. Gather your party, and let’s dive in for the greatest rewards. The revamped Molten Core bosses make this raid even more exciting and demanding than before, offering a nostalgic yet intense PvE experience.
Before we get to our SoD Molten Core walkthrough, you might want to check out our special deal. Our PROs at Gamer Choice can help you complete the Molten Core raid in record time. Secure the best loot, save hours of grinding, and benefit from unbeatable pricing. Gamer Choice delivers top-tier assistance so you can enjoy your game without stress.

Buy WoW SoD Boost
Level up fast and dominate Season of Discovery

Molten Core has been updated into a 20-player raid for Season of Discovery. You’ll encounter the same 10 classic Molten Core bosses from the original game, now enhanced to match the updated difficulty. A brand-new boss has also been introduced, putting your raid group's skills to the test. Successfully clearing the instance will reward you with class-specific Tier 1 gear sets, along with various powerful weapons and crafting recipes.

The location of Molten Core in Season of Discovery remains unchanged — it’s still nestled deep within Blackrock Mountain. This iconic place lies between the Burning Steppes and Searing Gorge. To reach the instance, players must travel through Blackrock Depths and proceed to the portal that leads directly into the raid.
Here’s a step-by-step guide on how to gain access to Molten Core in SoD:
For those who have completed the Attunement to the Core quest, you can teleport directly to the entrance. More on that process will be covered later in the guide.
The layout of Molten Core can be confusing due to its cavernous structure and the ever-present lava. Understanding the order of Molten Core bosses is essential for a smooth raid. Refer to the Molten Core map and follow the boss progression listed below:
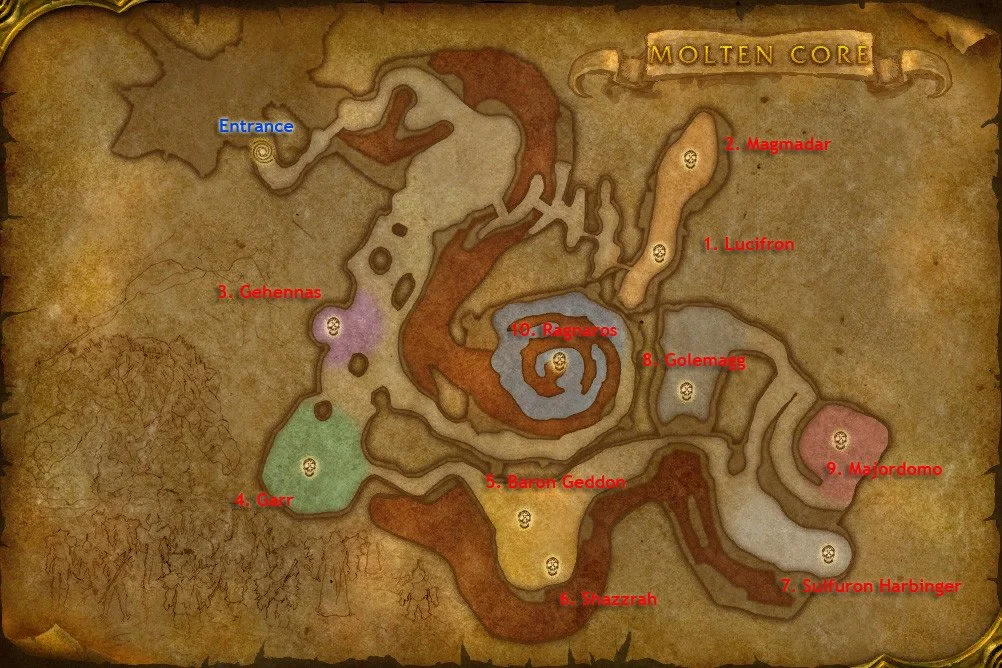
This route is the most efficient. While it’s technically possible to go after Gehennas and Garr first, it would mean backtracking to Lucifron and Magmadar, which is inefficient. We highly recommend following the boss order as listed.
Note: A new boss has been added in WoW SoD Phase 4. Details will be added here once available.
To participate in Molten Core during Season of Discovery, your character must be level 60 — the maximum level for all current SoD phases. Reaching this cap ensures that every player in your group has full access to their class toolkit, making them ready for the intense fights ahead.
Like all other raids in Season of Discovery, Molten Core has a weekly reset. This means you can only loot the raid once per week. After that, additional runs won’t reward you with the regular raid drops. Molten Core is scheduled to release on July 25 at 10:00 p.m. CET for European servers and 1:00 p.m. PST for North American servers. Check back later for a live reset timer to stay on track with your raid planning.
To gain permanent access to Molten Core, you must complete the Attunement to the Core questline. Begin by speaking with Lothos Riftwaker at Blackrock Mountain — the easiest way to find him is by entering through Searing Gorge. You’ll need to be at least level 55 to start the quest.
Follow these steps to complete the attunement:
Finishing this process gives you a quick-access teleport straight to the raid, bypassing mobs and long runs. If you want to skip the hassle, Gamer Choice offers quick attunement services so you can jump into the action immediately.
At this time, details regarding quests specific to Molten Core in Season of Discovery have not been confirmed. We’ll update this section as soon as new information becomes available.
While any group composition can technically clear the raid, certain classes make the challenge significantly easier. Below are the top picks for each role based on current performance against Molten Core bosses.
Here are three standout DPS options for the raid:
Durable tanks are crucial for survival against hard-hitting Molten Core bosses. These are the best choices:
Here are the best healing options to support your group through the toughest Molten Core bosses:
As long as your raid communicates effectively and each player knows their role, defeating all Molten Core bosses is entirely possible with any team. The raid has been tuned to allow for multiple compositions, so your group’s coordination and execution will ultimately determine your success.
When you defeat all Molten Core bosses in Season of Discovery, you’re rewarded with a variety of powerful items. These rewards include Tier 1 armor sets available for every class and specialization, along with exclusive weapons, trinkets, and crafting recipes. With the rework introduced in Phase 4, the loot has been adjusted to match the upgraded difficulty of the raid, making every drop feel valuable and rewarding.
Conquering Molten Core bosses grants players Tier Tokens, which can be exchanged for pieces of Tier 1 armor specific to your class and specialization. Starting with SoD Phase 4, these Tokens have become class-locked, ensuring only your class can use them to acquire the corresponding set items. This update simplifies the loot distribution and gives players a clear path to gearing up. You can now get the exact Tier Set piece you need in just a few steps with the help of our Gamer Choice team.
Below is the full list of all Tier 1 sets available in Season of Discovery:
Druid Tier Set – Cenarion
| Spec | Set Name | Role |
|---|---|---|
| Balance Druid | Cenarion Eclipse | DPS |
| Feral Druid | Cenarion Cunning | DPS |
| Restoration Druid | Cenarion Bounty | DPS |
| eral Druid | Cenarion Rage | Healer |
Hunter Tier Set – Giantstalker
| Spec | Set Name | Role |
|---|---|---|
| Ranged Hunter | Giantstalker Pursuit | DPS |
| Melee Hunter | Giantstalker Prowess | DPS |
Mage Tier Set – Arcanist
| Spec | Set Name | Role |
|---|---|---|
| Caster Mage | Arcanist Insight | DPS |
| Healer Mage | Arcanist Moment | Healer |
Paladin Tier Set – Lawbringer
| Spec | Set Name | Role |
|---|---|---|
| Holy Paladin | Lawbringer Mercy | Healer |
| Retribution Paladin | Lawbringer Radiance | DPS |
| Protection Paladin | Lawbringer Will | Tank |
Priest Tier Set – Prophecy
| Spec | Set Name | Role |
|---|---|---|
| Caster Priest | Dawn Prophecy | DPS |
| Healer Priest | Twilight Prophecy | Healer |
Rogue Tier Set – Nightslayer
| Spec | Set Name | Role |
|---|---|---|
| DPS Rogue | Nightslayer Thrill | DPS |
| Tank Rogue | Nightslayer Battlearmor | Tank |
Shaman Tier Set – Earthfury
| Spec | Set Name | Role |
|---|---|---|
| Melee DPS Shaman | Earthfury Impact | DPS |
| Ranged Caster Shaman | Earthfury Eruption | DPS |
| Tank Shaman | Earthfury Resolve | Tank |
| Healer Shaman | Earthfury Relief | Healer |
Warlock Tier Set – Felheart
| Spec | Set Name | Role |
|---|---|---|
| Warlock | Corrupted Felheart | DPS |
Warrior Tier Set – Might
| Spec | Set Name | Role |
|---|---|---|
| DPS Warrior | Unstoppable Might | DPS |
| Tank Warrior | Immoveable Might | Tank |
These revamped Tier Sets enhance your performance across all roles. With Season of Discovery introducing off-meta specs like Healer Mage or Tank Shaman, these sets accommodate new builds that are not just viable but often preferred by players seeking flexibility in raids against Molten Core bosses.
In addition to Tier Tokens, you’ll also receive gear from the newly rebalanced loot table. Many items have been fine-tuned specifically for Phase 4 to improve their value and usability. Unlike the Tier Sets, these drops are not class-specific and can be worn by anyone whose class supports the item by default. Take a look at some of the loot examples you can obtain:
| Type | Item | Slot |
|---|---|---|
| Weapons | Core Hound Tooth | One-Hand |
| Eskhandar's Right Claw | Main Hand | |
| Malistar's Defender | Off-Hand | |
| Cloth Armor | Malistar's Defender | Waist |
| Gloves of the Hypnotic Flame | Hands | |
| Leather Armor | Wild Growth Spaulders | Shoulder |
| Fireguard Shoulders | Shoulder | |
| Mail Armor | Helm of the Lifegiver | Head |
| Crown of Destruction | Head | |
| Wristguards of True Flight | Wrist | |
| Plate Armor | Core Forged Greaves | Feet |
| Onslaught Girdle | Waist | |
| Jewelry | Essence of the Pure Flame | Trinket |
| Band of Accuria | Finger | |
| Shard of the Scale | Trinket | |
| Cloaks | Fireproof Cloak | Back |
| Cloak of the Shrouded Mists | Back |
Note: The items listed are only a portion of the total loot available in the game. You'll find even more gear drops when you enter the raid and challenge the Molten Core bosses yourself.
If you're into professions, the raid also features several rare and powerful crafting recipes. These Season of Discovery Molten Core recipes allow players to enhance gear with powerful effects or produce consumables that give an edge in future raids. Whether you're an enchanter, leatherworker, alchemist, or engineer, these patterns are invaluable additions to your crafting library:
Need help leveling up your profession to use these recipes? Let Gamer Choice boost your Profession Level so you’re always ready to craft the best gear enhancements available.
Taking down every one of the Molten Core bosses is no easy task. Each fight requires an understanding of mechanics, positioning, and precise execution. With our guide, your raid team can tackle each encounter effectively, regardless of your group composition. Use the chart below to get a summary of essential tactics:
| Boss | Tactics for DPS | Tactics for Tanks | Tactics for Healers | Abilities |
|---|---|---|---|---|
| Lucifron | Getting rid of Flamewaker Protectors is the highest priority. Try not to take extra damage from Cleave and Shadow Shock whenever possible. | Minimize the damage your allies take. It can be done if the boss and Flamewaker Protectors are positioned properly. The main goal here is not to let others suffer damage from Cleave. | Impending Doom and Lucifron’s Curse should be dispelled first. Those who are affected by Dominate Mind are also of the highest priority. | Lucifron's Curse Cleave Impending Doom Shadow Shock Dominate Mind |
| Magmadar | Avoid Panic if possible even if you are a melee DPS. As a ranged DPS, try not to get hit by Lava Bomb. This is important since most of the healing will be concentrated on melee DPS rather than ranged ones. | As a Warrior, you can use Berserker Rage to dispel Panic. Also, keep the boss in one place and do not move unless you are hit by Lava Bomb. | Watch for melee DPS and Tanks HP all the time. This is especially important when the boss activates Frenzy. | Magma Spit Enrage Panic Lava Bomb |
| Gehennas | Do not stand in one place if it is affected by Rain of Fire. Dispel Gehennas’ Curse if you have utility abilities for this. | Maintain aggro all the time and get away from the zone covered with Rain of Fire. Otherwise, your Healer might not be able to heal you up. | Prioritize healing allies affected by Rain of Fire. Dispel Gehenna’s Curse from your melee DPS and Tanks. | Gehennas' Curse Shadow Bolt Rain of Fire |
| Garr | Firesworn is your priority target you need to take down whenever they spawn. Also, make sure you never stand near an exploding add, as they deal a ton of damage. | Off-tanks like Feral Druid can take care of Firesworn as they spawn. Make sure you are not positioned too close to each other to avoid taking too much AoE explosion damage. | Off-tanks should be your priority when they suffer damage from Firesworn. Also, heal up those allies who are affected by Antimagic Pulse. | Eruption Magma Shackles Immolate Separation Anxiety Antimagic Pulse |
| Baron Geddon | Spread out if you are affected by Living Bomb, spend as much Mana as possible to suffer from Ignite Mana less. | Maintain constant aggro and do not take too much damage from Inferno whenever possible. | Dispelling Living Bomb from your melee DPS and Tanks should be a priority. When Inferno is active, make sure to heal up the squishiest targets. | Ignite Mana Inferno Living Bomb |
| Shazzrah | Do not stay too close to other melee DPS when Arcane Explosion is cast. Interruping Deaded Magic should be a priority whenever possible. | Keep the boss steady in the center of the area. Do not move unless you have to get away from Arcane Explosion. | Heal up all the targets who take damage from Arcane Explosion. Having a mass Healer like Restoration Druid would be the best in this case. | Magic Grounding Gate of Shazzrah Arcane Explosion |
| Sulfuron Harbinger | Make sure the boss has no one to empower with Inspire. For this, you need to get rid of all adds spawning around the area. | Help your DPS clear out adds so that the boss cannot cast Dark Mending too often. | Heal up DPS and Tanks affected by Shadow Word: Pain. Whenever possible, help your damage dealers to get rid of adds. | Dark Mending Inspire Shadow Word: Pain |
| Golemagg | Prioritize attacking Golemagg rather than Core Ragers. | Keep aggro on both the boss and Core Ragers. Get rid of the latter. Your DPS should be able to focus on the boss freely. | Your main Tanks are the highest priority in this fight. They will suffer tons of incoming damage from the boss and Core Ragers. Pyroblast can make the situation even worse if you do not heal up in time. | Magma Splash Summon Player Pyroblast |
| Majordomo | Get rid of Flamewaker Healers above the Elite ones. Clear them out as soon as they spawn before they can heal the boss or other adds. | Help your DPS take down both Flamewaker types. Maintain aggro on the boss and interrupt the most dangerous spells whenever possible. | Tanks are your main priority once again. Make sure you are healing them only during Magic Reflection. | Damage Shield Summon Ragnaros Magic Reflection |
| Ragnaros | Do not stay too close during Lava Burst casts. Get rid of adds ASAP throughout the Submerge phase. | Keep the boss positioned in the center of the area. Return to melee range after Wrath of Ragnaros. | Group healing is essential during the Submerge phase. Make sure to have a Restoration Druid for this purpose. | Magma Blast Lava Burst Wrath of Ragnaros |
Keep in mind that depending on your class lineup and group synergy, you may need to adjust your strategies slightly. Still, these tips will help form a reliable baseline for conquering every boss.
Defeating Molten Core bosses is just part of the challenge — trash mobs can also be a threat if not handled properly. These enemies often accompany bosses or serve as buffers that empower them. Failing to manage them can result in wipe scenarios, especially in longer fights. Here are the most dangerous trash mobs you should watch for in the raid:
Effective crowd control and targeting priority are essential for smooth progression, especially when moving between the Molten Core bosses.
No raid is complete without consumables. These items are vital for survivability, damage, and overall raid efficiency. Especially when facing fire-heavy damage from most Molten Core bosses, the right potions and food can be the difference between victory and defeat. Below are the top consumables you should bring:
On top of that, make sure to bring class-specific food. Casters benefit from Runn Tum Tuber Surprise, while Smoked Desert Dumplings are excellent for melee DPS and tanks. While the buffs may not be as impactful as potions, they still provide a noticeable edge during boss encounters.
You’ll need to reach level 60 to access Molten Core in Season of Discovery. This is the maximum level available in Phase 4, unlocking your full potential for the raid.
Completing a full Molten Core run usually takes about 3 hours, depending on your raid’s coordination and experience with the mechanics.
The final encounter in Molten Core is against Ragnaros, the Firelord, who stands as the ultimate challenge of the raid.
Understanding each boss's key mechanics and high-damage abilities is crucial. Build your strategy around countering these threats and form a balanced raid team that can handle various roles efficiently.
The recommended progression path through Molten Core is as follows: Lucifron, Magmadar, Gehennas, Garr, Baron Geddon, Shazzrah, Sulfuron Harbinger, Golemagg the Incinerator, Majordomo Executus, and Ragnaros.
Molten Core features 11 bosses in total during Season of Discovery. Ten are classic encounters from the original version, and one is a newly introduced boss exclusive to Phase 4.
You’ll find the entrance to Molten Core inside Blackrock Mountain, located at coordinates 20.5, 32.8. You’ll need to pass through Blackrock Depths to reach the raid portal.

Buy WoW SoD Gold
Get SoD gold now and stay ahead of the competition!
This concludes our comprehensive guide to the revamped Season of Discovery Molten Core raid. We've covered the essential strategies to defeat all Molten Core bosses, the loot you can expect to earn, and the best items to bring with you. As one of WoW’s most iconic raids, Molten Core offers a thrilling chance to test your skills and coordination. Don’t miss your opportunity to relive this legendary experience. Whether you're a veteran or a newcomer, assemble your team and prepare to conquer the fiery depths. Until then, we’ll see you in Azeroth, champion!