


+15 More
Digital Aura Portal - FZCO
Building A1, Dubai Digital Park, Dubai Silicon Oasis, Dubai, United Arab Emirates Premises Number 72647 - 001
Business registration number: 70647
gamer-choice.com © 2026
Digital Aura Portal - FZCO
Building A1, Dubai Digital Park, Dubai Silicon Oasis, Dubai, United Arab Emirates Premises Number 72647 - 001
Business registration number: 70647
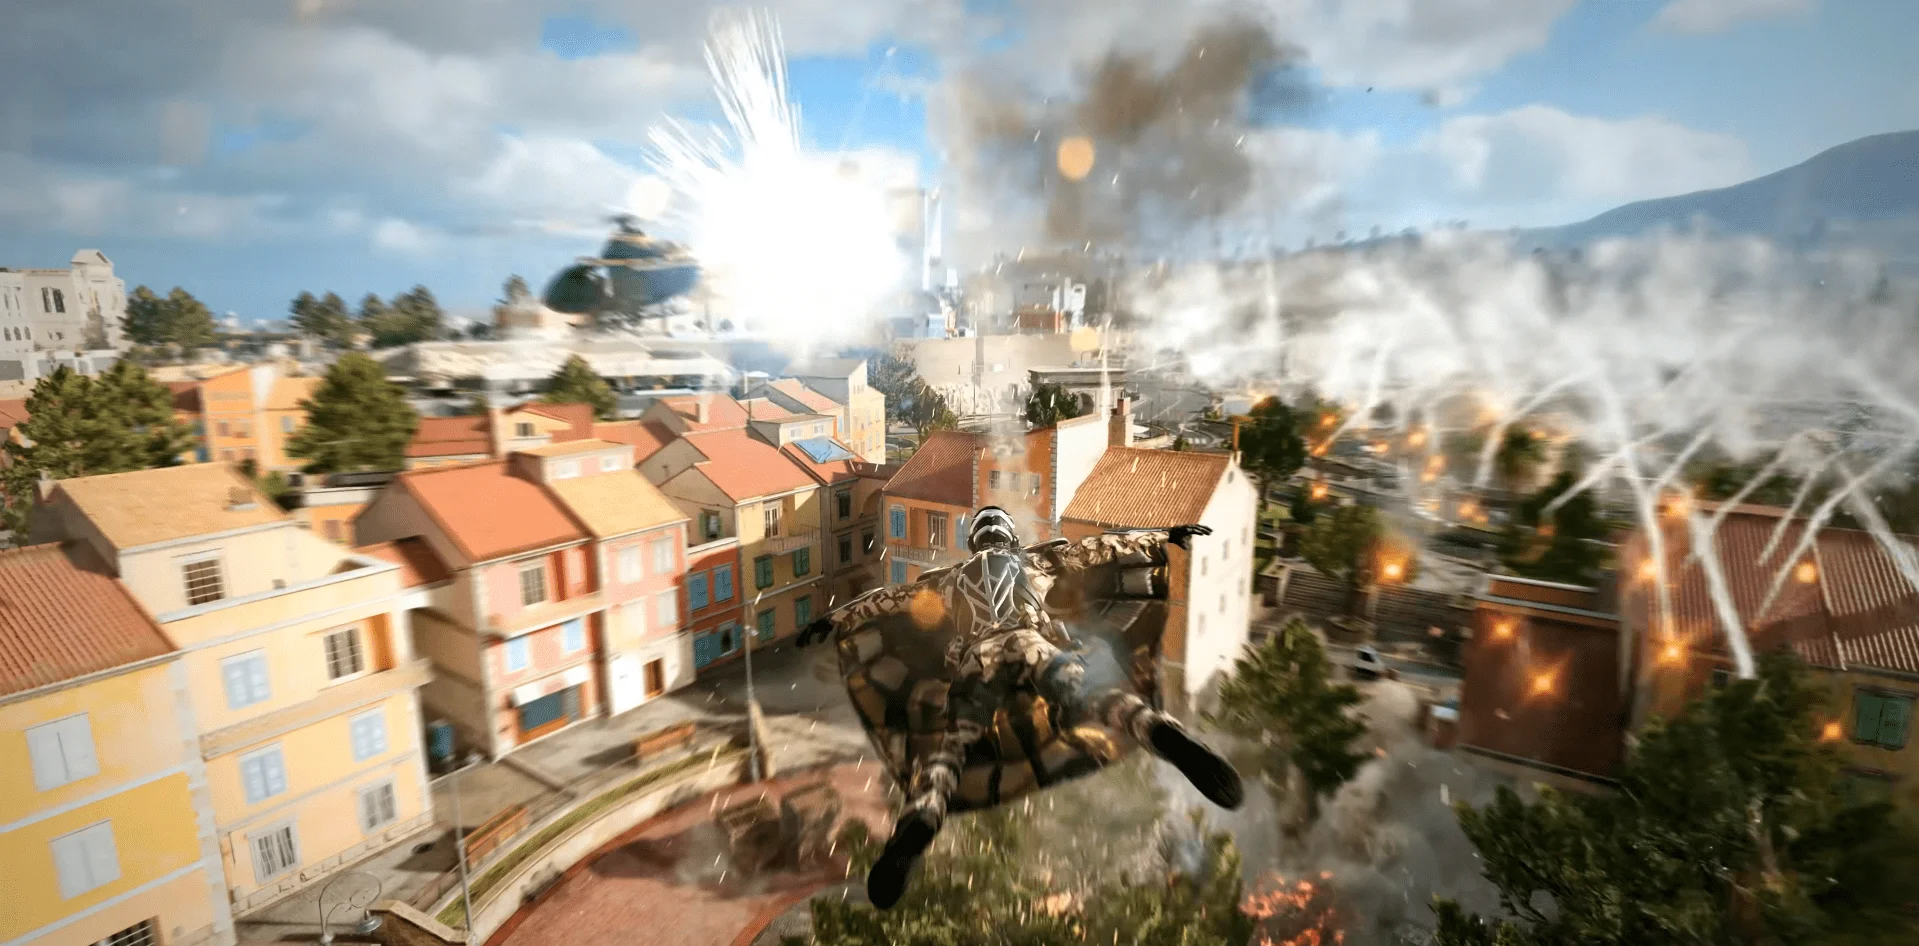
A fresh battle royale map has finally arrived, and honestly, it looks fantastic. Alongside a set of gameplay updates that noticeably improve the overall experience, Avalon introduces new ways to approach engagements. In this Avalon map guide for Warzone, I’ll go through all POIs and highlight the most important changes.
Avalon Map Guide for Warzone Quick Summary:
Black Ops Royale is a new mode introduced with Avalon, offering unique rewards such as Operator skins. Check out our Warzone Black Ops Royale Boost on Gamer Choice to unlock all rewards quickly and efficiently!
Avalon is partially a new map for CoD Warzone, reusing many assets from the endgame mode of Black Ops 7 while introducing meaningful improvements. It brings multiple quality-of-life updates and long-requested features, including better visual clarity. This season strongly emphasizes the new Black Ops Royale mode, which takes inspiration from BO4’s Blackout by removing custom loadouts and limiting redeploy options. Personally, the concept sounds far more appealing than the current system.
Let’s go over Black Ops Royale and the key new features added to Avalon:
All of these changes make Warzone feel faster in terms of movement but more tactical overall. It almost feels like the opposite of Resurgence. It’s fair to say the developers are finally listening to the community—but how it plays out in practice remains to be seen. Now, let’s move on to the POIs.
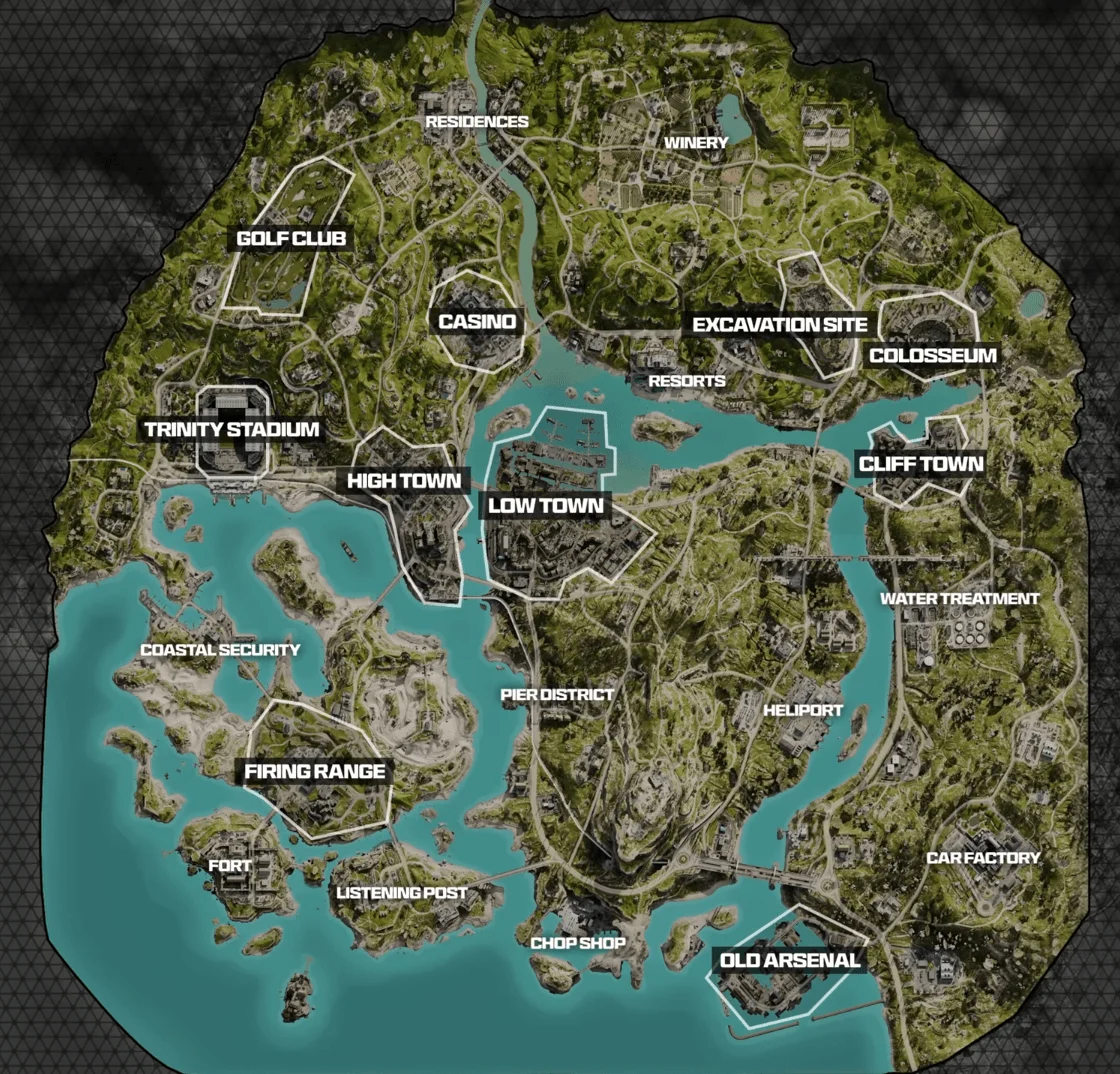
The official CoD website divides Avalon into five zones, though from what I’ve seen, this classification doesn’t impact gameplay much. It’s a bit odd, but not particularly important. The map features 21 POIs in total. Let’s break them down in the table below:
| POI | Short Description |
|---|---|
| Golf Club | Inspired by the original “Hazard” map from Black Ops. Some minor elevation and a building nearby. |
| Residences | More of a classic sector for CoD games. Crossroads connecting a small living area. Includes two sub-areas: Tennis Club and Azure Pine. First is a small court with a helipad nearby. Second is a resort in the mountain area. |
| Trinity Stadium | Map from the BO6 multiplayer. Multi-level combat made me reminisce about Verdansk Stadium in MW 2019. There’s a Police Station near the stadium and Villas. |
| Casino | Huge and luscious casino. A large area suitable for in-building combat or roof shootouts. Not far from it are the Mansions, connecting Casino to High Town, and the Estates, North of the Stadium. Quite an open area, so be careful when rotating. |
| High Town | Somewhat of a downtown area, left from the Low Town, which is a central area of the map. Prepare for fights here. A tall skyscraper is a great vantage point to overlook the surrounding areas, such as Yacht, which is basically the Lifeline map from BO6. |
| Winery | A picturesque location. Mostly flat, not a lot of cover, so use the view obstruction to hide in the bushes when crossing this POI. Not far from it is a High Village, which has a tall old church standing in the middle of it, which helps control the Winery area with a sniper rifle. |
| Resorts | A big hotel building with a beach connected to it. Three floors and the underground parking. It’s one of the favorite places to land for early-round shootouts, because it’s a Skyline map from Black Ops 6, which was one of the most popular maps there. There’s also a small Service Station area close to the Avalon Resort. |
| Excavation Site | Ruins of an old town. Lots of cover, no unfair elevation advantage, perfect for fair boots-on-the-ground fights. |
| Colosseum | I mean, it’s in the name. This place just begs you to land there and start a show. There’s an underground area and a fighting ring. You can tell the devs are baiting for TikTok clips of players having 1-on-1 brawls. The Colosseum is surrounded by Eastern Ruins and Lavender Ruins, which are minor POIs. They play basically the same as Excavation Site. |
| Coastal Security | Obligatory docks with a lighthouse. The layout is convenient for smaller-scale shootouts. |
| Firing Range | Yet another map taken from BO6 with the same title. Can be a bit labyrinthian in its layout, and it’s easy to lose your orientation completely. Next to the Firing Range is a military outpost with barracks and a tower. |
| Fort | Fort d’Avalon is a big area, separated from the mainland, so you can be sure that all fights happening here, stay here. Near the Fort is a small island called Cursed Rock, which is a Protocol multiplayer map from BO6. One day, we’ll get a brand new map with no assets reused, but not until CoD stops dropping every year. |
| Listening Post | I struggle to say something of note here, as this part of the map seems kinda bland for me. It connects to the Firing Range and Fort. Not far from it is a minor POI called Radars. Radars are there to induce stress and paranoia, as they overlook the bridge connecting the island to the mainland, and you can expect snipers there. |
| Low Town | One of the more interesting areas in terms of gameplay. There are lots of ascenders and ziplines that allow you to traverse here quickly. The biggest map point as well. Though it’s another map taken directly from BO6, it feels completely different here, perhaps given the more open-ended context. |
| Pier District | A pier with a Ferris Wheel and a few buildings not far from it. For some reason reminds me of Sapienza from Hitman. Ready to have flashbacks to hours of grinding in BO6, since apartments here are home to the infamous Stakeout grindhouse. |
| Heliport | Industrial area with not too many helicopters, despite the name. Or maybe I was always late to take control of them during the match. Further down from it is a High-Voltage Substation and an art Warehouse, North of the Heliport. |
| Chop Shop | Another industrial area is located in a depression and surrounded by two small islands, overlooking the area. Lowkey a banger area to fight at. Idk, something about its layout scratches my brain. On the hill above it is a Comms Tower, which is also the tallest point of the map. To the East of the Chop Shop is Avalon Bridge. |
| Cliff Town | This area feels like a Low Town and High Village remix. This tiny area has it all - an underground walkway leading to the boat pier, an industrial area, and a plethora of small buildings nearby with a chapel overlooking the town. East of the location is a Drug Den. |
| Water Treatment | An industrial area filled with silos and warehouses. Though it looks quite neat, there’s not much to do here. North of this area is an old Aqueduct. |
| Car Factory | W.M.D. map from Black Ops 6. Bigger in size, or at least it feels like it. Area with lots of verticality (for CoD) and multiple points to control the area. |
| Old Arsenal | Probably the most creative-looking area in Avalon. While most of it is a docking area, there’s an unfinished part of a cruise liner that you can get into and have a shootout. |
Even though many assets are reused from previous modes, the gameplay experience feels quite different due to larger open spaces and increased verticality. Personally, I’m excited to try this map, especially after RedSec didn’t meet expectations. While the battle royale genre isn’t as dominant as it once was, it’s refreshing to see CoD still experimenting instead of simply reworking Avalon into another extraction-style mode.
Honestly, the best landing spot is wherever you feel most comfortable. Factors like map layout, loot crate distribution, and power positions all play a role. Familiarity with a location is often the first step toward securing a win.
That said, if you're looking for the strongest drop locations in Avalon, here are my recommendations:
The main hotspot for combat. If you enjoy constant action and King-of-the-Hill-style fights, this is your go-to area. It also features a high concentration of loot.
Exactly what it sounds like—a tight combat arena where only one squad is likely to survive. Expect intense early fights.
This area mirrors Skyline, meaning many players will already understand its layout and use that knowledge to their advantage.
A classic Battle Royale zone featuring a central structure surrounded by multiple buildings. According to developers, it’s also packed with loot similar to Low Town.
If you want immediate action without delay, Cliff Town delivers a fast-paced experience similar to Low Town but even more aggressive.
If you prefer a slower start, consider landing on the outskirts. This allows you to loot safely while other players eliminate each other. Just keep in mind that loot quality will be lower, and you may need to complete more contracts to stay competitive.
Black Ops Royale shifts away from the modern fast-paced formula and returns to a more classic Battle Royale style, where strategy matters just as much as mechanical skill. With all the changes introduced in Season 2, your playstyle should adapt accordingly.
Here are some essential tips to succeed in BO7 Warzone:
One key thing to understand: while movement has become faster, the overall pacing of matches is slower. Avoid unnecessary early fights and play more strategically. If you’ve played BO4, think of a similar approach. If not, play cautiously until you secure strong loot—then start pushing aggressively.
The strongest landing locations in Avalon include Low Town, Colosseum, Resorts, High Town, and Cliff Town, in that exact order. While these areas are highly contested and can be risky, they consistently offer the best loot and fastest early-game progression.
Rather than a specific POI, the highest loot concentration comes from dynamic Zombie Zones. These zones appear during matches and provide access to top-tier loot, making them the most valuable areas to prioritize.
Always aim to secure high ground whenever possible, as it gives you a major advantage in visibility and control. Keep your resources well-managed, including ammo and healing items. Stay close enough to your team to support each other, but avoid clustering too tightly. In urban areas, prioritize rooftops or elevated structures, while in open terrain, positioning near the circle’s edge can help reduce exposure.
Maintain a balance between speed and caution—rotate efficiently, but avoid reckless pushes. Focus on smart decision-making, take advantage of elevation, and prioritize visiting Zombie Zones for stronger loot. Completing contracts along the way will also help you stay well-equipped throughout the match.