


+15 More
Digital Aura Portal - FZCO
Building A1, Dubai Digital Park, Dubai Silicon Oasis, Dubai, United Arab Emirates Premises Number 72647 - 001
Business registration number: 70647
gamer-choice.com © 2026
Digital Aura Portal - FZCO
Building A1, Dubai Digital Park, Dubai Silicon Oasis, Dubai, United Arab Emirates Premises Number 72647 - 001
Business registration number: 70647
In this The Tomb guide for Call of Duty Black Ops 6, you'll find a detailed and beginner-friendly walkthrough of the brand-new Zombies map introduced in Season 2. The Tomb is a haunted maze of catacombs that hide the gateway to a twisted, shadowy dimension. Players must follow the journey of a lost explorer and conquer the Trials of the Damned to secure the legendary Sentinel Artifact. Need to wrap up the mission quickly and earn rewards like the X91 Ice-Pike wonder weapon, 5000XP, and an exclusive Calling Card? You can get assistance with The Tomb Walkthrough service from Gamer Choice. Their expert players will help you complete the entire quest in a secure and easy-to-follow process. You’ll also be able to track progress in real time and enjoy bonus features all in one place.

Buy CoD Boost
Get CoD boosts today and crush every match!

Before jumping into the main Easter Egg quest in The Tomb, make sure you’re equipped with a strong loadout. A reliable assault rifle with a drum mag is ideal, especially during the boss battle. For Gobblegums, Perkaholic is a go-to, but if available, the Wonder Bar can help you pull a Wonder Weapon like the Ice Staff from the Mystery Box instantly—saving a lot of time. However, this guide assumes you won’t have Wonder Bar access. For Field Upgrade, Ether Shroud is a must, ideally enhanced with Group Shroud (to cloak teammates) and Extra Charge (to gain an additional use).

Upon entering The Tomb map, begin building up points during the early rounds. Activating the Rampage Inducer at spawn can help you earn points faster by speeding up zombie spawns, but it’s optional since point gain stays the same. After reaching round five or six, you’ll encounter a bug round. Finish that, then begin unlocking doors throughout the map. Eventually, you’ll reach a location where you can place an amulet (from Citadelle des Morts) on a table. Doing so will open a red portal and cause several purple crystals to ignite across the map—these are components for crafting the Ice Staff. If you prefer to skip crafting, try your luck with the Mystery Box or use the Wonder Bar Gobblegum to get the Ice Staff directly. If not, follow the next steps to build it manually.
This The Tomb Zombies quest can be completed solo, as it’s split into four key phases. The first Staff component is guaranteed after defeating a Shock Mimic on round eight. Next, you’ll need to interact with two picture-based puzzles: the Hunter and the Bull. Around 15 purple crystal locations are spread across the map—some are near Quick Revive, Speed Cola, and Stamin-Up. Focus first on the four potential spawns near the Hunter picture. You want the crystal to appear closest to the Hunter. If it isn’t there, destroy the incorrect ones and wait 45 seconds for a respawn. Repeat until the correct one spawns. Do the same with the Bull picture and its four crystal locations.
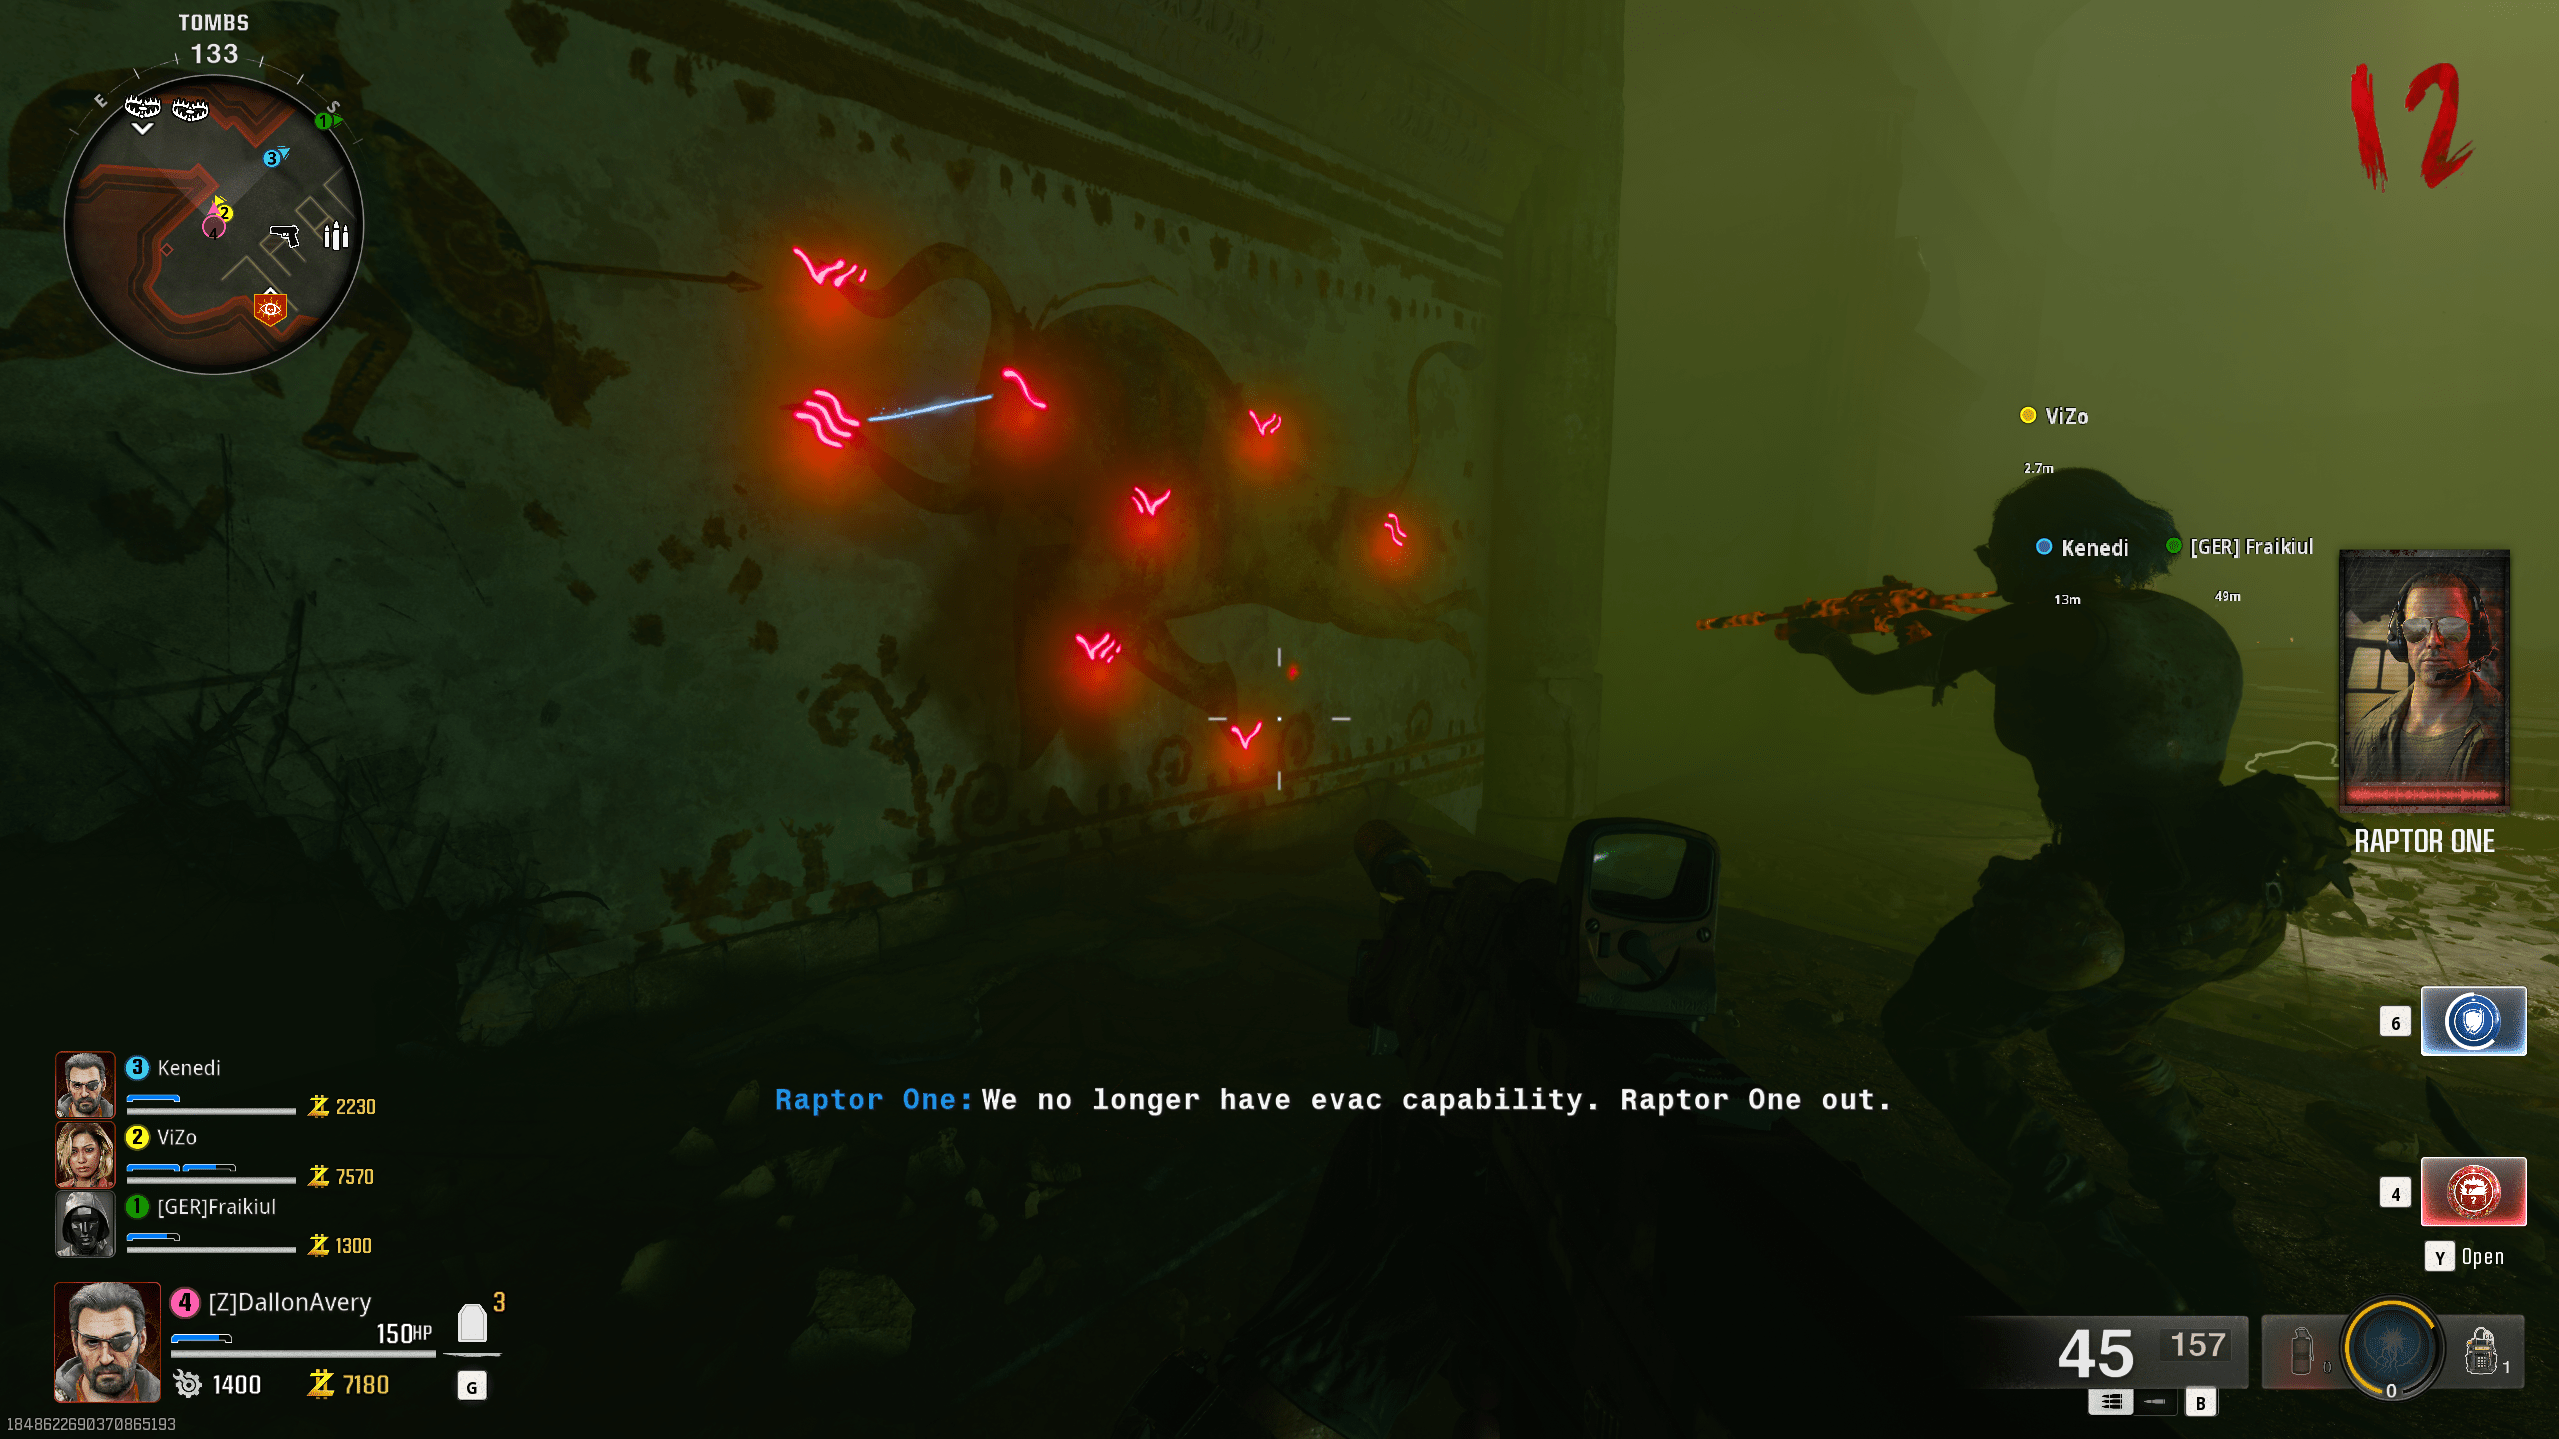
Once the correct crystals appear near both the Hunter and Bull images, use the Monocle to reveal glowing symbols on them. If there are fewer than 10 symbols (Hunter) or eight (Bull), shoot one at random to reset.
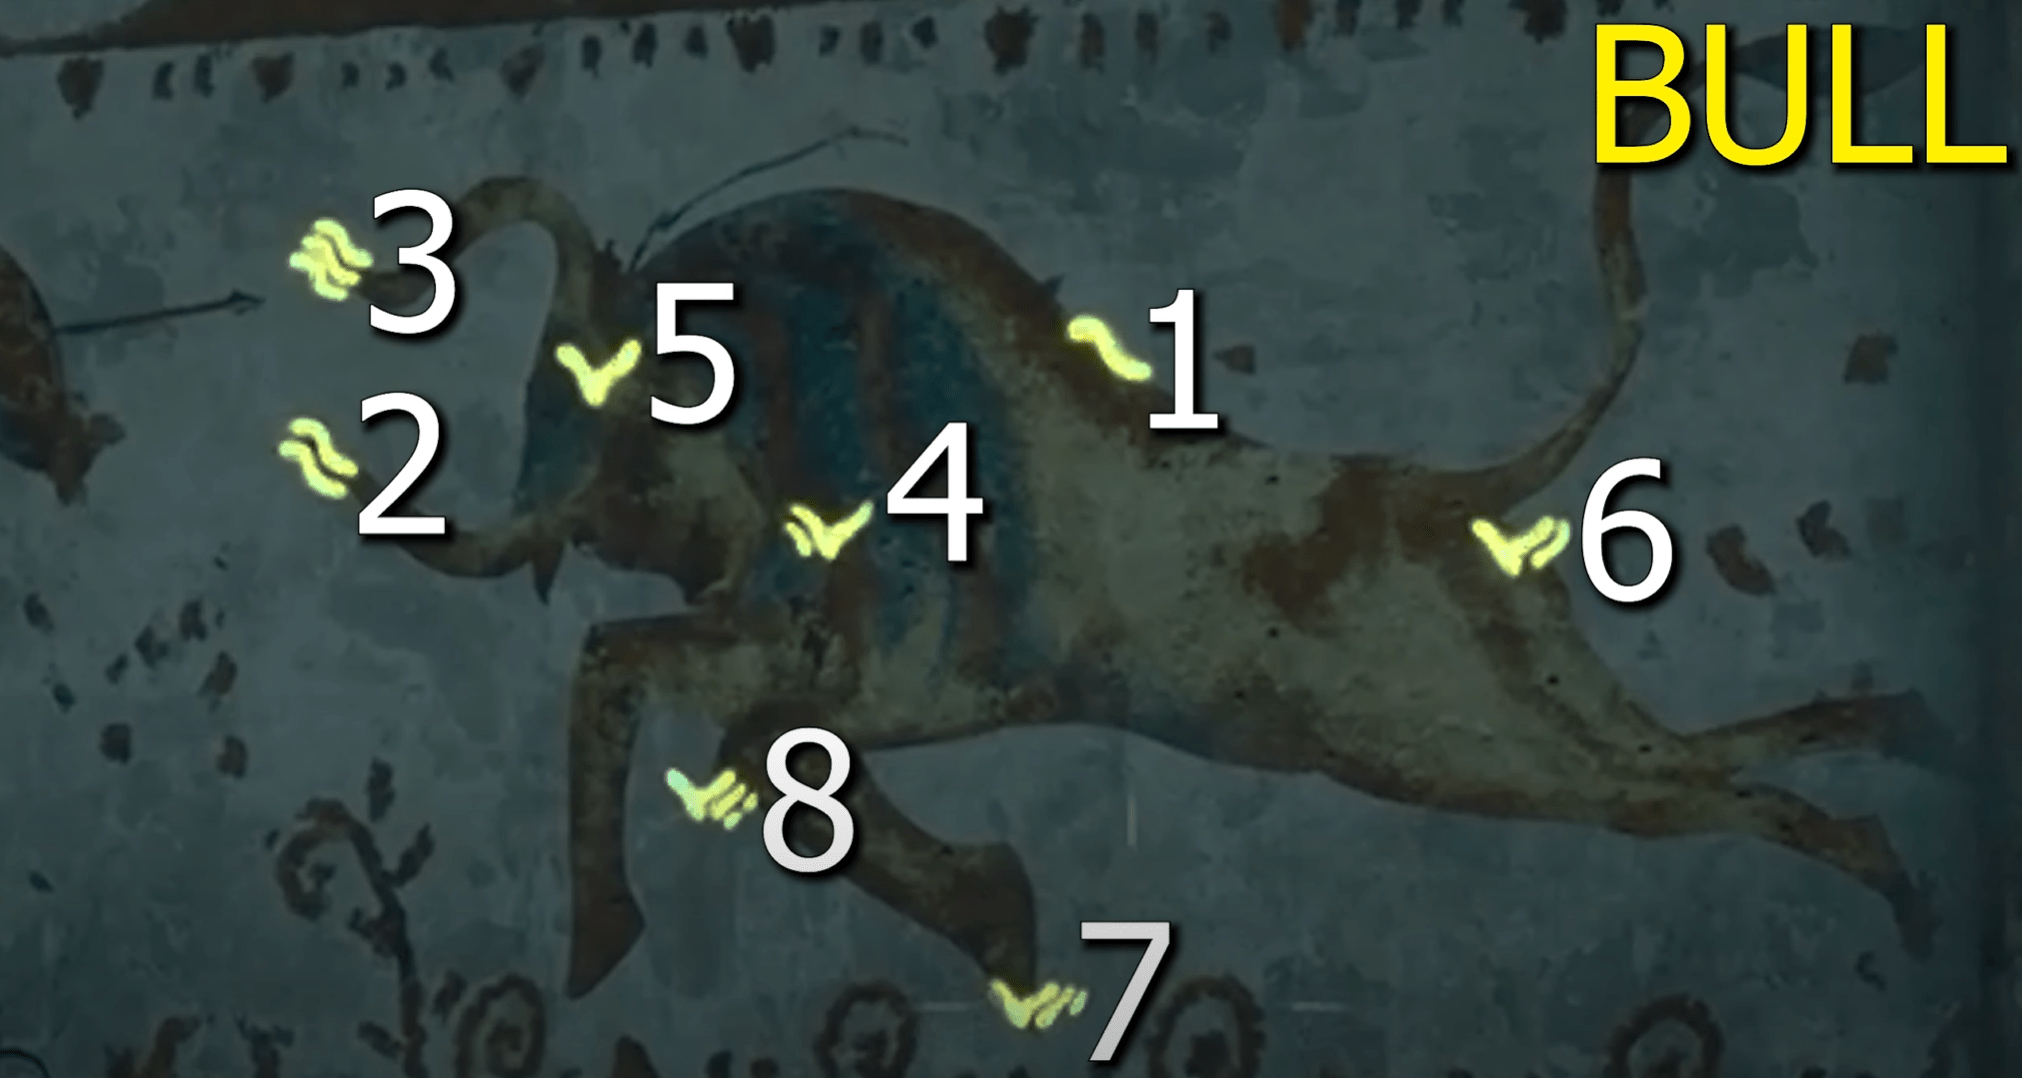
Now, shoot the symbols in the correct Roman numeral order. For the Hunter, add two to each number shown on the Bull puzzle.

This triggers a lockdown event where you’ll battle four waves of zombies and elite enemies. A purple orb will travel to each crystal in the constellation zone. After surviving all waves, you’ll receive a Staff piece. Repeat the process for the second image. With both parts collected and the Monocle equipped, step through the red portal into the Dark Aether. There, interact with a cracked wall to initiate a build sequence. Defend it for 60 seconds and claim the completed Staff.
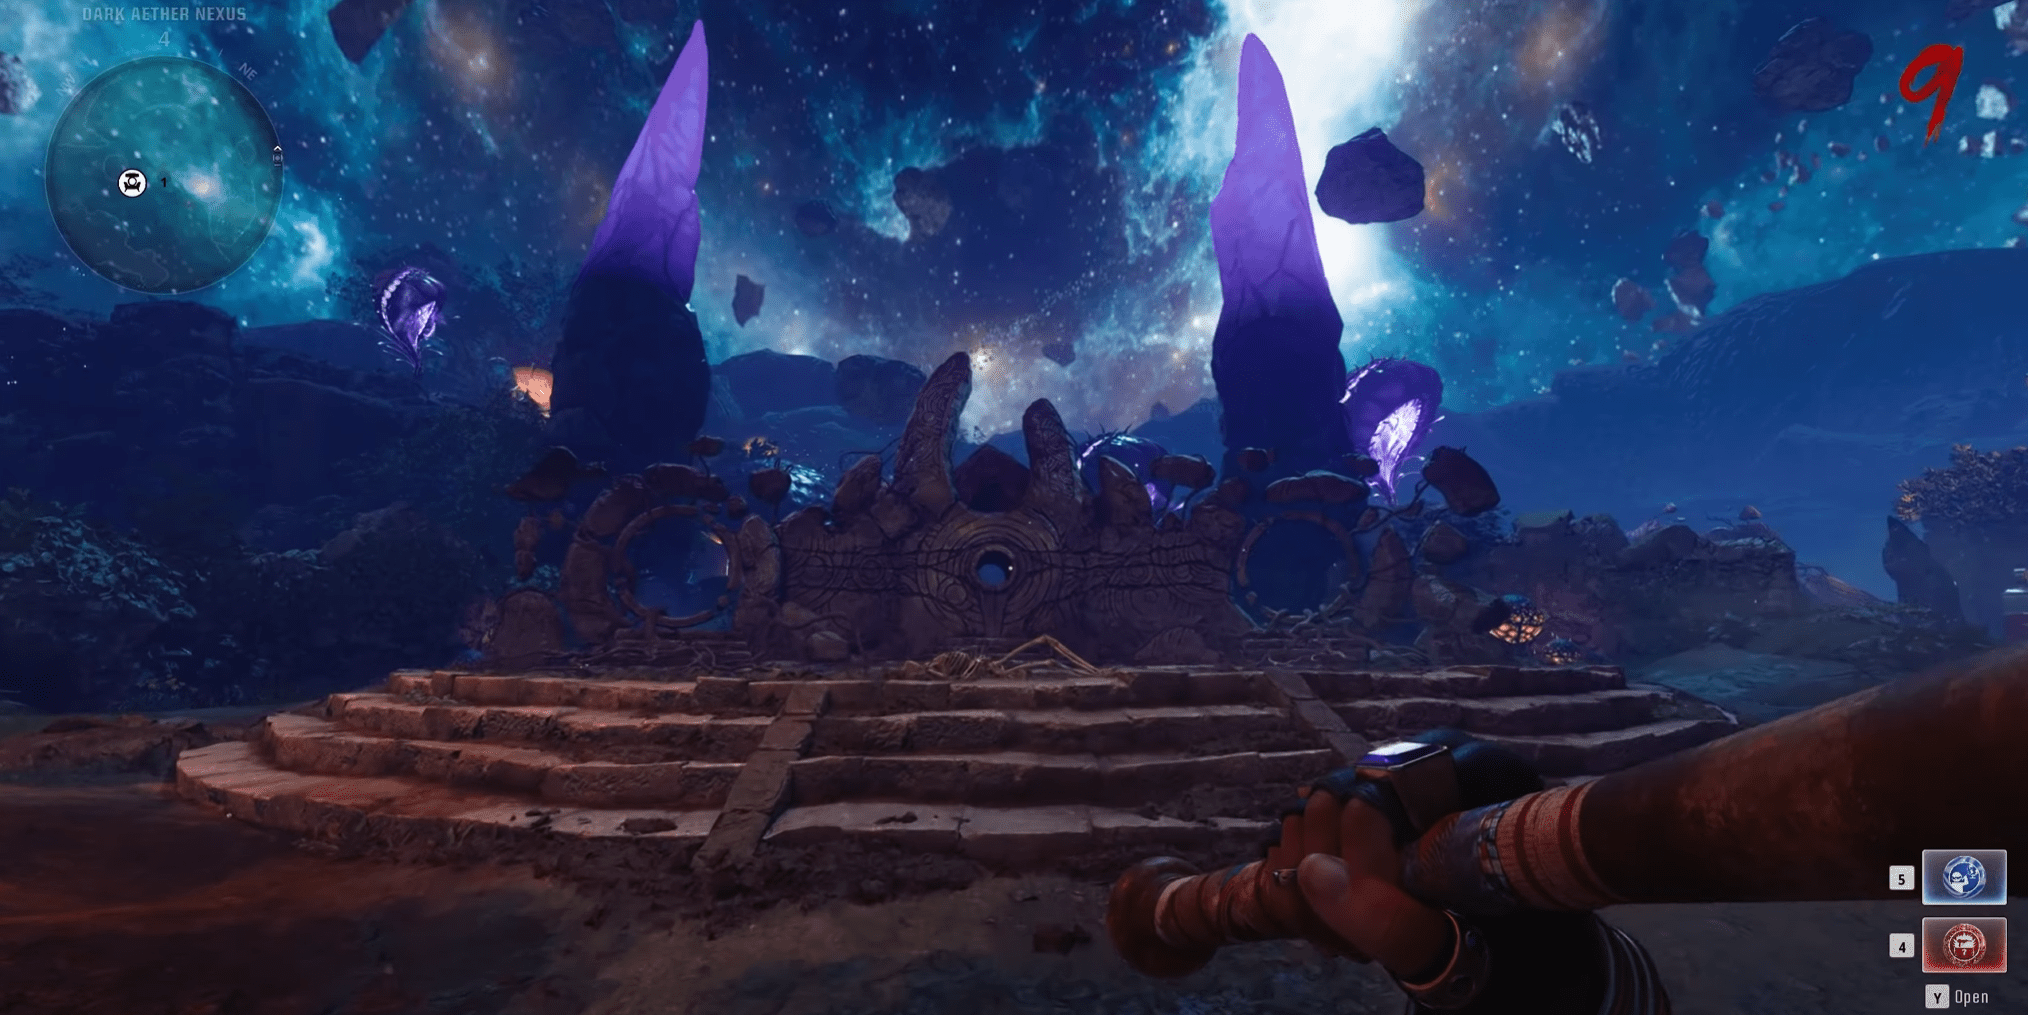
Now it’s time to enhance the Staff. Head to the underground area and locate three purple crystals. Shoot them in quick succession—within 10 seconds—with the Staff. If done right, they’ll freeze instead of shatter. To make this easier, reposition the crystals closer together by shooting them with any regular weapon. They’ll move after 45 seconds. Once you have three nearby, freeze them with the Staff. You’ll hear a confirmation quote if successful. Helpful perks include Tribologist or Hot Foot to move faster. In co-op, split the job between two players to hit the crystals even faster. Once frozen, re-enter the Dark Aether. Search for three glowing purple symbols on floating rocks and shoot them with the Staff. These rocks move lower as each symbol is shot. A lore message from Archibald will play, and one of four portals will shut down. Nearby, a set of runes will appear. Exit through another portal, memorize the symbols from the rocks, and locate the correct closed portal:
At the rune-locked door, shoot the three matching symbols using the Staff. Only the Staff works here. Once open, go through to a high platform and interact with a floating purple orb to trigger an escort mission. Follow and defend the orb by killing zombies around it. If you fail to charge it in time, the orb floats away and you must try again next round. At the end of the path, an Amalgam enemy will spawn. Defeat it, and the orb will fly into the cracked wall. Return there and interact to finish the Staff upgrade.
With the upgraded Staff, it’s time to complete the Sekhmet’s Vigor Trials. There are four dark energy challenges, each tied to a color-coded vermin statue inside the Dark Aether. Start with the blue statue. Shoot it with Sekhmet’s Vigor to release an orb. Pick it up and leave through the blue portal. At spawn, place the orb on the glowing statue. Survive waves of crawling enemies. Once done, retrieve the orb and bring it back into the Dark Aether using a different portal and place it back on its statue. Repeat this for the yellow statue. This time, flying parasites will appear. Kill them and collect energy fragments. Insert them into the statue until the challenge completes. Return the orb the same way. For the third, go to the green statue—depicting a two-headed monster. Exit via the Green portal. Fight zombies, Doppelghasts, and avoid floor lasers. After clearing the area, return the orb to the original statue. The final challenge is with the red statue, where you’ll face Unipaak, a shielded monster. Its shield is tied to a random zombie—kill the linked one to drop the shield. Defeat Unipaak and return the orb. When all four challenges are done, four beams of purple energy will shoot from the overhead crystal, signaling the Sentinel Artifact door is now open. Enter to start the final showdown.

The final part of The Tomb walkthrough in Black Ops 6 Zombies is the intense boss battle against the Sentinel Artifact. To maximize your chances of success, it's important to enter the fight fully prepared. Below is a list of essential gear and recommendations before facing the final showdown:
Avoid using explosive damage types, as they are largely ineffective during this encounter in The Tomb.

Buy CoD Warzone Account
Get fully upgraded COD Warzone accounts today!
To start the fight, interact with the Sentinel Artifact and vote to begin. The boss opens with an Orange Phase, where it unleashes a rotating laser beam that deals high damage and stuns any player caught in its path. This beam shifts between the upper and lower platforms of the arena, requiring players to constantly alternate elevations to avoid it. After several beam cycles, the artifact enters a Ghostly Purple Mode. This signals the damage phase. During this brief window, focus all your team’s firepower on the artifact. Ether Shroud (especially Group Shroud) is great for staying safe while dealing damage. If done correctly, you can knock off about 10% of the boss's total health before it transitions back to Orange Phase.
Once the first Sentinel Artifact is destroyed, two new ones appear. Each of these fires its own deadly laser beam, making movement and spacing more important than ever. One of the artifacts will periodically glow Purple, signaling it’s vulnerable. Coordinate with your team to mark the correct one and focus all attacks on it. Eliminating just one reduces the boss’s health by another 10%. In solo play, quick reactions might allow you to take down multiple artifacts in one go, skipping a phase entirely.
The next stages escalate with three and eventually four artifacts entering the fight, each continuing the same laser patterns. The approach doesn’t change: avoid lasers, wait for a Purple glow, and unleash your DPS. By this point in The Tomb, conserving resources becomes vital. Save Ether Shroud uses for tight spots, and be sure to grab any max ammo drops at the end of each phase to prepare for the tougher stages ahead.
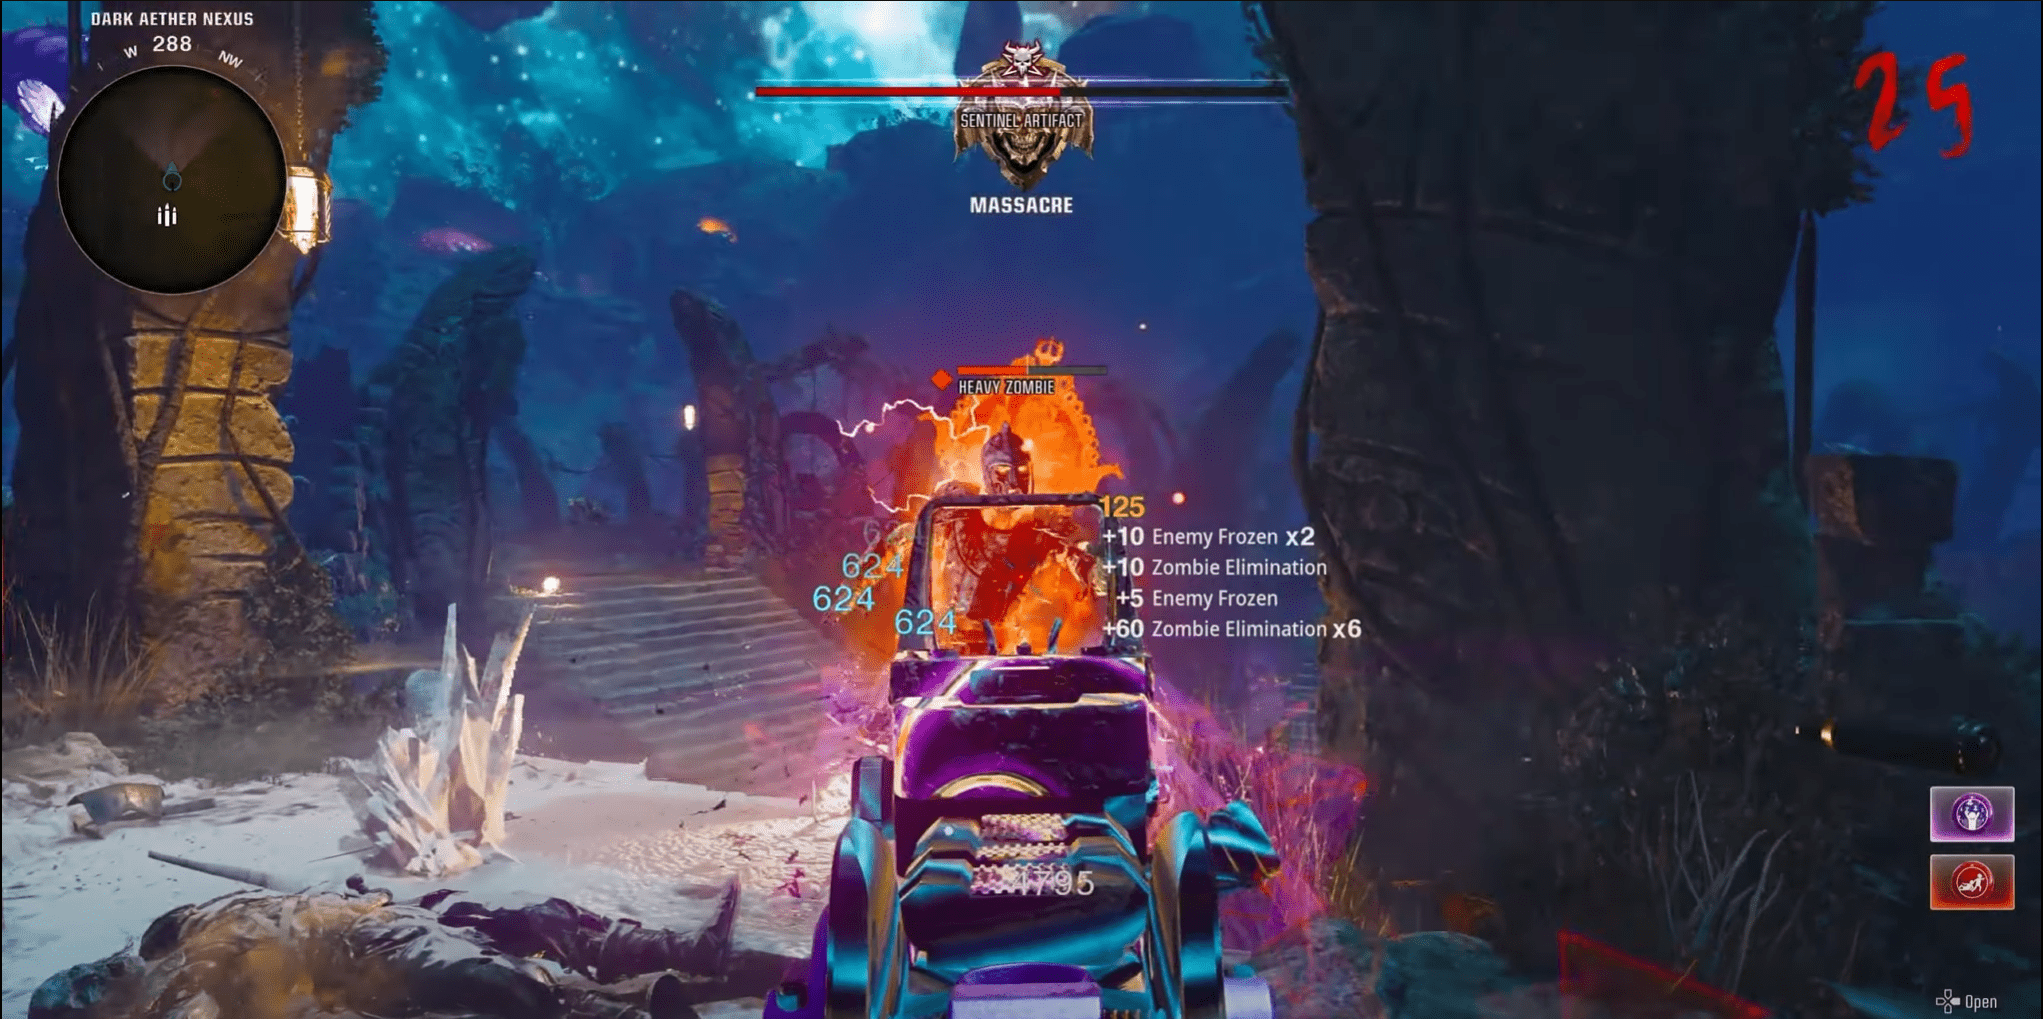
Instead of floating targets, these waves feature Heavy Zombies carrying Sentinel Artifacts. These enemies are significantly stronger and must be taken down quickly. After you kill the Heavy Zombie, they drop their artifact, which must be destroyed before it powers up. The key is fast target switching. While still avoiding laser fire from the remaining floating artifacts, prioritize taking out the Heavy Zombie and the dropped artifact as soon as possible. This sequence repeats in the following wave with another Heavy Zombie.
Next, a red-colored Doppelgast boss joins the battle. This enemy is incredibly lethal—capable of one-shotting players who don’t have Juggernog, even with full health and armor. The best counter is overwhelming burst damage. Focus every weapon and ability you have on the Doppelgast immediately after it spawns. Once killed, it drops a Sentinel Artifact that must be destroyed like the others to proceed.
These final elite phases introduce powerful enemies with high health and strong attacks. First comes a supercharged Mimic, followed by a supercharged Amalgam in the next wave. To handle these fights in The Tomb, make use of:
Defeat each elite enemy and destroy the artifact they drop to move on to the final phase.
This is the climax of The Tomb Zombies Easter Egg. The remaining Sentinel Artifacts form a semicircle while a central one begins slowly moving backward. The entire squad must pour every ounce of damage into the central artifact before it reaches the end. If the central artifact isn’t destroyed in time, your team will be wiped out, and the entire Easter Egg will fail. Use everything at your disposal:
If successful, the artifact shatters, and the fight ends. Interact with the central location to trigger the final cinematic and complete The Tomb main quest.
To initiate The Tomb Easter Egg, begin by progressing through the initial rounds to earn points. Continue unlocking red-marked doors until you reach a table where an amulet can be placed. Interacting with this table activates a portal to the Dark Aether and unlocks the Pack-a-Punch Machine, officially starting the quest.
You can obtain the Ice Staff either by building it or acquiring it from the Mystery Box. For crafting:
Once the crystals are correctly placed near the Hunter and Bull pictures, symbols will appear on them. To complete the puzzle:
The final battle in The Tomb features the Sentinel Artifact and several complex phases. Here's a breakdown:
Successfully defeating the boss and destroying the last artifact plays the final cutscene and completes The Tomb Easter Egg.
The Tomb map in CoD Black Ops 6 may appear compact, but the difficulty scales fast as the rounds progress. While the main objectives are fairly straightforward, the only real mental hurdle is solving the constellation puzzles when constructing the Ice Staff. Other than that, the mission steps are easy to grasp and can be remembered after a few runs. The real obstacle lies in the boss fight—it’s long, brutal, and layered with complexity. Although you can rush through most of The Tomb fairly quickly, expect the Sentinel Artifact fight to take multiple attempts. Ensure your squad is fully equipped with upgraded armor, max-level weapons, and at least one or two Wonder Weapons to stand a solid chance of finishing this epic Zombies mission.