Vengeance Demon Hunter Tank Guide - The War Within 11.1
The Vengeance Demon Hunter has always been a bit of a gamble before the start of a new Season — you never knew if it would land in Tier F or S. There’s rarely a middle ground. In this Vengeance Demon Hunter guide, we’ll explore its strengths, how to effectively mitigate its minor weaknesses, the best-in-slot (BiS) gear, and take a detailed look at its abilities and overall utility in raids and Mythic+ dungeons.

Table of Contents
Vengeance Demon Hunter Overview
Demon Hunters are the kings of mobility in raids and dungeons. In general, they can move around more and more quickly than many other specs, thanks to Infernal Strike, as well as various talents that aid their mobility. Additionally, they excel at burst AoE damage, with many abilities dealing AoE and cleave damage. They also excel at dungeon utility using tools such as Sigil of Silence and Chaos Nova to control enemy spellcasters for extended periods.
Vengeance Demon Hunter defensively features a mix of strong, constant healing and damage mitigation, with low-cost but low uptime of active mitigation and the ability to mitigate magic damage extremely well.
Vengeance Demon Hunter Strengths and Weaknesses
Strengths
- Has access to a wide array of defensive tools, both active and passive, that lets Vengeance handle almost any situation it needs to defensively.
- Defensive builds still has access to most of the important offensive talents.
- Higher mobility than practically any other spec in the game.
- Our abilities scale incredibly well into AoE, with most of our core abilities being strong AoE abilities.
- Access to some of the strongest Crowd Control tools available in dungeons.
- Access to Chaos Brand which provides a good portion of extra damage for your group.
Weaknesses
- Struggles defensively during early moments in combat.
- Some utility comes at a moderate offensive or defensive cost.
- Both Hero trees complicates rotation a fair amount compared to earlier expansions.
- Some utility comes at a moderate offensive or defensive cost.
- Damage and healing suffers a lot from rotational mistakes, especially as Aldrachi Reaver.
Vengeance Demon Hunter Basic Gameplay
Vengeance is all about resource management, including active mitigation, healing, damage, and monster control. The rotation is all about building souls as quickly as possible with tools like Fracture or Fallout and then consuming them with either Spirit Bomb or Soul Cleave. Outside of the build/spend cycle, you will be weaving in multiple sigils to help crowd-control the enemies.
As a beginner, you may start out using Shear instead of Fracture as you begin to learn the rotation and start to figure out how to properly use the rest of your toolkit. If you are a beginner, the best place to start becoming familiar with the spec is by reviewing the Easy Mode Page.
Vengeance Demon Hunter 11.1 Changes
Beyond the changes to Demon Hunter, there are also a handful of Vengeance-specific changes which have varying impact on your talent choices and overall power:
- All ability damage increased by 20%.
- Demon Spikes base duration increased from 6 seconds to 8 seconds.
- Cycle of Binding now reduces the cooldown of all sigils by 5 seconds when you cast Sigil of Flame.
- Burning Blood now increases Fire damage by 8%, down from 10%, and Fiery Demise increases damage by 15%/30%, down from 20%/40%. However, both of these talents now affect Sigil of Spite and The Hunt.
- Feed the Demon is now a 1-point talent, reducing the cooldown of Demon Spikes by 0.35 seconds per Soul Fragment, instead of 0.25/0.5 seconds.
- Fallout now always spawns one Soul Fragment with a slightly increased amount of souls generated on 5 or fewer targets.
- Fel Devastation cooldown no longer resets upon leaving Metamorphosis after casting Metamorphosis if playing as Fel-Scarred.
Vengeance Demon Hunter Leveling Guide for The War Within
Vengeance Demon Hunter Leveling Playstyle
Due to being a Tank specialization, Vengeance offers multiple effective ways of leveling. The ability to pull large groups of enemies and self-sustain large amounts of damage makes it fairly efficient at questing, despite doing less damage than a DPS specialization. Alternatively, you will also benefit from short, if not instant, queues to dungeons, allowing you to speedrun dungeons.
Gear Options
Item level is always more important than individual stats when leveling up. Always choose the piece of gear with the highest item level. Items with Speed tertiary stats can help speed up your leveling, especially during extended periods spent indoors.
Rotation while leveling up
- Use Sigil of Spite.
- Use The Hunt.
- Use oul Carver.
- Use Fiery Brand.
- Use Fel Devastation.
- Use Sigil of Flame.
- Use Immolation Aura.
- Use Felblade to build Fury.
- Use Fracture to build Fury and Soul Fragments.
- Use Spirit Bomb with 4+ Soul Fragments.
- Use Soul Cleave to dump Fury after using Spirit Bomb.
Vengeance Demon Hunter Tank Spec, Builds, and Talents
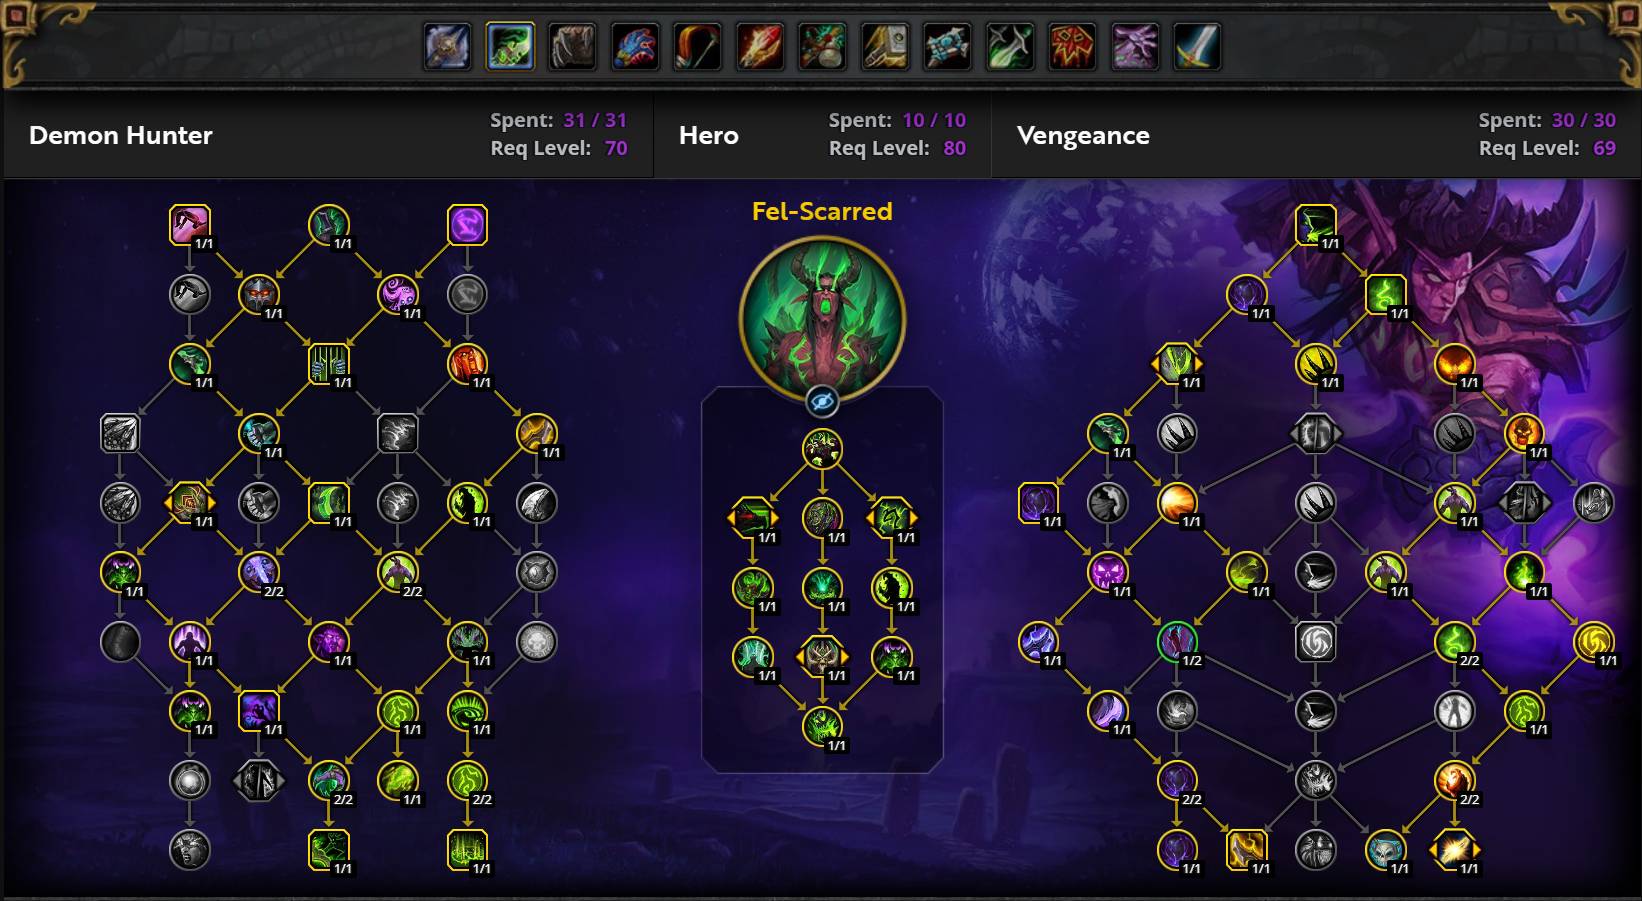

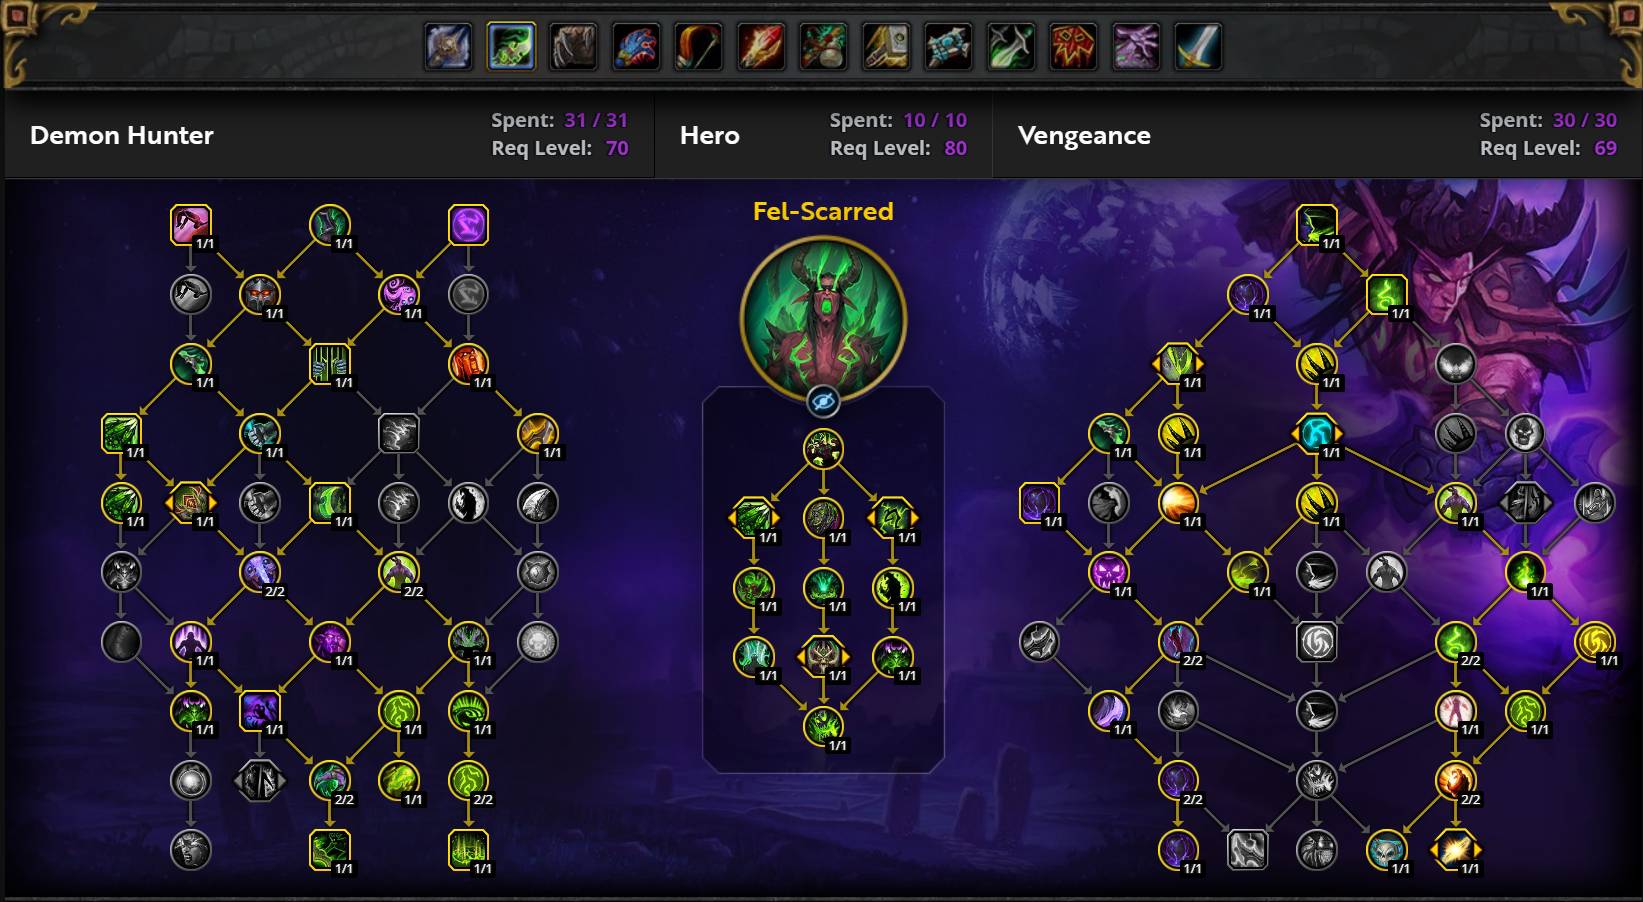
Copy the Vengeance DH talents, paste them into the game.
Raid / Single Target - Fel-Scarred
Raid / Cleave - Fel-Scarred
Mythic+ / AoE - Fel-Scarred
PvP Talents (War Mode)
You have the option to enter "War Mode" in your faction's capital city. Enabling War Mode provides the following benefits:
- Grants access to PvP talents in the open world.
- 10% increase in World Quest rewards at max level.
- 10% more experience gained while leveling.
- Earn Conquest Points, which can reward gear every week.
With the benefits of enabling War Mode for leveling and PvE content, it is recommended to enable the feature to maximize your leveling and rewards at max level. However, be aware that enabling it exposes you to open-world PvP and the risk of hostile enemy players interfering with you.
Best Hero Talents for Vengeance Demon Hunter in The War Within
Raiding Hero Talents for Vengeance Demon Hunter
Aldrachi Reaver
Soul Fragment generation regardless of the target count, and Thrill of the Fight, which increases healing by 20% with fairly high uptime. Wounded Quarry now also echoes physical damage done to additional targets into your primary target, which could prove useful in fights with add spawns, allowing you to funnel damage into the boss.
Fel-Scarred
Fel-Scarred is currently ahead offensively in all target counts but falls slightly behind defensively in raids, as it heavily relies on using your main mitigation tools aggressively. However, it could see especially good value in fights that require frequent AoE bursts or have vulnerability windows with extra damage taken.
Mythic+ Hero Talents for Vengeance Demon Hunter
Aldrachi Reaver
Aldrachi Reaver has strong potential in Mythic+, especially in higher keys. The updated Wounded Quarry brings a potent funnel damage profile, which might see use in dungeons where you can pull trash on top of bosses to funnel damage into the boss. Defensively, Aldrachi Reaver offers strong healing bonuses from Incorruptible Spirit, Thrill of the Fight, and Wounded Quarry. While it does less overall damage than Fel-Scarred, it still deals a respectable amount without having to commit your strongest defensives as offensive tools. The biggest drawback to Aldrachi Reaver is that, due to Wounded Quarry, target swapping comes with a significant power loss, and general uptime is significantly more important to keep generating Soul Fragments to keep Reaver's Glaive coming.
Fel-Scarred
Fel-Scarred especially shines in situations with many enemies, while still winning offensively against bosses. It is a strong option for Mythic+ in all key levels and shines in key levels where enemies die significantly faster. While Fel-Scarred does not offer as much healing as Aldrachi Reaver, it does offer strong mitigation tools in Set Fire to the Pain, Enduring Torment, and Student of Suffering, as well as higher uptime on Metamorphosis and Sigil of Flame.
Vengeance Demon Hunter Tank Stat Priority
The Basics of Stats for Vengeance Demon Hunter
The defensive stat priority for Vengeance Demon Hunter is as follows:
- Agility
- Haste / Critical Strike
- Versatility / Mastery
Your stat priority also applies to enchants, consumables, and gear.
There are no set stat numbers to aim for. You do not need to focus on reaching specific percentages of any stat. For DPS, it is recommended to simulate your gear to determine which stats provide the most damage.
For survival, prioritize item level above all, with a rough priority of secondary stats as mentioned, while still maintaining a balanced spread of stats.
Entering season two of The War Within, you will have significantly lower amounts of secondary stats compared to previous expansions. However, you may still reach diminishing returns if your gear focuses on only one stat. Diminishing returns for each stat begin at the following points:
- Haste: 19800 Rating
- Critical Strike: 21000 Rating
- Mastery: 21000 Rating
- Versatility: 23400 Rating
Instead of strictly following the stat priority above, here are a few general rules for stats versus item level:
- You cannot get universal stat weights for survivability.
- A 5+ item level increase almost always means the new item is worth equipping.
- At a 3-item level difference, choose the item that better fits your stat priority or go for item level; the difference will likely be small.
- Rings, necks, tier sets, and trinkets do not follow these rules outside of large item level gaps.
- Always gem/enchant for your best stat.
These statistics have been derived from a combination of common sense, in-game testing, and simulations using SimulationCraft.
Getting a Better Understanding of Vengeance Demon Hunter Stats
Agility increases your Attack Power, Dodge chance, and Baseline Armor of Demon Spikes, as well as Armor via Mastery: Fel Blood.
Haste reduces the global cooldown (until you reach 100% Haste) and also reduces the cooldown of Demon Spikes, Immolation Aura, Felblade, and Fracture. It scales well, with many of our talents gaining significantly more value from higher Soul Fragment generation. Haste also increases the rate of your Auto-attacks, which is relevant for Aldrachi Reaver as it increases the amount of souls generated by Wounded Quarry.
Mastery: Fel Blood increases your Attack Power and the amount of Armor you gain from Demon Spikes based on your Agility. It will increase your Armor by half the amount when Demon Spikes is not active.
Critical Strike increases the chance for your damaging abilities to be twice as effective. Your Critical Strike rating is also converted into Parry rating. Shattered Souls cannot critically heal for twice the amount, but some other minor self-healing effects can. Critical Strike interacts with the talent Volatile Flameblood to generate extra Fury from Immolation Aura. Critical Strike scales incredibly well defensively with flat Parry effects such as Demon Spikes and Illuminated Sigils. If you are playing Down in Flames instead of Illuminated Sigils, the defensive value of Critical Strike reduces marginally.
Versatility increases all your damage and healing done, and decreases all damage taken.
Most encounters have abilities that cannot be mitigated or avoided. Also, you need to have a decent amount of health in order to give yourself the chance to be healed before a subsequent attack kills you. As such, you need a minimum amount of Stamina. This amount will, in most cases, simply come from the Stamina found innately on your gear. Therefore, item level is the determining factor in keeping your health pool growing.
Vengeance Demon Hunter DPS Rotation, Cooldowns, and Abilities
Single-Target Rotation for Vengeance Demon Hunter
- Use Fiery Brand if you are setting up to press Metamorphosis.
- Use Metamorphosis when Fel Devastation is on cooldown and Sigil of Flame has zero charges available, and you have no abilities that can still activate Demonsurge explosions available.
- Use Felblade if Fel Devastation is available and you have less than 50 Fury.
- Use Fel Devastation to activate Demonsurge.
- Use any remaining abilities that activate Demonsurge explosions before Metamorphosis or Demonic runs out.
- Use The Hunt on cooldown.
- Use Sigil of Spite on cooldown.
- Use Soul Carver on cooldown.
- Use Sigil of Flame, ideally without overcapping Fury, unless the target already has Sigil of Flame applied to it. In that case, only use it if you are about to reach two charges or are about to cast Metamorphosis.
- Use Immolation Aura on cooldown.
- Use Soul Cleave if you are close to overcapping on Fury.
- Use Felblade when you will not cap on Fury.
- Use Soul Cleave to spend Fury.
- Use Fracture when you will not cap Fury.
- Use Throw Glaive as a filler or when you are not in range of your enemy.
Single-Target Opener for Vengeance Demon Hunter
- Pre-cast Immolation Aura 2 seconds before pull.
- Pre-place Sigil of Flame 1 second before pull.
- Use Fiery Brand.
- Use Felblade.
- Use The Hunt.
- Use Fel Devastation.
- Use Spirit Burst.
- Use Soul Sunder.
- Use Sigil of Flame.
- Use Metamorphosis before Sigil of Flame lands.
- Proceed with your normal rotation according to the priority list below.
Vengeance Demon Hunter Talents' Effect on Rotation
Frailty
Frailty is a core, passive mechanic for Vengeance Demon Hunter. Depending on which talents are selected in the Vengeance tree, it will be applied to all targets hit by Sigil of Flame, Spirit Bomb, or Soul Cleave.
With all related talents selected, each stack of Frailty grants:
- 8% leech from all damage dealt to the target
- 4% increased damage to the target
- 3% reduced damage taken from the target
Talenting into Soulcrush allows you to stack multiple stacks, with each stack having an independent duration.
While it is possible to stack up Frailty to increase the damage of strong abilities, attempting to optimize damage this way usually results in a loss of overall damage due to disruptions in your rotation. The best approach is to use offensive cooldowns with the natural amount of Frailty stacks your rotation generates.
Fiery Demise
If you talent into Fiery Demise, your Fiery Brand will function as both an offensive and defensive cooldown. Since many of your abilities deal fire damage, increasing fire damage by up to 30% is a significant boost.
When using Fiery Demise, ensure that all strong fire spells are used during the duration of Fiery Brand. This includes Soul Carver (if talented) and Fel Devastation. Since Fel Devastation is often used for its defensive value, ideally, you should finish channeling it just as the initial Fiery Brand expires.
Active Mitigation for Vengeance Demon Hunter
As a Vengeance Demon Hunter, you have one active mitigation ability: Demon Spikes.
Demon Spikes should be used frequently to avoid and reduce Physical damage taken, even against simple auto-attacks. Try to always keep at least one charge active unless you are about to enter a longer period of downtime with Fiery Brand, Fel Devastation, and Metamorphosis on cooldown. In such cases, use Demon Spikes to bridge the gap.
If talented into Illuminated Sigils, you can pair Demon Spikes with keeping Sigil of Flame on your targets. The Parry chance is additive, allowing you to parry a significant number of enemy attacks.
Defensive Cooldowns for Vengeance Demon Hunter
As a Vengeance Demon Hunter, you have two defensive cooldowns: Metamorphosis and Fiery Brand. Additionally, two talents, Demonic and Illuminated Sigils, turn Fel Devastation and Sigil of Flame into defensive cooldowns.
Metamorphosis increases your current and maximum health by 40% and your Armor by 200% for 15 seconds. It also enhances Shear and Fracture to generate 1 extra soul and 20 extra Fury. With a 2-minute cooldown and no cost, Metamorphosis is best used proactively to prepare for incoming damage rather than reactively as an emergency cooldown.
Fiery Brand should be applied to a target when you anticipate taking high damage or want to reduce overall damage taken, whether Physical or Magical. With Burning Alive, Fiery Brand can spread to multiple enemies, providing both damage and defensive value.
The talent Demonic grants 7 seconds of Metamorphosis when casting Fel Devastation, making it a potent defensive cooldown. It has a 40-second cooldown and a 50-Fury cost.
Illuminated Sigils increases the Parry chance by 12% against targets affected by Sigil of Flame. This significantly reduces incoming physical damage, which is a primary threat in Mythic+ dungeons.
Soul Fragments
Soul Fragments are a unique mechanic for Vengeance Demon Hunters, originating from the Shattered Souls passive.
When you kill a target, there is a chance that a Soul Fragment will be created. This orb appears on the ground at a nearby location and lasts for up to 20 seconds. If you walk over it, you will consume the Soul Fragment and be healed for 348.075% of your attack power in health. Only you can see and interact with your Soul Fragments.
If a Soul Fragment is generated from a Demon target, consuming it will increase your damage done by 20% for 15 seconds.
In addition to Soul Fragments, there are also Lesser Soul Fragments. These have a chance to be created when you damage targets with Shear or Immolation Aura (if you have the Fallout talent), and using Fracture generates 2 Lesser Soul Fragments each time it is used. They function in the same way but heal for 6% of damage taken in the last 5 seconds, or a minimum of 1% of your Maximum Health.
It is important to note that if you already have 5 active Soul Fragments or Lesser Soul Fragments, any additional fragments will be instantly consumed. Additionally, Spirit Bomb will consume all Soul Fragments within 100 yards.
Vengeance Demon Hunter Tank Gems and Consumables
Best Gems for Vengeance Demon Hunter
The War Within introduces Blasphemites, special gems that provide different stacking effects based on the number of different gem colors you use. For Vengeance Demon Hunter, there are really only two valid choices: Culminating Blasphemite and Elusive Blasphemite.
Using Culminating Blasphemite with a mixture of all gem colors except Amber will provide a very minimal DPS gain. Alternatively, my general recommendation is to pair Elusive Blasphemite with all non-Amber gems. You can either choose whichever four different gems simulate the most damage or combine Deadly Emerald, Quick Ruby, Quick Sapphire, and Quick Onyx to get an 8% passive movement speed increase. Any extra gem slots should be filled with Deadly Emerald.
Best Flask for Vengeance Demon Hunter in The War Within
If you are using Tempered Potion, you should always use Flask of Alchemical Chaos. The stats provided by the flask will be random, but it will increase the potency of Tempered Potion, as it will activate all four secondary stats, compared to three stats with a regular Tempered Flask.
If you do not intend to use Tempered Potion, your flask of choice should instead be Flask of Tempered Swiftness.
Best Weapon Oil/Stone for Vengeance Demon Hunter in The War Within
To figure out if you should use Oil of Deep Toxins, Ironclaw Whetstone, or Algari Mana Oil on your weapons, you should simulate yourself since the bonuses they provide are mostly offensive. Algari Mana Oil offers a very small defensive gain and can be used if this is your priority.
Best Potion for Vengeance Demon Hunter in The War Within
Your stat potion should be Tempered Potion. Use these when you will do the most damage with your abilities, likely during your cooldowns and/or Bloodlust or Heroism. You can also obtain Fleeting Tempered Potion from Cauldrons that can be spawned by Alchemists.
You should keep a stock of Algari Healing Potion to use when at low health, and if you have a Warlock in the group, grab their Healthstone and use them as well. Do not macro these together, they are best used separately! You can also obtain Fleeting Algari Healing Potion from Cauldrons that can be spawned by Alchemists.
Best Food for Vengeance Demon Hunter in The War Within
Since our secondary stats are stronger per-point than our primary stat, you should be eating secondary stat food at all times, either Beledar's Bounty, Outsider's Provisions, Jester's Board, Empress' Farewell personal food, or the The Sushi Special Feast. They are all identical.
In addition, if you can afford it, you should use Crystallized Augment Rune to increase your primary stat. Augment Runes are expensive, and disappear on death, so use them wisely!
Best Enchants for Vengeance Demon Hunter
| Slot | Enchantment |
| Necklace | Magnificent Jeweler's Setting (adds up to 2 sockets to a Ring or Neck) |
| Main Hand | Enchant Weapon - Authority of Radiant Power |
| Off Hand | Enchant Weapon - Authority of Radiant Power |
| Chest | Enchant Chest - Crystalline Radiance |
| Bracers | Enchant Bracer - Chant of Armored Leech |
| Legs | Stormbound Armor Kit |
| Boots |
Enchant Boots - Defender's March (Stamina) Enchant Boots - Scout's March (Movement Speed) |
| Rings | Enchant Ring - Radiant Haste |
| Cloak | Enchant Cloak - Chant of Leeching Fangs |
Vengeance Demon Hunter Gear and Best in Slot
This section will cover everything you need to know about equipping your character correctly.
BiS Gear for Vengeance Demon Hunter
| Slot | Item | Source |
| Helm | Fel-Dealer's Visor (678) | One-Armed Bandit / Matrix Catalyst / Great Vault |
| Neck | Semi-Charmed Amulet (678) | Rik Reverb in Liberation of Undermine |
| Shoulder | Fel-Dealer's Recycled Reavers (678) | Rik Reverb / Matrix Catalyst / Great Vault |
| Cloak | Test Pilot's Go-Pack (678) | Sprocketmonger Lockenstock in Liberation of Undermine |
| Chest | Fel-Dealer's Soul Engine (678) | Sprocketmonger Lockenstock / Matrix Catalyst / Great Vault |
| Bracers | Killer Queen's Wristflickers (678) | Rik Reverb in Liberation of Undermine |
| Gloves | Fel-Dealer's Underhandlers (678) | Cauldron of Carnage/Matrix Catalyst/Great Vault |
| Belt | Adrenal Surge Clasp (675) | Crafted — Leatherworking |
| Legs | Fel-Dealer's Fur Kilt (678) | Stix Bunkjunker / Matrix Catalyst / Great Vault |
| Boots | Dragster's Last Stride (678) | Vexie Fullthrottle in Liberation of Undermine |
| Ring #1 | The Jastor Diamond (678) | Chrome King Gallywix — Liberation of Undermine |
| Ring #2 | Cyrce's Circlet (678) | Siren Isle |
| Trinket #1 | Eye of Kezan (658) | Chrome King Gallywix — Liberation of Undermine |
| Trinket #2 | House of Cards (678) | One-Armed Bandit in Liberation of Undermine |
| Main Hand | Capo's Molten Knuckles (678) | Mug'Zee — Liberation of Undermine |
| Off Hand | Everforged Warglaive (675) | Crafted — Blacksmithing |
Raiding Trinket Tier List for Vengeance Demon Hunter
This Trinket Tier List is biased towards single-target damage, as Vengeance Demon Hunter generally already has access to all the defensive tools required to clear the Raid. At that point, maximizing damage to help kill the boss becomes the primary focus. When Trinkets are equal in terms of single-target, AoE, or mixed performance, and defensive gains are taken into account, the priority shifts.
A "Tier," as defined by this list, represents a difference of around 0.5-1% DPS. This means that S-Tier Trinkets are approximately 0.5-1% better in overall damage compared to A-Tier Trinkets, and so on.
Any trinket not included in this list can be considered underperforming to the point where it is better to use a Mythic 0 version of an S-tier trinket.
S-Tier
- Eye of Kezan — A strong stacking Agility effect with extra damage once you reach full stacks. Very strong in longer encounters.
- House of Cards — 90-second cooldown trinket for a burst of Mastery to amplify the damage from Demonsurge, combine with Metamorphosis as Fel-Scarred for a strong burst window that are guaranteed to get stronger as the fight progresses.
- Signet of the Priory — 2-minute trinket that gives a large amount of your highest secondary stat, useful when combined with Metamorphosis as Fel-Scarred. Grants some bonus stats to others who wear the trinket and lets you benefit when they use it as well. Can be very strong if a lot of people are using it.
A-Tier
- Tome of Light's Devotion — Decently strong Critical Strike trinket while it is in Inner Radiance mode, as well as granting your abilities a chance to deal bonus Holy damage.
- Improvised Seaforium Pacemaker — Potent Critical Strike trinket with an internal 1-minute cooldown with decent uptime.
- Reverb Radio — Passive Haste trinket with a decent amount of total stats provided.
- Suspicious Energy Drink — Mastery proc trinket with high uptime.
B-Tier
- Geargrinder's Spare Keys — On-use damage effect on a 2-minute cooldown.
- Vexie's Pit Whistle
Mythic+ Trinket Tier List for Vengeance Demon Hunter
This Trinket Tier List evaluates trinkets based on two main factors: significant defensive power or excellent damage output.
A "Tier," as defined by this list, is balanced around the performance of different types of trinkets. A strong offensive trinket will typically rank a "Tier" higher than another if the difference in damage is approximately 0.5-1% overall. For defensive trinkets, their ranking depends on the defensive value they provide and how useful they are in a dungeon setting.
S-Tier
- Chromebustible Bomb Suit — A strong defensive trinket on a 90-seconds cooldown. Absorbs 75% of all damage taken until the shield is depleted. Upon depletion it deals a small amount of damage to all nearby enemies.
- Signet of the Priory — 2-minute trinket that gives a large amount of your highest secondary stat, useful when combined with Metamorphosis as Fel-Scarred. Grants some bonus stats to others who wear the trinket and lets you benefit when they use it as well. Can be very strong if most of your party is using it.
- Ringing Ritual Mud — A 2-minute cooldown shield trinket, with a cooldown reduction effect if you take damage from any Damage-over-time effect. A decent option to Chromebustible Bomb Suit, especially if the dungeon features a lot of Damage-over-time effect.
- Improvised Seaforium Pacemaker — A passive Critical Strike trinket with a built in 60-second cooldown. The cooldown is useful in that it is very often gonna guarantee instant activation on new targets at the start of combat, increasing your Parry chance and your damage when setting up pulls, which is where Vengeance frequently struggle.
A-Tier
- Reverb Radio — Decently strong Haste trinket offers decent damage and passive defensive benefits.
- Scrapfield 9001 — Grants a shield when you drop below 60%, which absorbs a medium amount of damage. Can only occur every 30 seconds. If you go 20 seconds without dropping below 60% health you gain a small amount of Haste.
- House of Cards — 90-second cooldown Mastery Trinket, powerful to sync with cooldowns for extra damage. Unfortunately you rarely get a lot of value of the increased power from longer combat duration.
- Suspicious Energy Drink — Mastery proc trinket with high uptime.
B-Tier
- Azerokk's Resonating Heart — High Agility proc with low uptime, less consistent than other stat sticks.
- Funhouse Lens
- Eye of Kezan — Strong trinket when you can spend consistent time in combat. But the frequent combat drops in Mythic+ leads to lower stack average than would be ideal. Often lose stacks due to walking/flying extended durations.
Best Crafted Items for Vengeance Demon Hunter
Our BiS Crafts depend on the content you are focusing on. The best mix of offensive and defensive power appears to be Adrenal Surge Clasp and a weapon with Blessed Weapon Grip, making this a solid choice for a Mythic+-focused player. If your main focus is Raiding, Darkmoon Sigil: Ascension is a stronger option. This also applies if you play a lot of Havoc, as Darkmoon Sigil: Ascension provides good value for both specializations. Make sure to simulate your character to determine if other options better suit your current gear.
For players starting the Season, the choice differs as early gearing is not just about the best Crafted Slots and Embellishments but also potential short-term Item Level gains. This means targeting high-value gear slots. For Vengeance, the highest-value slot is your Main-hand weapon, making it a strong first craft. A weapon with Blessed Weapon Grip or Darkmoon Sigil: Ascension is likely to be one of your best early crafts, with the attachment choice depending on whether you focus on Mythic+ or Raiding.
The War Within Season 2 Tier Set for Vengeance Demon Hunter
The Tier Set consists of 5 items, all carrying the Fel-Dealer moniker. Unique bonuses are unlocked when wearing 2 or 4 pieces from the set:
- Demon Hunter Vengeance 11.1 Class Set 2pc — Taking damage has a chance to grant you 4 seconds of Metamorphosis and Luck of the Draw!, increasing your damage dealt by 15% for 10 seconds.
- Demon Hunter Vengeance Season 1 4pc — The Hunt has a 75% chance to reset its cooldown whenever you gain Luck of the Draw!
The Tier Set Bonus provides a solid increase in performance and is a long-term goal to work toward. You can use the Matrix Catalyst to convert regular items (from Mythic+, for example) into Tier Items.
The set is slightly stronger for Aldrachi Reaver than Fel-Scarred, due to The Hunt activating Reaver's Glaive.
You only need 4 out of 5 pieces to gain both set bonuses. Given equal item levels on all pieces, we recommend simulating your gear to determine if replacing a set piece with another item provides better overall performance. Check out the BiS List for more details.
Addons for Vengeance Demon Hunter
Generic Addons for Demon Hunters
- ElvUI
- Boss Mods: Deadly Boss Mods or Bigwigs
- GTFO
- Parrot or Mik's Scrolling Battle Text
- Weak Auras
- Recount / Skada / Details!
- Grid and GridClickSets (Optional)
Specific Addons for Vengeance Demon Hunters
- Omen Threat Meter
Macros for Vengeance Demon Hunter
General Macros for Demon Hunters
Disrupt Focus Interrupt Macro
- #showtooltip
- /cast [@focus,harm,nodead][] Disrupt
This macro use Disrupt on your current focus target.
Focus Purge Macro
- #showtooltip Consume Magic
- /cast [@focus,harm,nodead][] Consume Magic
This macro will use Consume Magic on your current focus target.
Specific Macros for Vengeance Demon Hunters
Sigil Macro
- #showtooltip
- /cast [mod:ctrl, @player] Sigil of Flame; [nomod, @cursor] Sigil of Flame
You should use this macro for your Sigils. You can then use it either with @cursor or @player, depending on what you prefer. Only use the macro if you are comfortable with the range of your sigils. You can replace Sigil of Flame with any other Sigil spell name to get the same effect.
Infernal Strike Macro
- #showtooltip
- /cast [mod:ctrl, @player] Infernal Strike; [nomod, @cursor] Infernal Strike
Blessing of Protection Cancelaura Macro
- /cancelaura Blessing of Protection
This macro is very useful to have. It allows you to cancel a Blessing of Protection that may have been cast on you, allowing you to resume your attacks. It is also important because, while you are under the effect of Hand of Protection, mobs will not attack you and instead will just attack the next person the aggro list (usually a DPS player).
Mouseover Taunt Macro
- #showtooltip Torment
- /cast [@mouseover,harm,nodead][]Torment
This macro will use Torment on the target you are currently mousing over.
WeakAuras for Vengeance Demon Hunter
WeakAuras is an essential tool for Vengeance Demon Hunter and Tanks, offering unparalleled customization to enhance your gameplay. Rather than focusing on specific examples, we recommend exploring Wago.io, where you’ll find an extensive library of WeakAuras to suit your needs.
If you are unfamiliar with WeakAuras, it is an incredibly powerful and widely-used AddOn that allows you to create custom displays for nearly everything in the game. This includes tracking buffs, debuffs, cooldowns, Focus, resources, and much more.
To import a WeakAura, visit Wago.io and select one that fits your preferences. Click the "Copy WeakAura Import String" button to copy it to your clipboard. Next, log into the game and type /wa in the chat box to open the WeakAuras interface. Navigate to the "Import" section, press Ctrl+V to paste the copied string, and click "Import". You’re ready to go!
Mastering WeakAuras and customizing it to your playstyle is highly recommended for any serious raider. With countless options available on Wago.io, you can tailor your interface to optimize your performance and focus on what truly matters in combat.
Vengeance Demon Hunter Frequently Asked Questions
How Much of X Stat Should I Have?
There are no strict caps or specific goals for any secondary stat. The overall quantity of stats is usually more important than perfect distribution. It's common to overestimate the value of having the "correct" secondaries, but in reality, even a higher amount of your weakest stat often outperforms a smaller amount of your best stat. Stat differences are generally minor, so focus on maximizing the total stat value.
Should I Play Defensively or Offensively?
This depends on your level of comfort and the context of the encounter. For progression or unfamiliar situations, prioritizing defense is key to ensuring survival. As you gain confidence and understand the mechanics, you can shift towards a mixed approach—balancing DPS and survivability. Once you're fully comfortable with an encounter, you can lean more towards DPS without jeopardizing your role in the group. The right balance varies based on your group, gear, and personal skill level.
What Piece Is Better, X or Y?
When comparing gear, a difference of 6 or more item levels typically makes the higher-level piece better. For smaller differences, evaluate how well each piece is itemized for your spec. If the old piece has poor stats and the new one is ideal, the swap may be worth it. However, there's no universal answer—gear upgrades depend on your setup, as every piece interacts uniquely with others. For specific encounters, looking at high-ranking parses on Warcraft Logs can offer insights into optimal setups.