Feral Druid DPS Guide - The War Within 11.1
Select your Specialization
Druids are a remarkable class, known for their majestic shapeshifting powers. For many years, they have remained a favorite choice for thousands of players. In this The War Within Feral Druid Guide, we will explore the latest changes to Feral Druids, delve into their abilities and rotation, and identify the essential consumables you’ll need to optimize your performance.

Table of Contents
Feral Druid Overview
Feral, the Melee DPS specialization for Druids, forms its core gameplay around a dual resource system of Energy and Combo Points and uses them to apply powerful Bleed DoT effects on targets. Alongside that, both are used in tandem to create a build-and-spend system that incorporates pooling for high-damage moments. As a Druid, it also provides the Mark of the Wild buff to increase your group's Versatility.
Feral Druid Strengths and Weaknesses
Strengths
- Good sustained AoE while still maintaining priority damage, giving it a good niche in Mythic+
- Both Hero Talents are good for different damage profiles, adding flexibility
- Strong single-target damage, and extremely powerful 2-minute burst cooldowns making it a good Raid choice
- Good group utility and control options
- A variety of mobility tools
- Powerful active defensive toolkit
Weaknesses
- Has to sacrifice a little bit to pick up AoE tools and vice versa
- Reliant on cooldown timers and uptime to get full value, so planning is important
- Brings nothing unique as a melee, an often contested raid spot
- Raid utility is limited
- Some AoE tools are more focused on sustain which can be limiting if more frontloaded damage is needed
- Resource mis-management is very punishing
Feral Druid Basic Gameplay
Feral is one of the more complex specs to get started with due to relying on a dual resource system that requires you to manage and pool them correctly at different times. It has a slow passive resource in Energy that can be converted into Combo Points via generator spells, such as Shred, and then spent on finishing moves, such as Ferocious Bite.
Alongside this, Feral also has Bleed mechanics that apply debuffs to your target that require different resources - Rake needing Energy and Rip needing Combo Points. This creates a spec that, seems very busy at first glance, but it tends to play slower giving you room to make those decisions. This puts more weight on your gameplay choices and foresight rather than your snap gameplay. Once you grasp the concepts, it tends to click into place and becomes a lot more fluid to manage; it just takes a little practice!
It also has a very robust AoE toolkit that links together well, making use of Primal Wrath to apply the Rip effect to targets around you and Rampant Ferocity converts Ferocious Bite into an AoE tool keeping everything relevant. Finally, Apex Predator's Craving allows us to use all those active Rips to proc free additional Bite casts, creating a satisfying synergy between the entire toolkit.
Feral Druid Changes in Patch 11.1
While Patch 11.1 includes a sizable list of changes for Druids, most of them have little impact on Feral specifically or its overall playstyle. However, the class tree is receiving some significant structural improvements, providing new pathing options to pick up additional utility. This makes the patch feel fresh while keeping the core gameplay familiar. Here are some key highlights:
- Feral's base damage has received aura and ability buffs to accommodate the new class tree, resulting in a slight overall increase in throughput.
- The Druid class tree has been fully restructured, removing filler pathing and forced talents with little value. These have been replaced with more meaningful effects, leading to a net performance increase and additional opportunities to gain utility.
If you enjoyed Feral in Season 1, you'll be glad to know that its mechanics remain largely unchanged in Season 2. However, with some damage buffs and a new set bonus, there are still exciting updates to look forward to in The Undermine!
Feral Druid Leveling Guide for The War Within
Feral Druid Leveling Playstyle
Feral Druid is extremely mobile, allowing for fast questing and efficient movement between objectives. It has a strong AoE toolkit, but much of its damage occurs over time, requiring careful management to avoid being overwhelmed. Feral is also well-suited for dungeon leveling, though queue times may be faster if you opt to tank as Guardian.
Gear Options
While leveling, always equip the gear with the highest item level. Since you will frequently replace gear, there is no need to focus on secondary stats—simply use the best upgrades available.
Best Leveling Talents for Feral Druid
Talents can be changed anywhere in the world as long as you are out of combat. Experimenting with different talent combinations while leveling allows you to adapt to various encounters and gain a better understanding of the spec. Below is a recommended leveling path through the Class and Feral skill trees. This setup balances ease of learning with effectiveness, introducing core mechanics while avoiding overly complex resource management.
At level 10, you gain access to Rake and Rip from the Class tree. These abilities are central to Feral’s Bleed-based gameplay, and you should maintain them as much as possible during combat. Feral utilizes a dual-resource system: Energy fuels abilities like Shred for single-target and Swipe for AoE, generating Combo Points used for powerful finishers like Ferocious Bite.
Feral Druid DPS Spec, Builds, and Talents

Copy the Feral Druid talents, paste them into the game.
Raid / Single Target - Wildstalker
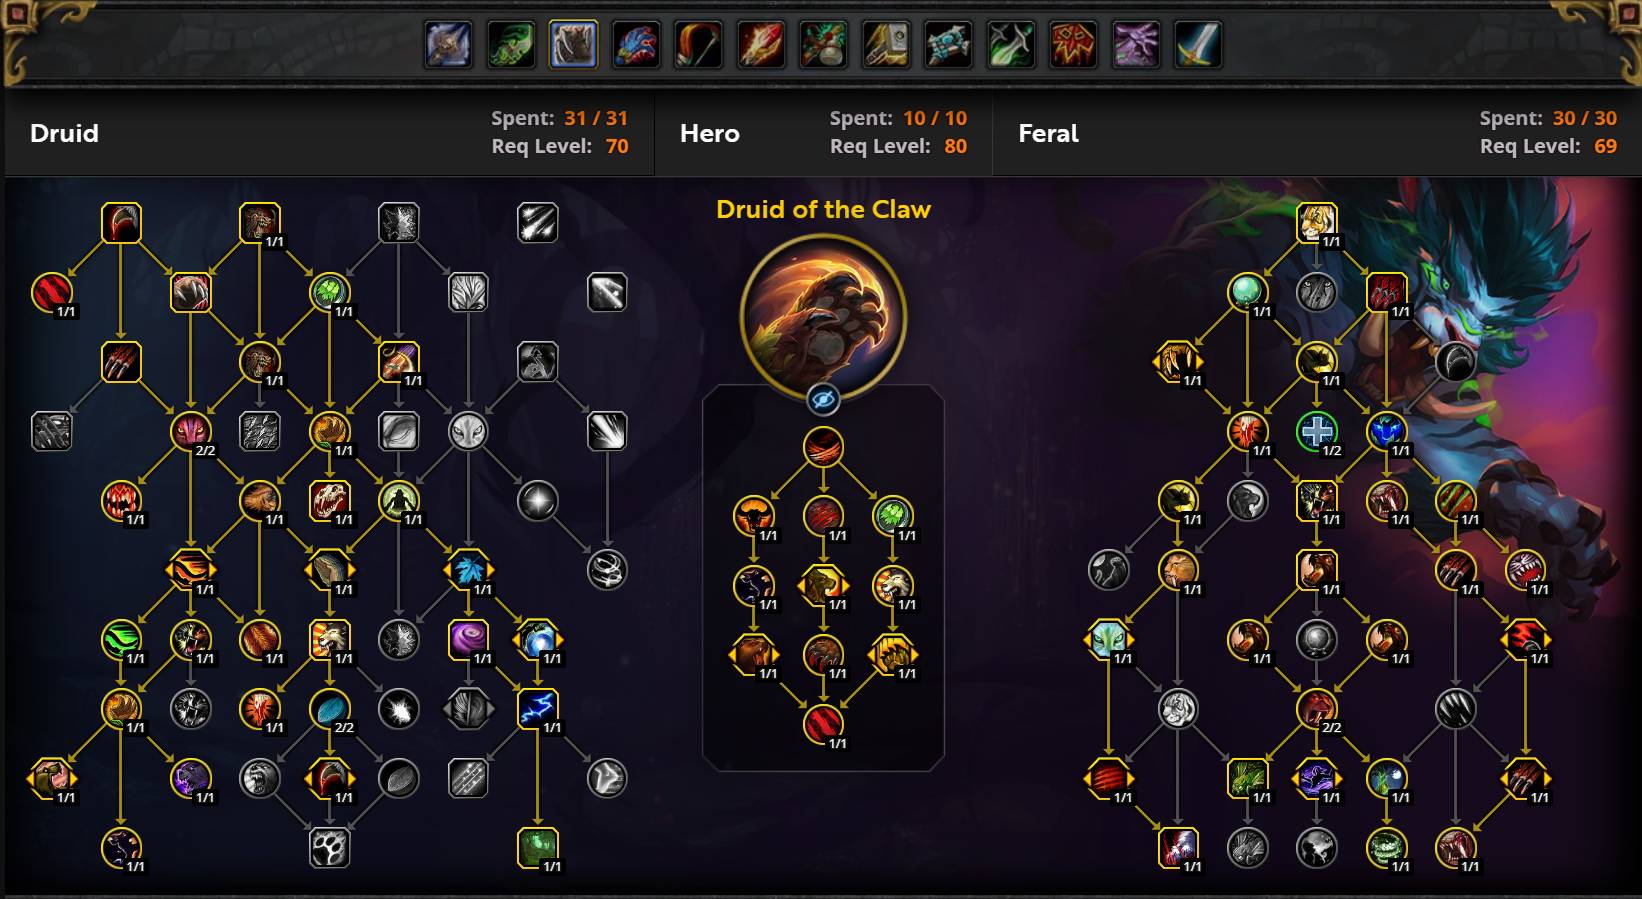
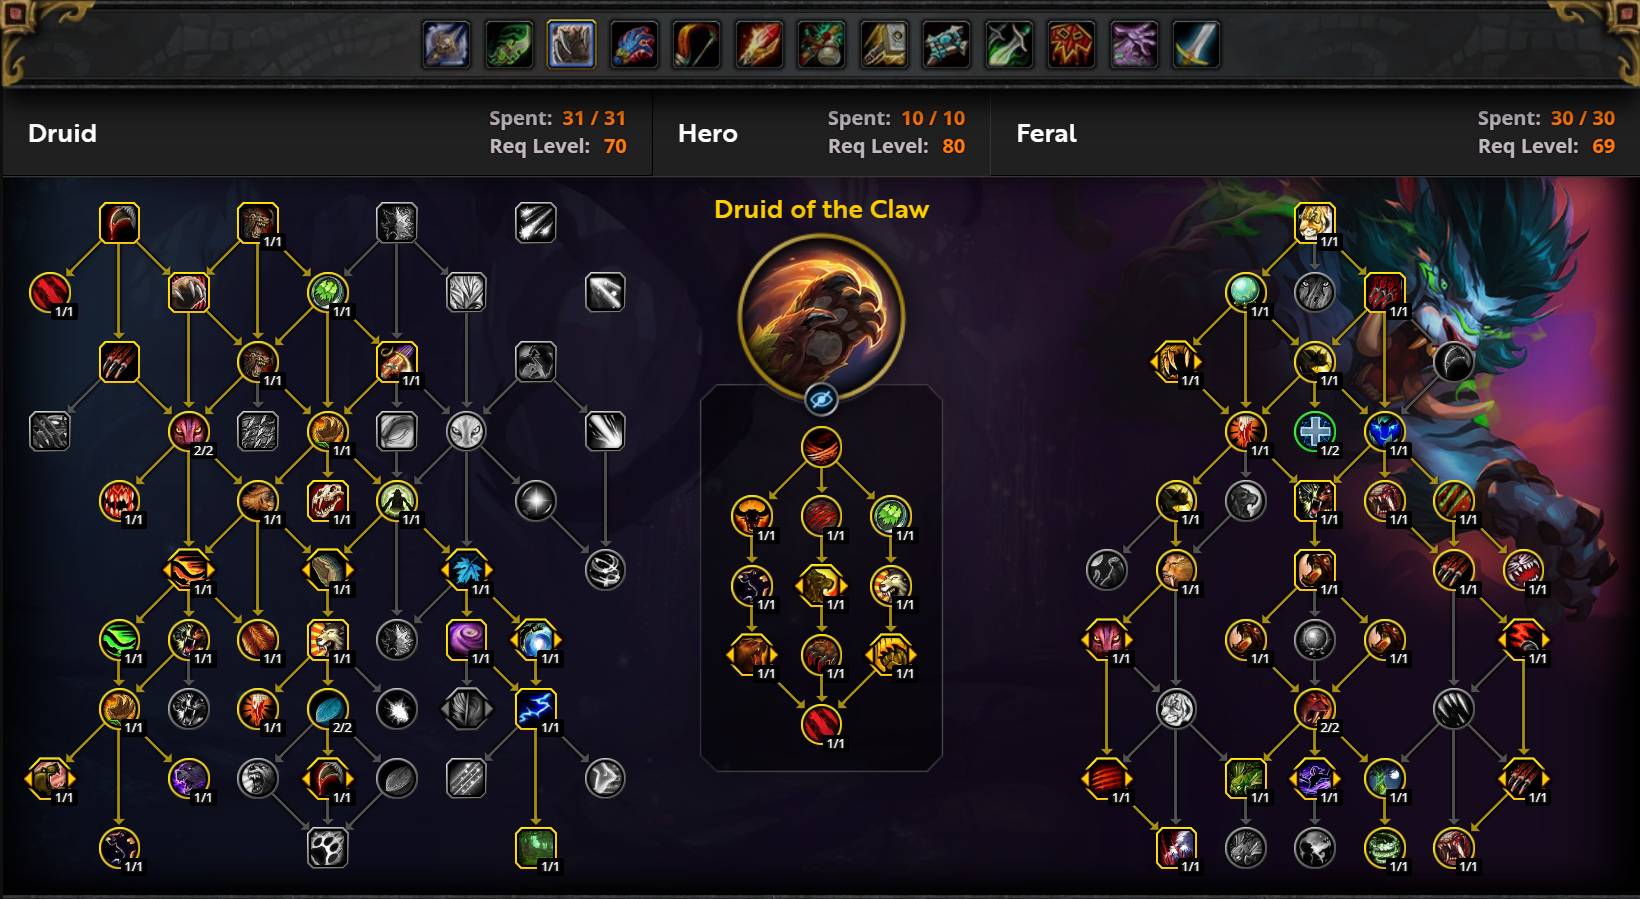
AoE / Mythic+ - Druid of the Claw
Delves - Druid of the Claw
PvP Talents (War Mode)
War Mode
War Mode is an optional feature that enables open-world PvP, providing various benefits when active:
- Grants access to PvP talents in the open world.
- Increases World Quest rewards by 10% at max level.
- Boosts experience gained while leveling by 10%.
- Allows you to earn Conquest Points, which provide weekly gear rewards.
With these advantages, enabling War Mode can significantly enhance your leveling efficiency and rewards at max level. However, it also exposes you to open-world PvP, meaning enemy players may attempt to interfere with your progress. Consider whether the risk is worth the reward before enabling it.
If you're interested in PvP as a Feral Druid or want tips on handling PvP encounters, check out our dedicated PvP guide.
Best Hero Talents for Feral Druid in The War Within
Raiding Hero Talents for Feral Druid
Currently, Wildstalker is the top choice for single-target encounters, though Druid of the Claw is not far behind.
- Wildstalker is slightly ahead in single-target, as its set bonus fits well with a standard talent build while enhancing DoT effects. It also plays passively, requiring no major adjustments to Feral’s usual playstyle.
- Druid of the Claw is slightly hindered by needing to pick Apex Predator's Craving from the tier set, which weakens Ravage. It also demands careful resource management instead of a heavy DoT focus, requiring optimization of Saber Jaws for Ferocious Bite. However, it provides powerful burst through Claw Rampage enhancing Berserk, along with superior durability for difficult encounters.
Mythic+ Hero Talents for Feral Druid
For Mythic+, Druid of the Claw is the recommended choice due to its strong damage profile and significant defensive advantages. However, Wildstalker remains competitive in raw numbers.
- Druid of the Claw excels with explosive 2-minute burst windows and strong AoE potential with good planning, while still maintaining solid single-target damage for bosses. It integrates well with the Feral playstyle, adding Ravage procs to manage. Additionally, it is highly durable, offering extra defensive tools for handling tough dungeon encounters.
- Wildstalker boosts DoT effects and supports a build centered around sustained multi-target damage. Its shorter damage cycle focuses on 30-second, 1-minute, and 2-minute bursts after proper setup in each pull. However, it requires precise execution, particularly in managing Unbridled Swarm, but rewards players with consistent multi-target damage.
Feral Druid DPS Stat Priority
Single Target Feral Druid Secondary Stat Priority
Both Druid of the Claw and Wildstalker share the same stat priority for single-target:
- Mastery = Critical Strike
- Haste
- Versatility
- Agility
Critical Strike is the top priority early in the expansion to generate enough resources for a smooth rotation via Primal Fury. However, Mastery is very close in value and will surpass Critical Strike once you have enough Crit to support it. These two stats should be your main focus early on.
Haste follows closely behind, helping with Energy regeneration and improving DoT tick rates, particularly for Wildstalker, as Bloodseeker Vines has a fixed duration.
Versatility is the lowest priority but still has value, especially if you need additional damage reduction.
As always, you should simulate your character using Raidbots and compare gear directly rather than relying solely on stat weights.
Multi Target Feral Druid Secondary Stat Priority
Both Wildstalker and Druid of the Claw have different stat priorities in AoE situations due to their distinct builds:
Wildstalker
- Mastery = Critical Strike
- Versatility
- Haste
- Agility
Mastery is extremely valuable for Wildstalker as it enhances all of the DoT effects and finishers, making it the best stat in multi-target scenarios. Critical Strike remains important for resource generation and additional damage.
Versatility is a useful multiplier, making it a solid third choice, while Haste is slightly less valuable once you have enough to sustain your cycle.
Druid of the Claw
- Mastery
- Critical Strike
- Versatility
- Haste
- Agility
Mastery is the top priority for Druid of the Claw as it amplifies Ravage and Primal Wrath in AoE. Critical Strike follows closely behind, boosting Combo Point generation via Primal Fury.
Versatility is slightly behind but still beneficial as another multiplier for strong abilities, while Haste is the lowest priority once resource generation is stable.
As always, you should simulate your character using Raidbots and compare gear directly rather than relying solely on stat weights.
Diminishing Returns on Stats
Every stat has a threshold where it begins to offer less increase per point gained, known as diminishing returns. Once you reach these values, stats become progressively less valuable and may fall behind other options. The current breakpoints are:
- 21,000 Critical Strike Rating
- 19,800 Haste Rating
- 23,400 Versatility Rating
- 21,000 Mastery Rating
With the higher item level in the current season, there is a risk of hitting these diminishing return points on at least two stats. Be mindful of these breakpoints if your simulation results seem unusual.
Understanding Feral Druid Stats
- Agility provides Attack Power, increasing the damage of your melee attacks and abilities.
- Critical Strike increases the chance for your attacks and abilities to critically strike, dealing double damage. Combo Point-generating abilities also grant an extra Combo Point on a Critical Strike thanks to Primal Fury.
- Mastery, through Mastery: Razor Claws, increases the damage of your Bleed effects, finishing moves, and Rampant Ferocity. This becomes even more valuable in multi-target situations where multiple Bleed effects are applied.
- Haste increases attack speed, Energy regeneration, and the tick rate of Bleed DoT effects. It also decreases the recharge time of Brutal Slash and, with Predator talented, increases the direct damage of Combo Point-generating abilities by 40% of your current Haste amount.
- Versatility increases all damage and healing done while reducing all damage taken.
Feral Druid DPS Rotation, Cooldowns, and Abilities
Feral Druid Single Target Rotation
Feral Druids in single-target focus on building Combo Points via Energy spenders, and consuming them with powerful Finishing moves in a cycle. It is a mixture of resource management and DoT maintenance, with a heavy emphasis on planning with some reactive elements.
- Cast Ferocious Bite with an Apex Predator's Craving proc to trigger Big Winner!!!.
- When at one or less Bloodtalons charges, pool Energy so you can trigger it after your next Finisher.
- Cast Tiger's Fury on cooldown at 5 Combo Points or 30 Energy below your cap.
- Cast Rip with 5 Combo Points if it is not active, or expiring within 5 sec.
- Cast Rake if it is not active, or expiring within 3 sec.
- Cast Moonfire if it is not active on your target, or expiring within 3 sec.
- Cast Adaptive Swarm.
- Cast Feral Frenzy on cooldown at 0-1 Combo Points.
- Cast Berserk on cooldown, aligning with Tiger's Fury. Try to sync with Convoke the Spirits.
- Cast Convoke the Spirits with Tiger's Fury active and as few Combo Points as possible.
- Cast Ferocious Bite with 5 Combo Points when Rip has more than 5 sec remaining.
- Cast Rake with Sudden Ambush if your DoT can be empowered by Pouncing Strikes.
- Cast Brutal Slash if close to 3 charges.
- Cast Thrash if it is not active, or expiring within 3 sec.
- Cast Shred to generate Combo Points.
The most important thread throughout all of Feral is making sure that you maintain Rip and Rake as efficiently as possible, ideally snapshotting them with Tiger's Fury and Bloodtalons. After that, your excess Energy and Combo Points are used to fuel Ferocious Bite while always keeping in mind your Bleed maintenance.
Feral Druid Opening Sequence
- Cast Prowl before combat starts.
- Cast Rake from Stealth to trigger Pouncing Strikes.
- Cast Moonfire.
- Cast Brutal Slash to spend a charge.
- Cast Shred until you are at 5 Combo Points.
- Cast Adaptive Swarm.
- Cast Berserk.
- Cast Tiger's Fury.
- Cast Rip with your first 5 Combo Points.
- Cast Feral Frenzy.
- Cast Ferocious Bite.
- Cast Convoke the Spirits when low on Energy and Combo Points with Tiger's Fury active.
- Continue with the normal priority list.
Always try to have all of your major effects applied before entering into Berserk, as you will be spending a lot of time casting, building, and spending aggressively due to the resource flood.
AoE Rotation for Feral Druids
Feral in AoE almost entirely hinges on powerful talent picks in the tree that attach AoE components to single-target finishers. Primal Wrath allows for much easier application of Rip, and Rampant Ferocity converts Ferocious Bite into AoE damage when paired together.
- Try to cycle 3 builders between finishers to activate Bloodtalons, but avoid wasting Combo Points.
- Cast Primal Wrath with 5 Combo Points under these conditions.
- Cast Ferocious Bite / Ravage with 5 Combo Points or with Apex Predator's Craving active.
- Cast Adaptive Swarm.
- Cast Tiger's Fury on cooldown while 70 or more Energy below your cap.
- Cast Berserk on cooldown with Tiger's Fury and Convoke the Spirits.
- Cast Feral Frenzy if at 0-1 Combo Points.
- Cast Convoke the Spirits during Tiger's Fury with Rip active on all targets.
- Cast Thrash if it is not active, or expiring within 3 sec.
- Cast Rake, cycling between targets.
- Cast Brutal Slash if close to 3 charges.
- Cast Thrash if it is not active, or expiring within 3 sec.
Many of the rules that Feral plays by in single-target remain in multi-target situations, alongside the need to apply Rake to multiple enemies. Primal Wrath replaces Rip entirely, and excess Combo Points are spent on Ferocious Bite to trigger Rampant Ferocity. Apex Predator's Craving procs are spent as quickly as possible.
Feral Druid Major Cooldowns
Berserk
Berserk is Feral's major damage cooldown, lasting 15 seconds with a baseline cooldown of 3 minutes, reduced to 2 minutes with Berserk: Heart of the Lion. While active, it provides several benefits:
- Generate 1 Combo Point every 1.5 seconds
- Combo Point generating abilities generate 1 additional Combo Point, and up to 3 Combo Points can be stored above the cap as Overflowing Power
- Finishing Moves restore Combo Points based on your current stacks of Overflowing Power.
- All ability damage increased by 15%.
- With Berserk: Frenzy — Combo Point generating abilities apply a Bleed for 150% of the damage dealt over 8 sec.
- With Incarnation: Avatar of Ashamane — duration increased to 20 seconds and Energy cost of Cat Form abilities reduced by 25%.
While there are a lot of effects tied into it, the main impact is quite simple: you deal a lot more damage and have access to significantly more resources. Feral deals a very large amount of damage during its cooldown windows, so making sure to use this on cooldown and burn off the extra resources is key.
Tiger's Fury
Tiger's Fury has a 30-second cooldown off-global-cooldown button that instantly generates 50 Energy and increases the damage of all of your Feral abilities by 15% for 10 seconds. This damage increase also "snapshots" Bleeds applied, amplifying them for their full duration. There are several specific talents that enhance this:
- Predator — increases the duration by 5 sec, and increases the damage of Combo Point generating abilities by 40% of your Haste.
- Savage Fury — also causes Tiger's Fury to grant 10% Haste and increase your Energy recovery rate by 25% for 6 seconds when cast.
- Raging Fury — increases the duration by an additional 5 sec.
- Tiger's Tenacity — causes your next 3 Finishing Moves after casting to also restore 1 Combo Point. The damage snapshot applied to Bleeds is also increased by 10%.
- Carnivorous Instinct — increases the damage bonus by 6% per point spent.
As you can see, Tiger's Fury makes up a major part of Feral's talent tree and is a core component of gameplay. It is generally pressed as close to every 30 seconds as possible, ideally with low Energy to take advantage of the refund. While it is active, you want to make sure to reapply any Bleeds to take advantage of the snapshot, and layer it over any other cooldowns such as Berserk.
Convoke the Spirits
Convoke the Spirits has a 2-minute cooldown, and when used, it casts a quick succession of 16 Druid spells free of cost over 4 seconds. This prefers Feral spells, but some abilities from other specs will also be mixed in. As of The War Within, it prioritizes single-target abilities on your current target. Some quick notes about the abilities it will aim to cast:
- Ferocious Bite is the finisher it will attempt to cast. This will be considered as a max Combo Point cast that consumes additional Energy, but is not increased further by Saber Jaws.
- Any Combo Point generating ability will still generate a Combo Point for you.
- Any effects that apply to ability casts, such as Sudden Ambush, will be consumed.
- The "exceptional spell" it can cast is Feral Frenzy.
Convoke the Spirits is always paired with Berserk and Tiger's Fury to maximize the burst of damage it provides. It can also be reduced to a 1-minute cooldown with Ashamane's Guidance (reducing the spells cast to 12), but is still always synced with these other buffs.
Feral Druid Mechanics
Combo Points and Energy
As a Feral Druid, the core of your abilities requires Energy to be used. Your Energy bar has a capacity of 100 Energy (increased by some Talents) and refills at a rate of 11 Energy per second baseline. Your Energy regeneration is increased by your Haste.
Feral has a pool of abilities that generate Combo Points (known as generators), those being Shred, Rake, Swipe / Brutal Slash, Thrash, Moonfire (with Lunar Inspiration) and lastly Feral Frenzy. Alongside this, you have abilities that consume these Combo Points (known as finishers) that consume all current Combo Points to deal damage based on the amount used. The more Combo Points consumed, the higher the damage (or stronger the effect) of each of these. Combo Point generation is also greatly impacted by Primal Fury, which causes Critical Strikes with your generators to grant an additional Combo Point.
Energy Pooling
Due to the slow generation of Energy for Feral, the concept of "pooling" Energy for key moments is an important one. This means holding your ability casts until certain conditions are met to then spend, as there will always be some amount of natural downtime present in the Feral rotation. Making sure to empty your resource leading up to each Tiger's Fury is also a good idea to avoid wasting the Energy it grants when cast.
Omen of Clarity procs should be used as soon as your cycle allows so that they do not get overwritten by subsequent procs. With Moment of Clarity, this allows for more flexibility to sit on one charge, allowing it to accumulate up to 2.
Bleeds, DoTs and Pandemic
Feral should always aim to have 100% uptime on both Rake and Rip, with additional DoTs included based on your talent build. This is the core of your damage output and defines the maintenance playstyle of Feral. Keep in mind that if you are playing Circle of Life and Death, all of the below effects expire 25% faster.
Rake costs 35 Energy to apply and lasts for 15 seconds, making it the easiest tool to manage.
Rip costs 20 Energy, but its duration is also dependent on how many Combo Points it is applied with. You should aim to apply Rip at 5 Combo Points for the best Energy efficiency. When applied at 5, it lasts for 24 seconds.
Thrash costs 40 Energy to cast and deals its damage over 15 seconds. This should also be maintained at all times in AoE and Single-Target.
With Lunar Inspiration, Moonfire now costs 40 Energy and is similarly important to maintain, just like Rake.
Snapshotting
Bleed snapshotting is a core component for Feral Druids, but it only works with specific damage-increasing buffs. Snapshotting means that the damage to the Bleed effect is determined at the time of application and will carry over the amplification effects of the following buffs (where applicable) for the entire duration.
The effects that interact with Bleeds, and the DoTs they affect are:
- Tiger's Fury — all DoT effects;
- Sudden Ambush — Rake;
- Bloodtalons — Rip / Primal Wrath;
- Moment of Clarity — Thrash.
Tiger's Fury applies to any Bleed effect, while Bloodtalons only applies to your Finishers in Rip and Primal Wrath. Sudden Ambush also only applies to Rake via the Pouncing Strikes effect.
Generally, the rule of thumb is to avoid refreshing Bleeds if you will overwrite a stronger snapshot, and instead wait until they are about to expire or until a more opportune moment to do so.
Ferocious Bite
Ferocious Bite is your big direct-damage finisher, but it should only be used to bleed off excess Combo Points after you have Rip (or Primal Wrath) active on targets. If you plan to cast it, ensure these DoTs have enough remaining duration to still generate Combo Points before they expire. You should always aim to cast it at 50 Energy to consume extra, amplifying its damage (which is significantly more important if playing with Saber Jaws).
As covered in the rotation section, this ability should be treated as something you cast only when you have room to do so. While the big damage it deals can be tempting, losing uptime on DoTs is not worth it. Apex Predator's Craving procs make this completely free and should be consumed immediately, as they do gain the damage bonus from extra Energy consumption but are not increased further by Saber Jaws. These rules also apply to AoE with Rampant Ferocity — it is even more important to ensure Rip is applied via Primal Wrath to trigger the damage.
Ravage granted by Druid of the Claw follows the same rules for casting. However, in AoE situations, it becomes a much higher priority to spend these procs to avoid wasting any.
Feral Druid DPS Gems and Consumables
Best Gems for Feral Druid
It is highly recommended that you simulate your character for gems, as individual gear pieces significantly impact gem choices. Since our stats are very similar across both Hero Talent trees and content types, we follow a one-size-fits-all approach:
- Use Culminating Blasphemite in your first socket.
- Aim to have one of each color of gem to maximize its effect, focusing on Critical Strike. This includes one of Deadly Emerald, Deadly Onyx, and Deadly Sapphire.
- All other sockets should contain Masterful Ruby or Deadly Onyx.
- Some characters may find that meeting the requirements for Culminating Blasphemite is not worth it compared to stacking better-allocated gems. If your simulation suggests otherwise, follow its recommendation.
Since Feral benefits greatly from both Critical Strike and Mastery, simulating your character is crucial for determining the best gem setup.
If preferred, you can substitute Culminating Blasphemite for Elusive Blasphemite for a minor DPS loss in exchange for additional passive movement speed.
Best Flask for Feral Druid
There are two flask options depending on the situation:
- Flask of Alchemical Chaos — Slightly more RNG than the alternatives, but provides a net positive in stats and leads to stronger Tempered Potion uses, making it the recommended choice.
- Flask of Tempered Aggression / lask of Tempered Mastery — Numerically weaker but more consistent, providing a steady stat bonus. However, it results in a weaker Tempered Potion.
You can also obtain a flask of your choice from Algari Flask Cauldrons provided by Alchemists.
Best Potion for Feral Druid
Tempered Potion is the recommended potion and should be used alongside major cooldowns and Bloodlust / Heroism. You can also obtain Fleeting Tempered Potion from Algari Potion Cauldron provided by Alchemists.
Algari Healing Potion is the best healing potion, with a 5-minute cooldown. Multiple can be used in an extended boss fight. Additionally, Healthstones from Warlocks do not share a cooldown with other healing consumables, so remember to use them when available!
Best Food for Feral Druid in The War Within
Due to the high value of secondary stats in Season 2, you should use secondary stat food as long as one of them is your highest stat. The best feast option is The Sushi Special. For personal food, you can use Outsider's Provisions, Beledar's Bounty, Jester's Board, or Empress' Farewell.
Weapon Enhancement Consumables
Your best weapon enhancement consumable is Algari Mana Oil, which provides additional Critical Strike and Haste. Secondary stats have surpassed the value of Agility, making this the preferred option.
Augment Runes for Feral Druid
If you can afford it, use Crystallized Augment Runes to increase your primary stat. Keep in mind that Augment Runes are expensive and disappear on death, so use them wisely!
Best Enchants for Feral Druid
| Slot | Enchantment |
| Necklace | Magnificent Jeweler's Setting (adds up to 2 sockets to a Ring or Neck) |
| Weapon | |
| Chest | Enchant Chest - Crystalline Radiance |
| Bracers | Enchant Bracer - Chant of Armored Avoidance |
| Legs | Stormbound Armor Kit |
| Boots | |
| Rings | Enchant Ring - Radiant Critical Strike Enchant Ring - Radiant Mastery |
| Cloak | Enchant Cloak - Chant of Winged Grace |
Enchant Weapon - Stonebound Artistry is the general recommendation for all types of content. However, depending on your current gear, other secondary enchants like Enchant Weapon - Council's Guile or Enchant Weapon - Stormrider's Fury may come out on top. If your simulation suggests a different enchant, follow the results.
Feral Druid DPS Gear and Best in Slot
This section will cover everything you need to know about equipping your character correctly.
BiS Gear for Feral Druid
| Slot | Item | Source |
| Helm | Branches of Reclaiming Blight (678) | One-Armed Bandit / Matrix Catalyst / Great Vault |
| Neck | Gobfather's Gifted Bling (678) | Mug'Zee — Liberation of Undermine |
| Shoulder | Jaws of Reclaiming Blight (678) | Rik Reverb/Matrix Catalyst/Great Vault |
| Cloak | Consecrated Cloak (678) | Great Vault / Cinderbrew Meadery |
| Chest | Robes of Reclaiming Blight (678) | Sprocketmonger Lockenstock/Matrix Catalyst/Great Vault |
| Bracers | Killer Queen's Wristflickers (678) | Rik Reverb in Liberation of Undermine |
| Gloves | Rune-Branded Grasps (678) | Crafted — Leatherworking |
| Belt | Mekgineer's Championship Belt (678) | Mug'Zee in Liberation of Undermine |
| Legs | Moccasins of Reclaiming Blight (678) | Great Vault / Operation: Mechagon - Workshop |
| Boots | Rushed Beta Launchers (678) | Sprocketmonger Lockenstock — Liberation of Undermine |
| Ring #1 | Cyrce's Circlet (658) | Siren Isle |
| Ring #2 | The Jastor Diamond (678) | Chrome King Gallywix in Liberation of Undermine |
| Trinket #1 | Eye of Kezan (678) | Chrome King Gallywix — Liberation of Undermine |
| Trinket #2 | Improvised Seaforium Pacemaker (678) | Great Vault / Operation: Floodgate |
| Main Hand | Best-in-Slots (678) | One-Armed Bandit (678) in Liberation of Undermine |
Raiding Trinket Tier List for Feral Druid
S-Tier
- Improvised Seaforium Pacemaker — an ICD trinket, this will proc every minute on the dot, being an on-use in disguise that lines up with Berserk.
- Eye of Kezan — While it takes time to stack up, when it gets there it is unmatched in throughput, well suited for raid encounters.
- House of Cards — Hold to align with Berserk.
- Signet of the Priory — Lines up with Berserk naturally.
- Mechano-Core Amplifier — Lower Ilvl, but still worth it even without the bonus effect.
A-Tier
- Suspicious Energy Drink — Lower Ilvl, but still worth it even without the bonus effect.
- Shadow-Binding Ritual Knife — If Season 1 delve trinkets make a return, this is still very relevant.
- Azerokk's Resonating Heart
- Reverb Radio
- Junkmaestro's Mega Magnet
B-Tier
- Quickwick Candlestick — If Season 1 delve trinkets make a return, this is a relevant on-use alternative.
- Funhouse Lens — Hold to align with Berserk.
- Zee's Thug Hotline
- Sigil of Algari Concordance
- Conductor's Wax Whistle
- Mister Lock-N-Stalk
C-Tier
- Turbo-Drain 5000
- Garbagemancer's Last Resort
- Geargrinder's Spare Keys
- Grim Codex
- Ravenous Honey Buzzer
Mythic+ Trinket Tier List for Feral Druid
S-Tier
- Improvised Seaforium Pacemaker — an ICD trinket, this will proc every minute on the dot, being an on-use in disguise that lines up with Berserk.
- House of Cards — Hold to align with Berserk.
- Signet of the Priory — Lines up with Berserk naturally.
- Mechano-Core Amplifier — Lower Ilvl, but still worth it even without the bonus effect.
A-Tier
- Suspicious Energy Drink — Lower Ilvl, but still worth it even without the bonus effect.
- Shadow-Binding Ritual Knife — If Season 1 delve trinkets make a return, this is still very relevant.
- Azerokk's Resonating Heart
- Reverb Radio
B-Tier
- Quickwick Candlestick — If Season 1 delve trinkets make a return, this is a relevant on-use alternative.
- Funhouse Lens — Should hold to align with Berserk for large pulls.
- Junkmaestro's Mega Magnet
- Conductor's Wax Whistle
- Zee's Thug Hotline
- Sigil of Algari Concordance
- Eye of Kezan — the buff only lingers for 20 seconds out of combat, and loses a stack every 3 seconds, making it too hard to chain stacks between pulls.
C-Tier
Best Crafted Items for Feral Druid
Crafted gear in The War Within offers multiple choices depending on your current gear and Embellishment options. Ideally, you should simulate the optimal stats for your character, but Critical Strike and Mastery are generally the best choices, using an Algari Missive of the Peerless.
Best Crafting Order
For your first craft, you have two options depending on whether you want to use your Spark of Fortunes immediately:
- Craft an off-piece and apply Dawnthread Lining. We recommend a low-impact slot that does not conflict with your Tier set, such as Rune-Branded Armbands.
- If you have two sparks, craft a weapon like Charged Halberd with Darkmoon Sigil: Ascension. This should be paired with Writhing Armor Banding on your next off-piece.
After your first craft:
- Craft another off-piece and apply Dawnthread Lining. We recommend a low-impact slot such as Rune-Branded Grasps, as gloves are weaker this season, so long as it does not interfere with your Tier set.
- Craft another off-piece and apply Dawnthread Lining or Writhing Armor Banding, depending on your preference.
After completing priority crafts and Embellishments, use simulations to determine the best item to upgrade for item level. Rings and necks are generally good options since they are highly contested among other classes.
The best weapon is Best-in-Slots, but you should consider how likely you are to obtain one soon. Having a high item-level weapon is a significant advantage, so weigh your options carefully. All equippable two-handed Agility weapons have equal value, including Charged Halberd, Charged Crusher, and Vagabond's Careful Crutch.
The War Within Season 2 Tier Set for Feral Druid
The second Tier Set of The War Within, Roots of Reclaiming Blight, consists of 5 items that grant unique bonuses when equipping 2 or 4 pieces:
- Druid Feral 11.1 Class Set 2pc: Your spells and abilities have a chance to activate Winning Streak!, increasing the damage of Ferocious Bite, Rip, and Primal Wrath by 3%, stacking up to 10 times. Finishing moves have a 15% chance to remove all stacks, but any free Ferocious Bite procs are exempt.
- Druid Feral 11.1 Class Set 4pc: When you consume Apex Predator's Craving, you become a Big Winner, dealing heavy Physical damage to your target and increasing the damage of your periodic effects by 16% for 6 seconds.
The Feral set bonus is of average strength compared to Season 1, with a slight leaning toward Wildstalker. The majority of the power comes from the 2-piece bonus, making it worthwhile to switch to a 2-pc/2-pc combination once you acquire new pieces.
You should aim to complete the full set as early as possible. The Matrix Catalyst allows you to convert regular items from Mythic+ or Raid into Tier items.
Since you only need 4 pieces to maximize the set bonus, we recommend dropping the Gloves or Helm in favor of alternatives with more Critical Strike or Mastery where possible. Refer to the BiS List for more details.
Addons for Feral Druid
Generic Addons for Druids
- ElvUI
- Weak Auras
- Boss Mods
- Deadly Boss Mods
- BigWigs
- Details!
- Hekili
Macros for Feral Druid
Generic Macros for Druids
Rebirth
- #showtooltip Rebirth
- /cast [@mouseover,help]Rebirth;Rebirth
This macro casts Rebirth on your mouseover target if they are a friendly player. Otherwise, it casts Rebirth on your current target.
Remove Corruption
- #showtooltip Remove Corruption
- /cast [target=mouseover,help,nodead][target=target] Remove Corruption
Using this macro will cast Remove Corruption on your mouseover target, if they are a friendly player and they are not dead. Otherwise, it will cast Remove Corruption.
Specific Macros for Feral Druids
Regrowth Macro
This macro allows you to cast Regrowth, prioritizing your mouseover, and if you have no ally, then it will default to casting on yourself. The Autounshift command is placed to avoid casting Regrowth unless Predatory Swiftness is active to avoid leaving Cat Form.
- #showtooltip Regrowth
- /run SetCVar("autoUnshift",0)
- /cast [@mouseover,@player] Regrowth
- /run SetCVar("autoUnshift",1)
Unfortunately, this macro has been made non-functional due to some recent changes. If this changes and a new macro becomes available, this section will be updated.
Skull Bash Focus Interrupt
This will target your interrupt on your focus, so you do not need to switch targets for a key cast. Note you need to set up your focus beforehand with a /focus macro for this to work.
- #showtooltip
- /stopcasting
- /cast [@focus,exists][@target] Skull Bash
Mouseover Adaptive Swarm
For situations where you need to reapply Adaptive Swarm to maintain stacks with Unbridled Swarm, this can be useful. This can also be used to apply Moonfire with Lunar Inspiration more conveniently. Note that this will only apply to enemies; if you want to refresh on allies, remove the harm added to each bracket.
- #showtooltip
- /cast [@mouseover,harm,nodead], [@target,harm,nodead] Adaptive Swarm
Innervate Macros
Casting Innervate quickly when a healer needs it so you can get back into Cat Form has two options. You can either opt to focus your assigned healer and cast on them with this macro:
- #showtooltip
- /cast [@focus,nodead], [@target,nodead] Innervate
Or use a mouseover macro and highlight them from your raid frames:
- #showtooltip
- /cast [@mouseover,nodead], [@target,nodead] Innervate
Otherwise both of these macros will default to casting on your current target when used.
Mass Entanglement / Ursol's Vortex
This macro will allow you to use the same keybind for the crowd-control choice node on the class tree. This can be done for other choice nodes as well, such as Mighty Bash / Incapacitating Roar if you replace the spell names:
- #showtooltip
- /cast [known:Ursol's Vortex] Ursol's Vortex; [known:Mass Entanglement] Mass Entanglement
Ursol's Vortex into Typhoon
This macro can be used as a cast sequence on the same keybind to cast Ursol's Vortex into Typhoon to pseudo-grip enemies in 2 key presses. The @cursor is to instantly place the Vortex at your cursor, and can be removed if you want to manually press it, or replace with @player if you want to place it underneath yourself:
- #showtooltip
- /castsequence [@cursor] reset=20 Ursol's Vortex, Typhoon
This macro will stop your current cast and cast Skull Bash on your focus if available; otherwise, it will be cast on your target.
WeakAuras for Feral Druid
WeakAuras is an essential tool for Feral Druid and DPS players, offering unparalleled customization to enhance your gameplay. Rather than focusing on specific examples, we recommend exploring Wago.io, where you’ll find an extensive library of WeakAuras to suit your needs.
If you are unfamiliar with WeakAuras, it is an incredibly powerful and widely-used AddOn that allows you to create custom displays for nearly everything in the game. This includes tracking buffs, debuffs, cooldowns, Focus, resources, and much more.
To import a WeakAura, visit Wago.io and select one that fits your preferences. Click the "Copy WeakAura Import String" button to copy it to your clipboard. Next, log into the game and type /wa in the chat box to open the WeakAuras interface. Navigate to the "Import" section, press Ctrl+V to paste the copied string, and click "Import". You’re ready to go!
Mastering WeakAuras and customizing it to your playstyle is highly recommended for any serious raider. With countless options available on Wago.io, you can tailor your interface to optimize your performance and focus on what truly matters in combat.
Feral Druid Frequently Asked Questions
What Uptime Should I Have on My Bleeds?
Your goal should be to maintain close to 100% uptime on Rip, Rake, and Thrash in all situations. If you're using Lunar Inspiration, this also applies to Moonfire, even though it's not a traditional Bleed ability.
What Finisher Do I Cast in AoE?
In The War Within, Primal Wrath is your go-to finisher for maintaining Rip on multiple targets. Any additional resources should then be spent on Ferocious Bite. For cleaving situations, consider using Rampant Ferocity to convert your single-target damage into AoE. Ensure you're refreshing Primal Wrath based on the Rip timer rather than prematurely.
What Hero Talent Should I Play?
Both the Druid of the Claw and Wildstalker trees offer excellent damage boosts without requiring significant changes to execution. For raids, Wildstalker is generally recommended, while Druid of the Claw performs better in Mythic+.
When Should I Refresh My Bleeds and DoTs?
Take advantage of the Pandemic mechanic to refresh your abilities with up to 30% of their duration remaining, allowing the remaining time to be added to the new cast. Here are the refresh times:
- Rake: 4.5 seconds (3.4 seconds with Circle of Life and Death)
- Rip: 7.2 seconds (5.4 seconds with Circle of Life and Death)
- Thrash: 4.5 seconds (3.4 seconds with Circle of Life and Death)
- Moonfire: 4.8 seconds (3.6 seconds with Circle of Life and Death)
Should I Pool Resources?
Yes, pooling Energy is vital for optimal performance. Typically, you'll want to pool Energy at high Combo Points, spend when necessary to refresh effects, and then repeat the process. With talents like Bloodtalons, you'll adopt a "pool-dump-pool" cycle to maximize your output. Be cautious, as overly aggressive spending can cause missed opportunities for key overlaps, especially in The War Within.
What is Snapshotting?
Snapshotting involves applying Rake and Rip with active buffs like Tiger's Fury and Bloodtalons to enhance their damage for their entire duration. However, this mechanic does not work with trinkets or active effects like Sabertooth. Prioritize using Tiger's Fury for Rake and both Tiger's Fury and Bloodtalons for Rip whenever possible. Avoid overwriting these buffs without reapplying the abilities.
How Do I Play with Saber Jaws?
The Saber Jaws talent amplifies Ferocious Bite damage based on additional Energy consumption. To optimize this, avoid using Ferocious Bite recklessly and ensure you're pooling enough Energy before consuming Combo Points. This talent emphasizes the importance of effective resource management.
Convoke or Incarnation?
Convoke the Spirits is the preferred choice for most situations due to its high burst damage during a short channel, which can synergize well with Berserk. It also benefits from a reduced cooldown, making it a more consistent tool. While Incarnation: Avatar of Ashamane boosts sustained damage during Berserk, it requires uninterrupted uptime and offers less burst potential, making it less flexible.
How Much Haste, or Other Secondary Stats, Should I Have?
There are no fixed breakpoints for secondary stats in Feral gameplay. The importance lies in the total volume of stats rather than specific amounts of Haste, Mastery, or Critical Strike. Always simulate your gear to determine the ideal stat distribution for your character.
Do I Always Spend at 5 Combo Points?
Yes, always spend at 5 Combo Points. Although Primal Fury allows some overflow, sticking to 5 ensures the best resource efficiency. With Coiled to Spring, you gain added protection against overflow, making it easier to manage.
What Piece of Gear is Better?
Gear upgrades depend on your current setup and the synergy between items. Simulations provide the most accurate answer for what gear is best for your character. Factors like set bonuses, trinkets, and fight-specific needs may also influence your choice.
Which Race is Best for Feral Druid?
Race options for Druids are limited, but optimal choices vary by faction. Simulations can provide a more detailed analysis of which race suits your playstyle and build.