Augmentation Evoker DPS Guide - Midnight (12.0.1)
Select your Specialization
In this article, we’ll explore the unique features of the Augmentation Evoker in WoW The War Within and highlight how it differs from the Devastation and Preservation specializations. To start, let’s examine the distinctive aspects of Augmentation that smoothly integrate familiar elements from the other Evoker specs.

Table of Contents
Augmentation Evoker Overview
Augmentation Evokers is a support-oriented ranged DPS spec that was added to the game in the Dragonflight Expansion. Augmentation Evoker is the only Support Specialization in the game currently. A large portion of Augmentation Evokers damage comes from its allies so it loses minimal damage from doing mechanics or using its large plethora of utility. This makes Augmentation Evoker an excellent choice for both Raiding and Mythic+.
Augmentation Evoker is the first support-oriented specialization in World of Warcraft and acts as a mid-range caster DPS and has a range of 25 yards for most of their abilities although this can be extended to 30 yards on your helpful spells (buffs, heals) with Arcane Reach.
Augmentation Evoker Strengths and Weaknesses
Strengths
- Can save team members with Rescue.
- Unique supportive playstyle being the only primarily buff oriented specialisation.
- Flexible damage output because most of your damage comes from buffing others.
- Very mobile.
- Can remove a wide array of effects on players with Expunge to remove Poisons and Cauterizing Flame to remove Bleeds, Poisons, Curses, and Diseases.
- Very tanky with multiple defensives like Obsidian Scales, Renewing Blaze, Twin Guardian, Zephyr, and a cheat death Defy Fate.
- Unique Group utility like Spatial Paradox, Draconic Attunements, and Bestow Weyrnstone.
Weaknesses
- Damage output is based on other players.
- High end raid gameplay requires usage of external tools to optimise.
- 25 yard range takes some getting used to.
- Low damage without any allies.
- Tracking personal performance is extremely challenging.
Augmentation Evoker Basic Gameplay
The Augmentation Evoker playstyle is all about buffing your allies and has many interactions that help with this. Some examples are listed below:
- Ebon Might prefers to go on targets with Prescience, letting you control who you buff.
- Casting Empowered Spells during Ebon Might will extend its duration.
- The cooldown of your Upheaval can be reduced when you cast Eruption with Accretion.
- Casting Fire Breath with Leaping Flames talented will make your next Living Flame hit additional targets (based on the Empower level).
- Healing other players with Scarlet Adaptation will increase the damage of your next Living Flame.
- Casting Emerald Blossom or Verdant Embrace with Ancient Flame will reduce the cast time of your next Living Flame.
As a Augmentation Evoker, most of your rotational depth comes from choosing correct targets for Prescience and using the various interactions listed above to extend Ebon Might as long as possible.
Once at maximum level, we recommend checking out our Easy Mode guide, linked below. This guide will briefly go over what you need to do to play your character optimally, though, of course, the main Rotation and Talents pages are slightly more optimized.
Augmentation Evoker Changes in Patch 11.2
Augmentation Evoker received a 5% aura buff in Patch 11.2, which does not alter builds or talent choices. Additionally, Scalecommander's Bombardments was fixed to properly scale with Critical Strike and most damage modifiers, though it still does not interact with Molten Embers.
As this is still the early stage of the patch, class tuning is highly fluid and subject to rapid changes. Augmentation Evoker in particular is very sensitive to tuning adjustments, even those directed at other classes. It is recommended to check back after raid release for updated information.
Patch 11.2 also introduces Hero Talent–specific Tier Sets. The Chronowarden set comes with reduced value in Critical Strike and Versatility compared to the previous season, but higher item levels increase Mastery scaling, making Motes of Possibility the default choice across all content. Scalecommander players can also opt into Motes of Possibility with Mastery investment or choose a personal-damage-oriented alternative. More details are available in the updated Gear and Hero Talents sections.
Augmentation Evoker Levelling Guide for The War Within
Augmentation Evoker is a support-oriented specialization and has significantly lower personal damage output compared to Devastation Evoker. If you level primarily through dungeons, this will not be an issue, but for a smoother open-world leveling experience, questing as Devastation is recommended.
Gear Options
During leveling, prioritizing item level is generally the best approach. Select the highest item level gear available. For jewelry (Necklaces and Rings), it may be worth sacrificing a small amount of item level to avoid Versatility, as it is not a strong stat for Augmentation Evoker.
Augmentation Evoker PvP Talents for Leveling
Augmentation Evoker PvP talents do not provide a significant advantage overall but can slightly improve your leveling process by making combat easier.
- Born in Flame is recommended as it grants two instant cast Living Flames every time you cast Ebon Might, improving mobility while leveling.
- Divide and Conquer deals damage to enemies, helping clear packs of mobs faster while also breaking line of sight. If this talent feels inconvenient, consider using Unburdened Flight instead.
- Obsidian Mettle allows you to safely cast spells without interruption from knockbacks. It can also be useful for gathering Windswept Herbalism nodes.
- Unburdened Flight helps when escaping from enemy packs by preventing slows from Daze.
Augmentation Evoker DPS Spec, Builds, and Talents

Copy the Augmentation Evoker talents, paste them into the game.
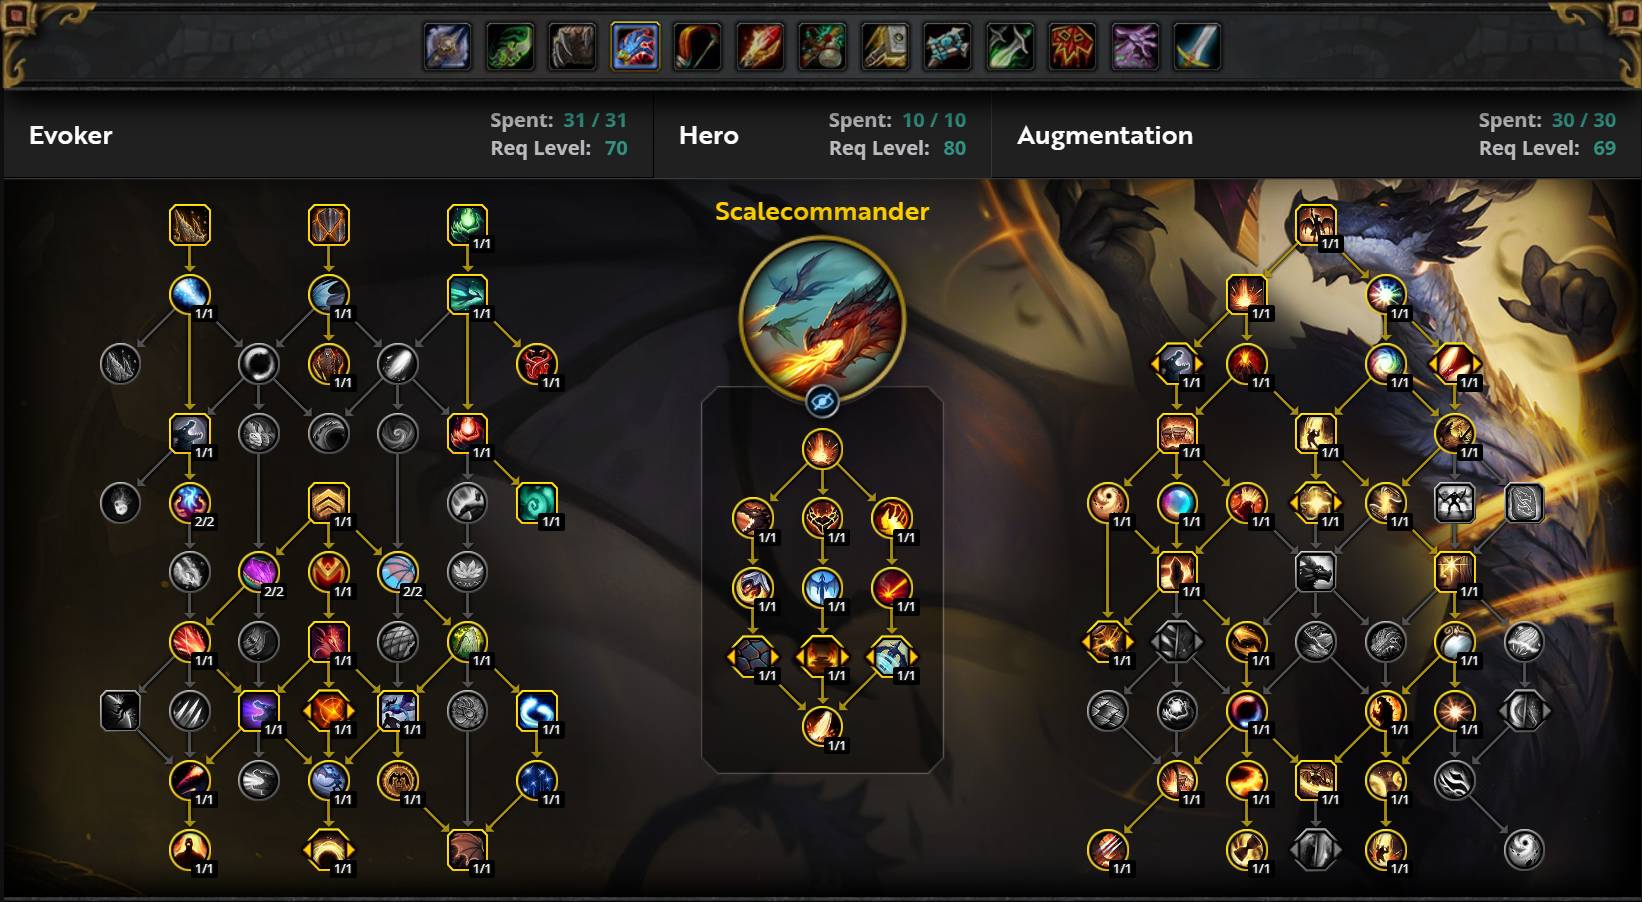
Scalecommander Single-Target Build
Scalecommander Mythic+/Delve Build
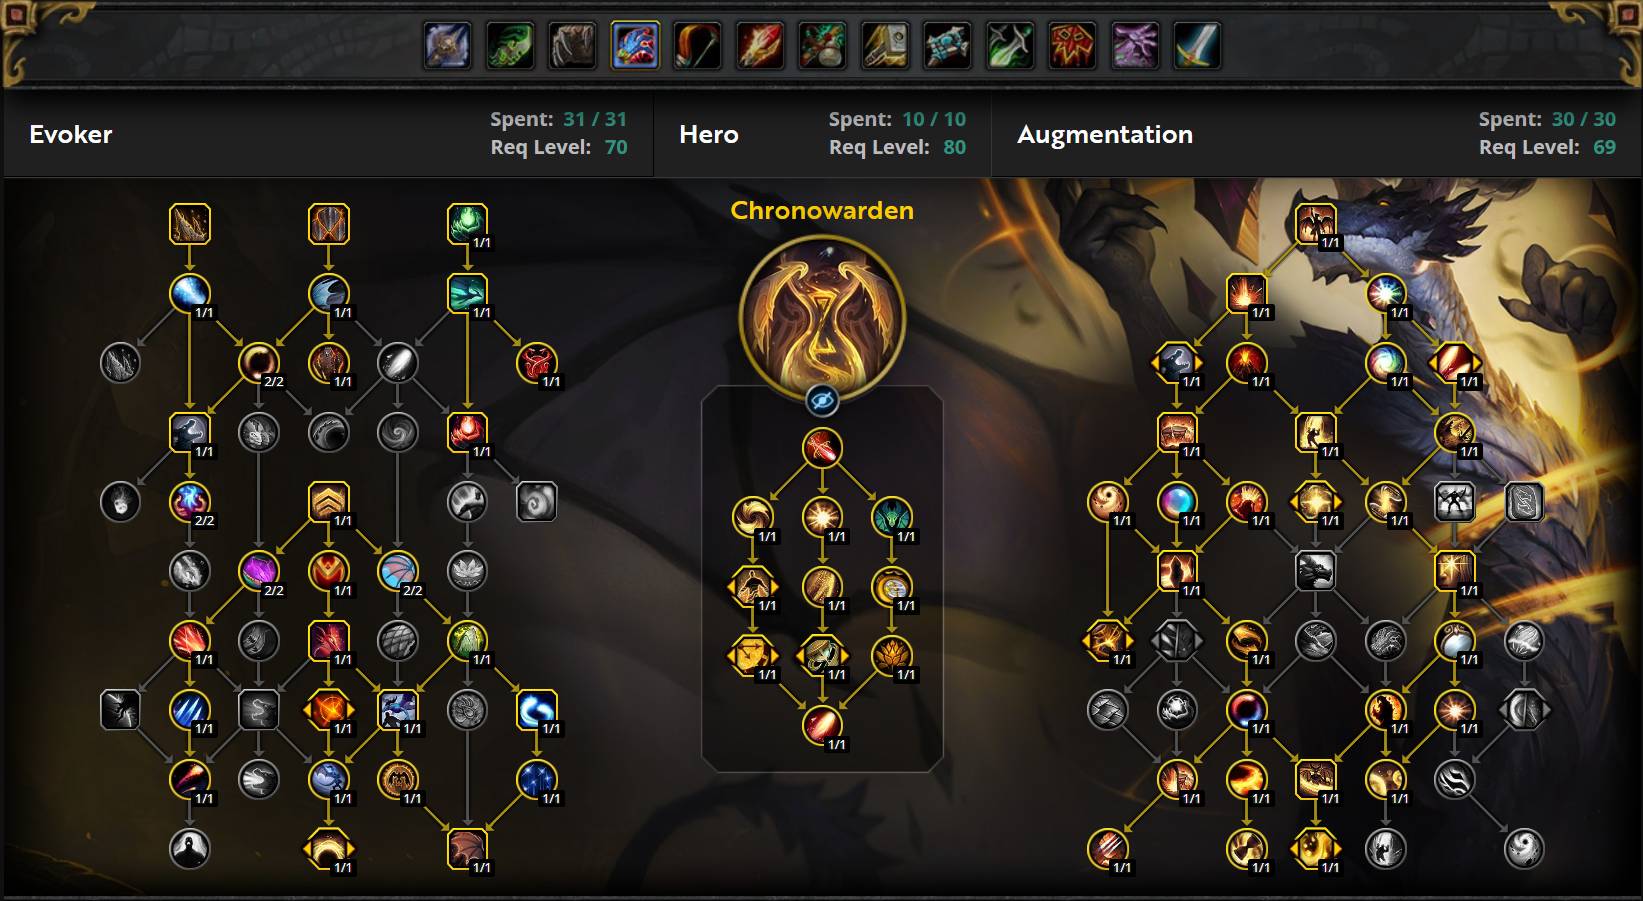
Chronowarden Universal Build
PvP Talents (War Mode)
Enabling War Mode makes you eligible for open-world PvP but also provides several benefits:
- World Quests at maximum level grant 10% increased rewards (30% for Alliance).
- Experience gained while leveling is increased by 10% (30% for Alliance).
- Earn Conquest Points towards weekly gear rewards.
- Gain access to PvP talents in the open world.
With these advantages, enabling War Mode is recommended for leveling and PvE content to maximize efficiency. However, it also makes you vulnerable to open-world PvP, including the risk of being attacked while leveling or completing World Quests.
Best Hero Talents for Augmentation Evoker in The War Within
Scalecommander Hero Talents
Scalecommander is the preferred Hero Talent for those who want a simpler playstyle or are in groups with fewer than four DPS to buff. It requires less cooldown syncing and tracking compared to Chronowarden.
In raid content, both talents perform similarly, but Scalecommander is about 3% ahead in situations where you do not have four DPS to buff. It also performs better when playing with weaker allies, as it is less dependent on their overall damage. This makes it the best general recommendation for most players across all content.
Additionally, Scalecommander provides significantly more personal damage than Chronowarden. However, much of this damage comes from Bombardments, which means it does not fully benefit when playing solo due to internal cooldown limitations.
Breath of Eons Usage
Scalecommander should use Breath of Eons almost on cooldown to maximize the effects of Melt Armor, Imminent Destruction, and Plot the Future. The personal damage increase from these talents generally outweighs strict cooldown alignment, though some syncing is still beneficial.
- On single-target fights, Breath of Eons will have around an 80-second cooldown.
- On AoE fights, the cooldown can be reduced to as low as 60 seconds due to Wingleader providing more cooldown reduction with additional targets.
Chronowarden Hero Talents
Chronowarden is an alternative Hero Talent for Raiding and Mythic+. This tree has a larger focus on planning and strategic play with its buffs. You play your Breath of Eons as a 2-minute cooldown alongside Tip the Scales as a Chronowarden.
A large part of Chronowarden is Double-time, which increases the strength of Ebon Might. This makes it slightly weaker in Mythic+ where you do not have four DPS.
Chronowarden buffs abilities you are already using, such as Upheaval and Living Flame, and provides a lot of Haste passively via Primacy and Temporal Burst, making your rotation feel more fluid.
You also get a powerful movement upgrade with Warp and a defensive boon attached from Temporality.
Augmentation Evoker DPS Stat Priority
Chronowarden Stat Priority
- Intellect
- Mastery (Motes of Possibility builds)
- Critical Strike
- Haste
- Mastery
- Versatility
Chronowarden's node Double-time brings Critical Strike Chance up in power.
It is worth stressing that all non-Versatility stats are very close in value, and this is merely a rough guideline. We first target a reasonable level of Haste to ensure comfort as well as to maximize the effects of our other talents and boost the power of our Mastery via Motes of Possibility, then stack as much Mastery as possible. The small amount of Critical Strike Chance we get from gearing is still valuable because of Double-time.
Scalecommander Stat Priority
- Intellect
- Critical Strike
- Haste
- Mastery (Motes of Possibility builds)
- Mastery = Versatility
All non-Versatility stats are very close in value, making this a general guideline rather than a strict priority. The goal is to maintain a comfortable level of Haste to optimize rotation flow and enhance other talents. This also increases the effectiveness of Mastery through Motes of Possibility. After reaching the desired Haste threshold, stacking Mastery becomes the main focus.
Augmentation Evoker DPS Rotation, Cooldowns, and Abilities
Rotation for Augmentation Evokers
The rotation for Evoker operates in 30-second cycles centered around empowered spells (Fire Breath and Upheaval) and Ebon Might. Between these cycles, you should pool your Essence to prepare for the next Ebon Might cast and minimize downtime.
Every two minutes, you can use Breath of Eons. Ensure that Ebon Might is active during this period to maximize its duration.
General Rotational Goals for Augmentation Evoker
- Use Breath of Eons when your allies have cooldowns active.
- Cast all charges of Prescience before Ebon Might, or use a single charge if you are about to overcap.
- Maintain Ebon Might for as long as possible.
- Use empowered spells to provide Versatility to allies via Shifting Sands and to extend Ebon Might.
Single Target Rotation for Augmentation Evoker
- Use Prescience on the next targets you want to receive Ebon Might. Use all charges if you will recast Ebon Might within the next 3 globals.
- Use Ebon Might if its remaining duration is less than 5.5 seconds to maximize uptime.
- Use your DPS potion if Breath of Eons is active or if the fight will end in 30 seconds.
- Cast damage trinkets on cooldown. If you have an on-use stat trinket, only use damage trinkets if your next Breath of Eons is more than 30 seconds away.
- Cast Fire Breath at maximum rank if Ebon Might is up.
- Cast active Mastery buff trinkets before Breath of Eons.
- Cast Breath of Eons.
- Cast active non-Mastery buff trinkets after Breath of Eons while Temporal Wound is active on the enemy.
- Cast Upheaval if Ebon Might is up and Essence Burst is not at maximum stacks.
- Cast Eruption if Ebon Might is up, if you are at maximum Essence, or if you have maximum Essence Bursts. With Imminent Destruction, pool Essence before each Breath of Eons window but continue spending with Essence Bursts or if you are at maximum Essence.
- Cast Blistering Scales on the current active tank if they do not have any stacks left.
- Cast Living Flame.
- If you need to move while casting, use Hover. If you have no charges left, use Azure Strike.
Example Opener Sequence
Precombat
- Start with >3s pull timer
- Cast Blistering Scales
- Cast Tip the Scales
- Precast Living Flame
Post Combat Start
- Cast Prescience.
- Cast Prescience.
- Cast Ebon Might.
- Use DPS potion.
- Cast damage trinkets on cooldown. If you have an on-use stat trinket that is not Spymaster's Web, prioritize the buff trinket instead.
- Cast Fire Breath at maximum rank.
- Cast active Mastery buff trinkets before Breath of Eons.
- Cast Breath of Eons.
- Cast active non-Mastery buff trinkets.
- Cast Eruption until you have 1 or fewer Essence Burst.
- Cast Upheaval.
- Cast Eruption.
- Cast Eruption.
- Cast Eruption.
- Cast Eruption.
- Cast Eruption.
- Continue with normal rotation priority.
Two-Target and Above Rotation for Augmentation Evoker
- Use Prescience on the next targets, you would like to receive Ebon Might if you will cap on Prescience charges within the next 3 globals and use all charges if you will recast Ebon Might within the next 3 globals.
- Use Ebon Might if Ebon Might's remaining duration is less than 5.5s. This is slightly longer than the pandemic duration, but this leads to more overall uptime by having more Ebon Might casts.
- Use your DPS potion if Breath of Eons is up or the fight will end in 30 seconds.
- Cast damage trinkets on cooldown. If you have an on-use stat trinket then only use damage trinkets if your next Breath of Eons is more than 30 seconds away.
- Cast Fire Breath at maximum rank if Ebon Might is up.
- Cast active buff trinkets for Mastery before Breath of Eons.
- Cast Breath of Eons.
- Cast active non-Mastery buff trinkets after Breath of Eons while Temporal Wound is up on the enemy.
- Cast Time Skip if Fire Breath and Upheaval are on cooldown.
- Cast Upheaval if Ebon Might is up and Essence Burst is less than maximum stacks.
- Cast Eruption if Ebon Might is up, if you are at maximum essence, or if you have maximum Essence Burst. With Imminent Destruction, pool essence shortly before each Breath of Eons window. You should continue spending with Essence Burst or if you have maximum essence.
- Cast Blistering Scales on the current active tank if they do not have any stacks of Blistering Scales left.
- Cast Living Flame.
- If you need to move while casting, use Hover. If you have no charges of Hover left, then use Azure Strike.
Cooldown Usage for Augmentation Evokers
Augmentation Evoker does not have many spells to use, but correct utilization is vital as most of the class's power comes from using its short cooldown spells.
- You should not cast Fire Breath or Upheaval without Ebon Might being up as this would waste the extension from Sands of Time, which is most of the value.
- You should not overcap charges of Prescience unless unavoidable due to lacking targets in range.
- Make sure to hit every enemy with Breath of Eons as this applies the damage amplification effect to every target.
- You should aim to use Deep Breath or Breath of Eons at the shortest distance, as the longer the line, the more time you are locked out from using other spells. It is inevitable if you need to move further, but you will lose some potential damage.
- Ideally, Hover should be used before movement is required, not in response, to avoid missing globals. Hover can be used while on the GCD from an instant cast spell like Azure Strike or Prescience to not incur any DPS loss.
Augmentation Evoker DPS Gems and Consumables
Best Gems for Augmentation Evokers
You should use Culminating Blasphemite or Elusive Blasphemite in one socket. The increase in damage from Culminating Blasphemite's crit effect is really minor (less than 0.1%), so you may prefer the movement speed from Elusive Blasphemite instead.
You should use at least one of each Deadly Onyx, Masterful Emerald, and Masterful Ruby. Fill remaining slots with Masterful Ruby. It is not worth using a Sapphire gem (Versatility) or an Amber gem (Stamina) on Augmentation Evoker to improve your Blasphemite.
As a Scalecommander, it is better to fill your remaining slots with Masterful Emerald or Deadly Emerald instead of Masterful Ruby.
Best Flask for Augmentation Evoker in The War Within
You should be using Flask of Tempered Mastery at all times.
Best Temporary Weapon Enchantments for Evoker Evoker in The War Within
You should be using Algari Mana Oil.
Best Potion for Augmentation Evoker in The War Within
Your stat potion should be Tempered Potion. Use these when you will do the most damage with your abilities, likely during your cooldowns and/or Bloodlust/Heroism. You can also obtain Fleeting Tempered Potion from Cauldrons that can be spawned by Alchemists.
You should keep a stock of Invigorating Healing Potions to use when at low health, and if you have a Warlock in the group, grab their Healthstones and use them as well. Do not macro these together; they are best used separately! You can also obtain Fleeting Invigorating Healing Potion from Cauldrons that can be spawned by Alchemists.
Best Food for Augmentation Evoker in The War Within
You should be eating from a Feast at all times, either Feast of the Divine Day, Feast of the Midnight Masquerade, or Hearty Feast of the Midnight Masquerade.
If Feasts are not available, eat Outsider's Provisions, Beledar's Bounty, Jester's Board, or Empress' Farewell instead.
In addition, if you can afford it, you should use Crystallized Augment Runes to increase your primary stat. Augment Runes are expensive and disappear on death, so use them wisely!
Best Enchants for Augmentation Evokers
| Slot | Enchantment |
| Necklace | Magnificent Jeweler's Setting (adds up to 2 sockets to a Ring or Neck) |
| Weapon |
Enchant Weapon - Authority of the Depths (Highest ST) Enchant Weapon - Authority of Radiant Power (~1k DPS behind, better AOE) |
| Chest | Enchant Chest - Crystalline Radiance |
| Bracers | Enchant Bracer - Chant of Armored Avoidance |
| Legs | Sunset Spellthread |
| Boots |
Enchant Boots - Defender's March (Stamina) Enchant Boots - Scout's March (Movement Speed) |
| Rings | Enchant Ring - Radiant Mastery |
| Cloak | Enchant Cloak - Chant of Winged Grace |
Augmentation Evoker DPS Gear and Best in Slot
This section will cover everything you need to know about equipping your character correctly.
BiS Gear for Augmentation Evoker
| Slot | Item | Source |
| Helm | Spellweaver's Immaculate Focus (TIER SET) | Forgeweaver Araz/Matrix Catalyst/Great Vault |
| Neck | Duskblaze's Desperation | The Soul Hunters in Manaforge Omega |
| Shoulder | Spellweaver's Immaculate Pauldrons (TIER SET) | The Soul Hunters/Matrix Catalyst/Great Vault |
| Cloak | Reshii Wraps with Crit | Season 3 Campaign Quests |
| Chest | Spellweaver's Immaculate Crestward | Fractillus/Matrix Catalyst/Great Vault |
| Bracers | Glyph-Etched Vambraces with Dawnthread Lining | Crafted — Leatherworking |
| Gloves | Spellweaver's Immaculate Scaleguards (TIER SET) | Soulbinder Naazindhri/Matrix Catalyst/Great Vault |
| Belt | Glyph-Etched Binding with Dawnthread Lining | Crafted — Leatherworking |
| Legs | Spellweaver's Immaculate Runeslacks (TIER SET) | Loom’ithar/Matrix Catalyst/Great Vault |
| Boots | Interloper's Chain Boots | The Soul Hunters in Manaforge Omega |
| Ring #1 | Band of the Shattered Soul | Dimensius The All Devouring in Manaforge Omega |
| Ring #2 | Ring of the Panoply | Tazavesh: Streets of Wonder |
| Trinket #1 | Astral Antenna | Loom’ithar in Manaforge Omega |
| Trinket #2 | Screams of a Forgotten Sky | Dimensius The All Devouring in Manaforge Omega |
| Weapon | Voidglass Sovereign's Blade | Nexus King Salhadaar in Manaforge Omega |
| Off-Hand | Iris of the Dark Beyond | Forgeweaver Araz in Manaforge Omega |
Best Trinkets for Augmentation Evoker in The War Within Season 3
Raiding Trinket Tier List for Augmentation Evoker
This Trinket Tier List is single-target biased, as this tends to be the most important aspect of Raiding. When Trinkets are equal on single-target, I will "break the tie" by looking into which Trinket performs better in AoE/mixed scenarios.
All trinkets are assumed to be 723 unless a lower item level is specified for the sake of comparison. The idea is to compare trinkets at their maximum obtainable item level to give you an idea of where things are placed. We do not suggest using two on use trinkets even if the trinkets are ranked higher than passive trinkets on this list. For more accurate information on how trinkets perform relative to each other for your own character, please sim your character.
A "Tier" as defined by this list is around 0.5% DPS, meaning that S-Tier Trinkets are around 0.5% better than A-Tier Trinkets, and so on.
NOTE: To keep things brief, not every Trinket is listed below, only ones that are particularly relevant or popular. If a trinket is excluded from this list, it is likely well below C-Tier.
S-Tier
A-Tier
- Naazindhri's Mystic Lash
- Araz's Ritual Forge
- Signet of the Priory
- Diamantine Voidcore (With Set)
- Mereldar's Toll
B-Tier
- So'leah's Secret Technique
- Gigazap's Zap-Cap
- Miniscule Mailemental in an Envelope
- Empowering Crystal of Anub'ikkaj
- Sunblood Amethyst
- Ara-Kara Sacbrood
- Diamantine Voidcore (Without Set)
C-Tier
- Harvester's Edict
- Incorporeal Essence-Gorger
- Void-Touched Fragment (Hero)
- Perfidious Projector
- Soulbreaker's Sigil
- Automatic Footbomb Dispenser (Hero)
- Essence-Hunter's Eyeglass (Hero)
Mythic+ Trinket Tier List for Augmentation Evoker
Inside Mythic+ dungeons, you typically want to use trinkets that are good for maximizing overall dungeon damage. This is not always just slamming full AoE trinkets, as Bosses will still take up a significant portion of the key.
All trinkets are assumed to be 723 unless a lower item level is specified for the sake of comparison. The idea is to compare trinkets at their maximum obtainable item level to give you an idea of where things are placed. We do not suggest using two on use trinkets even if the trinkets are ranked higher than passive trinkets on this list. For more accurate information on how trinkets perform relative to each other for your own character, please sim your character.
A "Tier" as defined by this list is around 0.5% DPS, meaning that S-Tier Trinkets are around 0.5% better than A-Tier Trinkets, and so on.
NOTE: To keep things brief, not every Trinket is listed below, only ones that are particularly relevant or popular. If a trinket is excluded from this list, it is likely well below C-Tier.
S-Tier
- Astral Antenna
- Azhiccaran Parapodia
- Lily of the Eternal Weave
- Screams of a Forgotten Sky
- Araz's Ritual Forge
A-Tier
- So'leah's Secret Technique
- Signet of the Priory
- Naazindhri's Mystic Lash
- Mereldar's Toll
- Diamantine Voidcore (With Set)
- Empowering Crystal of Anub'ikkaj
- Ara-Kara Sacbrood
B-Tier
- Gigazap's Zap-Cap
- Diamantine Voidcore (Without Set)
- Automatic Footbomb Dispenser (Hero)
C-Tier
The War Within Season 3 Tier Set for Augmentation Evoker
The Season 3 Chronowarden Tier Set Bonuses are:
The Season 3 Scalecommander Tier Set Bonuses are:
Addons for Augmentation Evoker
General Addons for Evoker
- ElvUI
- Boss Mods
- Deadly Boss Mods
- BigWigs
- GTFO
- Weak Auras
- Details!
- Method Raid Tools
Specific Addons for Augmentation Evokers
- Cell
WeakAuras for Augmentation Evoker
WeakAuras is an essential tool for Augmentation Evoker and players, offering unparalleled customization to enhance your gameplay. Rather than focusing on specific examples, we recommend exploring Wago.io, where you’ll find an extensive library of WeakAuras to suit your needs.
If you are unfamiliar with WeakAuras, it is an incredibly powerful and widely-used AddOn that allows you to create custom displays for nearly everything in the game. This includes tracking buffs, debuffs, cooldowns, Focus, resources, and much more.
To import a WeakAura, visit Wago.io and select one that fits your preferences. Click the "Copy WeakAura Import String" button to copy it to your clipboard. Next, log into the game and type /wa in the chat box to open the WeakAuras interface. Navigate to the "Import" section, press Ctrl+V to paste the copied string, and click "Import". You’re ready to go!
Mastering WeakAuras and customizing it to your playstyle is highly recommended for any serious raider. With countless options available on Wago.io, you can tailor your interface to optimize your performance and focus on what truly matters in combat.
Augmentation Evoker Frequently Asked Questions
Is Augmentation Evoker a good Power Infusion target?
No, Power Infusion is better utilized on one of the DPS players you are buffing. This ensures a greater overall damage contribution to the group.
How often does Essence regenerate?
Essence regenerates at a rate of 1 Essence every 5 seconds. This regeneration rate can be increased by specific talents and your Haste stat.
What is Hover Weaving?
Hover is not affected by the global cooldown (GCD), allowing you to cast a spell during the GCD of another ability. For example, while moving for a mechanic, you can cast Azure Strike and then activate Hover during the GCD. This enables you to continue casting impactful spells on the move, as the animation lockout of Hover is shorter than the GCD.
When should I play Scalecommander over Chronowarden?
We recommend playing Scalecommander in most situations. However, Chronowarden may perform better if your raid group has exceptional players (>95% parses on Warcraft Logs) or lacks many classes with 90-second cooldowns. The difference is minor, so feel free to choose the option you enjoy more.
Does Augmentation work with Details/Warcraft Logs?
Augmentation does not work accurately with Details, as Blizzard's design intentionally separates the in-game experience from out-of-game tools. While Details offers an estimation mode, it is often unreliable.
On the other hand, Augmentation works with Warcraft Logs, as Blizzard has implemented combat hooks to reattribute damage gained from support effects back to the Evoker. However, the system isn't perfect and may have inaccuracies. If you notice errors, report them to Blizzard.
When should I use Breath of Eons?
- As a Scalecommander: Use Breath of Eons as close to cooldown as possible, though aligning it with your allies' DPS cooldowns is optimal. On single-target fights, this generally aligns with a 90-second cooldown.
- As a Chronowarden: Treat Breath of Eons as a 2-minute cooldown to align with most DPS cooldowns. Avoid relying on its slight cooldown reduction for maximum effectiveness.
How should I move and DPS?
Evoker has several tools to maintain damage while moving:
- Hover is your most effective option, allowing you to cast spells on the move after its short animation.
- Use Hover Weaving (described above) for optimized movement while DPSing.
- If needed, you can fall back on Azure Strike as a quick-cast option.
How much Mastery should I have?
Prioritize Mastery after achieving enough Haste to make your rotation feel smooth. If playing as a Chronowarden with Double-time, Critical Strike Chance is roughly equivalent to Mastery.


Digital Aura Portal - FZCO
Building A1, Dubai Digital Park, Dubai Silicon Oasis, Dubai, United Arab Emirates Premises Number 72647 - 001
Business registration number: 70647