Mistweaver Monk Healing Guide - Midnight (12.0.1)
Select your Specialization
Welcome to The War Within Mistweaver Monk Guide. This is the right place to get acquainted with class mechanics and its overall changes. Hope you will find helpful and relevant answers to any questions you have. Make yourself comfortable, we are starting now!

Table of Contents
Mistweaver Monk Overview
The Mistweaver specialization is versatile, and different talent choices can allow it to fit the requirements of a raid very well. Mistweavers can, therefore, heal both tanks and the raid very well.
Based on talent choices, Mistweavers can be either unparalleled tank healers with strong area of effect throughput or damage-dealing mobile raid healers.
Mistweaver Monk Strengths and Weaknesses
Strengths
- Extremely powerful single-target healing.
- Is able to deal damage while healing.
- Very tanky due to a plethora of personal damage reduction cooldowns.
- Able to cast a large amount of healing spells while moving.
- Hyper mobile thanks to Chi Torpedo / Roll, Tiger's Lust, and Transcendence.
- Strong crowd control options by way of Paralysis, Leg Sweep, and Ring of Peace.
- Able to apply the 5% Physical damage debuff, Mystic Touch to enemies.
Weaknesses
- Does not offer a damage reduction cooldown to the raid.
- Mana management can be difficult for newer players to pick up.
- Historically bad scaling as an expansion progresses.
Mistweaver Monk Basic Gameplay
Like all healers, a Mistweaver needs to have a solid understanding of their spells so that they know which one to use in any given context. Unlike DPS, who can follow a rotation or priority queue, Healers are much more contextual.
Your aim needs to be maximizing efficient casts to squeeze the most healing out of your Mana bar. A high uptime and coverage of Renewing Mist is ideal is almost every situation for a Mistweaver as it is the driver for an enormous swath of our healing via Vivify, Invigorating Mists, Zen Pulse, and the myriad of other supporting talents. You should be looking to use your cooldowns such as Invoke Yu'lon, the Jade Serpent, Invoke Chi-Ji, the Red Crane and Revival as frequently as the fight allows, as these large cooldowns generally result in the strongest throughput (and by proxy mana efficiency) that our kit has to offer. Lastly, to keep up with your mana consumption, you should be mindful to use Mana Tea enough as to not overcap your stacks, as well as timing it before large healing events so that you can make the most of the mana cost reduction that it provides.
Mistweaver Monk Changes in Patch 11.2
General Changes
- Vivacious Vivification now causes your next Vivify to be instant cast after Rising Sun Kick (previously once every 10 seconds).
- Revival and Restoral healing increased by 100%, but falls off faster after 5 targets.
- Sheilun's Gift buffed by 20%.
- Vivify direct healing increased by 80%.
- Chi Harmony now increases healing taken by 25% (down from 50%).
- All Mistweaver healing reduced by 5%.
- Rushing Wind Kick damage reduced by 50%.
These changes improve Mistweaver performance in 5-man content while reducing dependence on multiple healing amplification buffs. Despite a global 5% nerf to throughput, Mistweaver remains a top-tier healer.
Hero-Talent Tier Sets
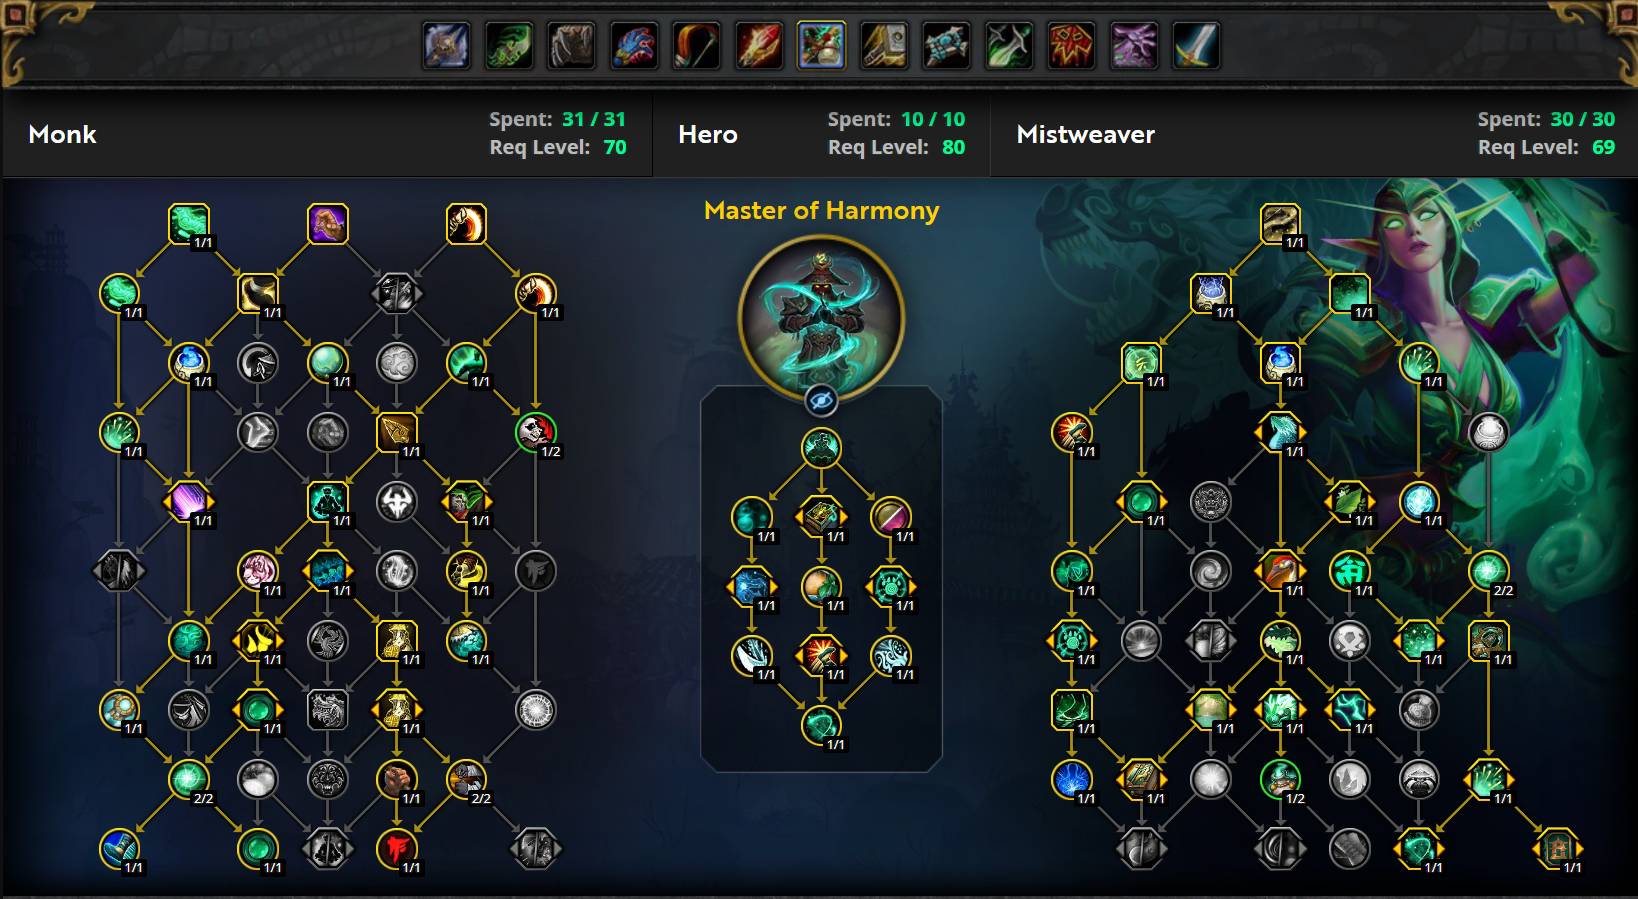
Master of Harmony
- 2-piece: Gaining vitality increases the chance for your next Tiger Palm to trigger a Harmonic Surge, dealing Nature damage and healing up to 5 allies.
- 4-piece: Casting Thunder Focus Tea guarantees the next 2 casts of Tiger Palm trigger Harmonic Surge.
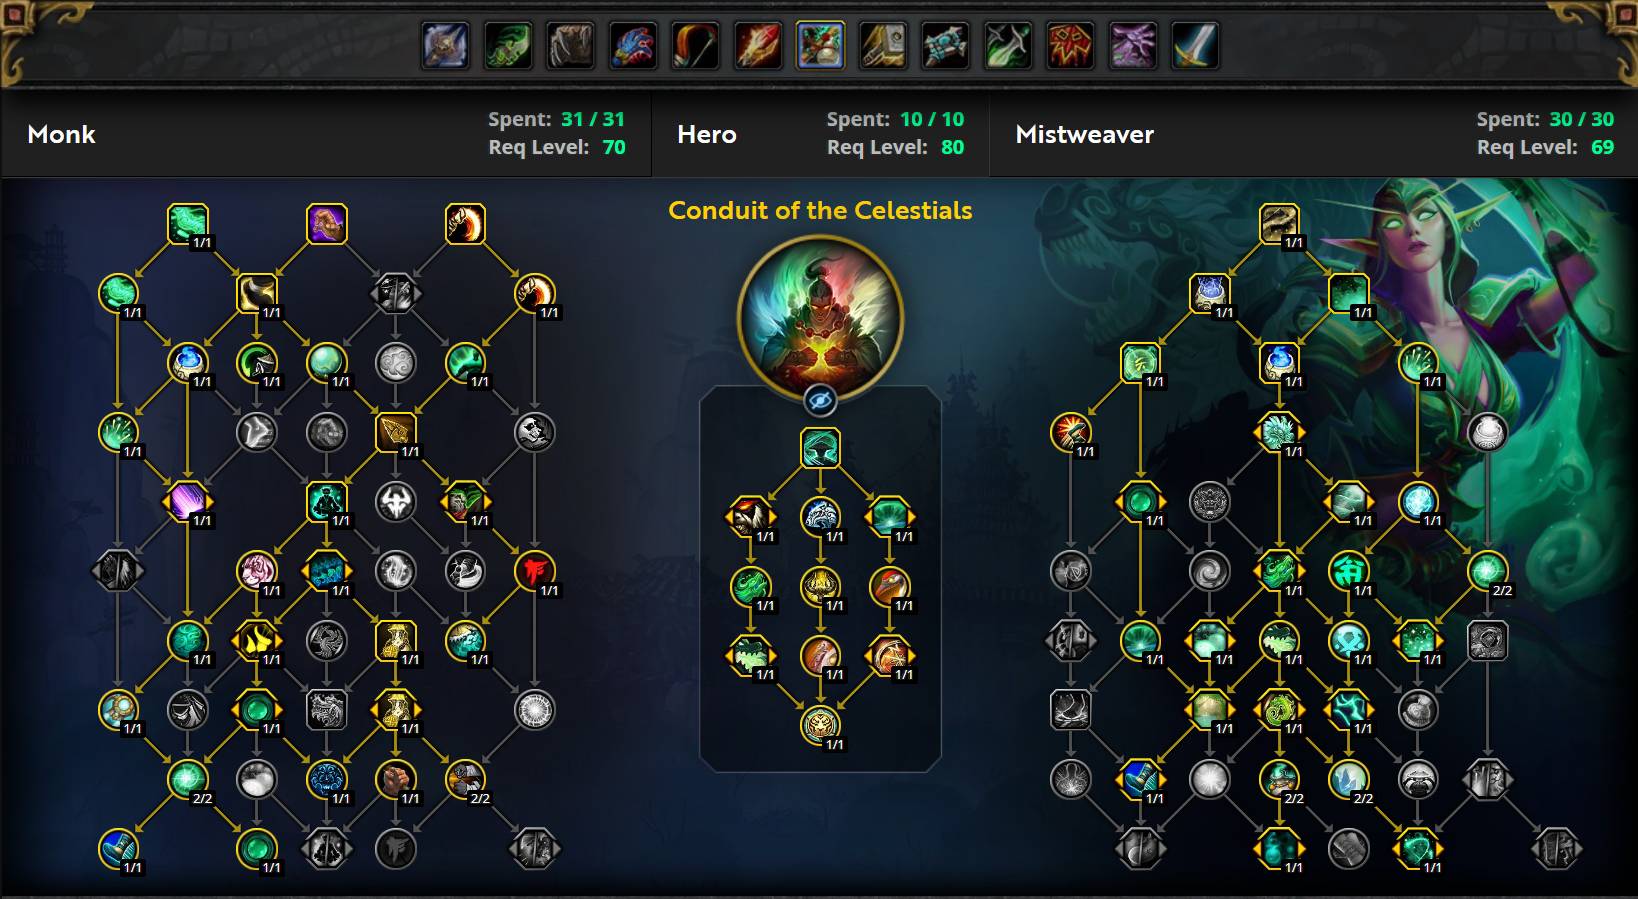
Conduit of the Celestials
- Monk Conduit of the Celestials 11.2 Class Set 2pc: Heart of the Jade Serpent triggers for 8 seconds at full effectiveness after casting Thunder Focus Tea.
- Monk Conduit of the Celestials 11.2 Class Set 4pc: Heart of the Jade Serpent increases haste by 15% while active and for 4 seconds afterwards.
The Master of Harmony set provides passive damage and healing increases, while the Conduit of the Celestials set can provide high uptime on the haste buff with proper play.
Reshii Wraps
Patch 11.2 introduces a new artifact cloak, Reshii Wraps, which is customizable, upgradable, and important for the upcoming Manaforge Omega raid.
Mistweaver Monk Leveling Guide for The War Within
Foreword
Among the three Monk specializations, Mistweaver is generally the slowest for leveling. If your goal is to reach max level quickly, leveling as a Windwalker is highly recommended. However, Mistweaver does have niche advantages. Due to strong sustain, Mistweavers can solo elite quests by outlasting dangerous mobs and gradually reducing their health while healing themselves. Outside of this, Windwalker outperforms Mistweaver in almost every aspect of leveling.
That said, this only applies to traditional quest-based leveling in the open world. If you prefer dungeon grinding, Mistweaver can be a surprisingly fast option. Below level 20, scaling makes you nearly invincible, and Spinning Crane Kick deals exceptional damage compared to other classes, allowing you to breeze through dungeons, eliminating mobs effortlessly. Beyond level 20, while the scaling effect diminishes, new talents continue to provide durability and strength until you reach max level.
Leveling Playstyle for Mistweaver Monk
If you choose to level as a Mistweaver, focus on dungeons, aiming to complete them and requeue as quickly as possible to maximize experience from the RDF queue bonus. As mentioned, at lower levels, scaling allows you to essentially run through dungeons unharmed, dealing high damage while keeping yourself healthy through HoTs and self-healing.
Your role is to take charge and lead your group, demonstrating that there’s no need for hesitation. Show your teammates that you’re committed to completing the dungeon efficiently, whether they keep up or not.
As the leveling scaling decreases and dungeon difficulty increases, you may need to rely on your group more. However, maintaining confident movement serves as non-verbal communication with your tank. If your tank sees you waiting hesitantly at the back, they may pull cautiously, unsure of your comfort level. Instead, make it clear through your actions that you want to keep moving forward, only stopping when necessary.
Stay alongside your tank or even slightly ahead between pulls. Use movement abilities to gain ground and pull mobs toward them. Utilize Tiger's Lust on your tank to help them keep up. As you progress and dungeons become harder, adjust your aggression based on your comfort level.
Finally, once you can no longer solo dungeon pulls, ensure that your aggressive movement style does not force your tank into an uncomfortable playstyle. Running ahead or pulling mobs can signal that you’re comfortable with a fast pace, but it should not be used to pressure the tank into playing beyond their limits.
Mistweaver Monk Healing Spec, Builds, and Talents
Copy the Mistweaver Monk talents, paste them into the game.
Rising Mist Raid Talents
Master of Harmony Mythic+ Talents
PvP Talents for Mistweaver Monks
- Eminence reduces the cooldown of Transcendence: Transfer by 15 seconds and allows you to port while stunned.
- Counteract Magic removes hostile magic effects from your target and increases your healing to them by 10% for 10 seconds, stacking up to three times.
- Refreshing Breeze grants a stacking buff while channeling Soothing Mist, increasing Expel Harm's healing by 15% and allowing it to dispel one Poison, Magic, and Disease effect from the target.
- Healing Sphere places a small orb on the ground that heals friendly targets who walk over it while also removing all harmful magic DoT effects.
- Zen Focus Tea grants immunity to silence and interrupt effects for 5 seconds on a 30-second cooldown.
- Grapple Weapon allows you to shoot a rope at a target, disarming them of their weapons for 6 seconds on a 45-second cooldown.
- Alpha Tiger grants 20% haste for 8 seconds on your first Tiger Palm on a target.
- Dematerialize reduces damage taken by 30% while stunned, decaying by 10% per second.
- Mighty Ox Kick knocks back your opponent.
- Peaceweaver reduces Revival's cooldown by 50% and makes targets hit by it immune to magic for 2 seconds.
- Thunderous Focus Tea causes Thunder Focus Tea to make Crackling Jade Lightning's knockback trigger instantly or causes Essence Font to increase your movement speed by 70% and make you immune to movement-impairing effects.
Best Hero Talents for Mistweaver Monk in The War Within
Raiding Hero Talents for Mistweaver Monk
Conduit of the Celestials is our strongest Hero Talent for many scenarios. It provides strong utility, throughput, and defensive capabilities, while fitting neatly into our current playstyle. The gameplay revolves around a powerful 90-second healing and damage cooldown, supported by random procs and buffs from other talents in the tree.
Master of Harmony centers around using your DPS and healing abilities to charge a "healing battery." When you cast Thunder Focus Tea, for 10 seconds all your heals will draw from the battery and place a HoT on the target for 25% of the amount healed. While this tree has interesting mechanics, it performs slightly worse on average than Conduit of the Celestials in a raid environment.
Mythic+ Hero Talents for Mistweaver Monk
Both Conduit of the Celestials and Master of Harmony perform excellently in Mythic+, and your choice will largely depend on your goals and experience. Conduit of the Celestials provides an extra throughput cooldown, which can be extremely valuable while pugging or if you are unfamiliar with the dungeons you are running. Master of Harmony, on the other hand, sacrifices this safety net in exchange for a substantial DPS increase.
Mistweaver Monk Healing Stat Priority
Raiding
- Intellect
- Haste
- Critical Strike
- Versatility
- Mastery
While Haste has always been a strong throughput stat for Mistweavers, it has historically taken a back seat due to not increasing our healing efficiency. However, with talent interactions, procs, and passives, Haste has become substantially more powerful for us. Critical Strike is also very strong, not only for throughput and efficiency but also for Mana Tea generation.
With the exception of Haste, all our stats are incredibly balanced. Mastery received substantial buffs leading into The War Within, and while we still do not necessarily want to stack it, it is no longer a burden on our gear.
Mythic+
- Intellect
- Haste
- Critical Strike >= Mastery
- Versatility
Haste remains very powerful, but in 5-man content where frequent spot healing is required, Mastery gains significant value. If your focus is purely on healing, Mastery is slightly stronger than Critical Strike. However, in terms of overall usefulness, Critical Strike has a slight edge.
That being said, it can be beneficial to allocate some Mastery on your gear to ensure your Invoke Chi-Ji, the Red Crane windows are as powerful as possible.
Stat Explanations
Intellect is your primary stat. It should be prioritized in all upgrades, as it increases Spell Power, which boosts the effectiveness of your healing.
Critical Strike enhances healing throughput by giving your spells a chance to heal for double the amount. Mana Tea also has a chance, equal to your Critical Strike percentage, to generate an extra stack.
Versatility increases all healing and damage done while reducing damage taken.
Haste reduces the cast time of heals, shortens the global cooldown, and decreases the cooldowns of Blackout Kick and Rising Sun Kick.
Mastery (Mastery: Gust of Mists) causes Renewing Mist, Enveloping Mist, Sheilun's Gift, Revival, and Vivify to also heal the primary target for an additional amount based on your Mastery level. Soothing Mist triggers Mastery once every eight ticks.
The proc rate of Soothing Mist operates on a "deck system," meaning each tick does not have a simple 1/8 chance to trigger Mastery. Instead, a hidden deck of eight cards determines when the proc occurs. Once the deck is exhausted, it reshuffles and starts over. This system ensures that you cannot get three back-to-back Mastery procs from Soothing Mist, with a maximum of two occurring under very specific conditions.
Mistweaver Monk Healing Rotation, Cooldowns, and Abilities
Raiding using Rising Mist
Maintain Renewing Mist on as many targets as possible to maximize burst healing with Vivify. Use Invoke Yu'lon, the Jade Serpent early and often during high-damage periods. Rising Sun Kick should be cast on cooldown to extend HoTs via Rising Mist, provide passive healing through Crane Style, and reduce cooldowns with Pool of Mists.
Raiding Using Tear of Morning
This build still prioritizes high uptime on Renewing Mist, but instead of relying on Rising Mist for extension, it leverages Enveloping Mist to proc Rapid Diffusion.
While Invoke Yu'lon, the Jade Serpent remains a key cooldown, this playstyle is not reliant on Rising Sun Kick, allowing for more flexibility in positioning.
Peer Into Peace facilitates rapid Enveloping Mist applications by letting Soothing Mist swap targets as you cast. Additionally, it reduces your GCD to 1 second instead of 1.5.
Mythic+
Maintaining broad Renewing Mist coverage is a top priority. However, in Mythic+, you also need to focus on Jadefire Stomp placement and uptime. Ensure you are always buffed with Awakened Jadefire and Jadefire Teachings. Use Invoke Chi-Ji, the Red Crane liberally due to its short cooldown. When healing becomes intense, spam Vivify. For single-target healing, cast Soothing Mist (if talented) into Enveloping Mist, followed by Vivify.
Single Target Healing
Vivify is your primary heal. If a target is taking sustained damage, channel Soothing Mist on them. For higher damage, apply Enveloping Mist, which can also be used preemptively.
Use Renewing Mist on cooldown unless you're saving charges for upcoming heavy damage. Never sit on 2 charges (or 3 with Pool of Mists)—always keep it rolling.
If a player is in immediate danger, use Life Cocoon.
Raid Healing
When healing raid-wide damage, consider damage intake, affected targets, and mana efficiency.
- Use Renewing Mist on cooldown unless strategically saving charges.
- If playing Rising Mist, cast Rising Sun Kick on cooldown.
- For 3-4+ damaged raid members, use Vivify to top them off, ensuring you have Renewing Mist out for Invigorating Mists efficiency.
- For spot healing, use Enveloping Mist, especially with follow-up damage, as it procs Rapid Diffusion and boosts Renewing Mist count.
- When 10+ members are taking damage, consider cooldowns like Invoke Yu'lon, the Jade Serpent. If talented into Gift of the Celestials, use it frequently. If using Jade Bond, maximize cooldown reduction.
- If talented into Chi Burst, use it on cooldown when it can hit at least 5 damaged allies.
Cooldown Usage for Mistweaver Monks
As a Mistweaver Monk, you have several powerful cooldowns that should be used in tandem with your regular rotation.
Thunder Focus Tea should be used as often as possible during an encounter. It should typically be paired with Renewing Mist or Enveloping Mist for maximum effectiveness.
Life Cocoon should be used on the tank or another player about to take a significant amount of damage. Time it to coincide with dangerous encounter mechanics for maximum impact.
Revival is a raid-wide heal that acts as a powerful raid cooldown. Your raid leader may assign a specific timing for its use, but otherwise, activate it when the raid is critically low on health or requires a mass dispel.
Invoke Chi-Ji, the Red Crane allows certain DPS abilities to proc your Mastery on two targets while also empowering Enveloping Mist. Best used during periods of extended damage when you can melee the boss.
Invoke Yu'lon, the Jade Serpent passively heals the raid while also enhancing Enveloping Mist and reducing its mana cost by 50% for the duration. The optimal way to play during this window depends on your chosen talent build, which is discussed in the Yu'lon section.
Mistweaver Monk Healing Gems and Consumables
Best Gems for Mistweaver Monk in The War Within
You should use Culminating Blasphemite in one socket. Then, ensure you have one gem of each type in other sockets to maximize the Crit effect, ideally Quick Ruby, Quick Onyx, Quick Sapphire, and Deadly Emerald. Fill in remaining sockets with Deadly Emerald.
Truthfully, Culminating Blasphemite's actual DPS contribution is so minor that it is nearly irrelevant. An alternative option is to run Elusive Blasphemite for the extra run speed, following the same logic as choosing Speed enchants over Avoidance. This is a personal choice if you feel it is worthwhile.
Best Flask for Mistweaver Monk in The War Within
You should be drinking the Flask of Tempered Swiftness at all times.
Best Potion for Mistweaver Monk in The War Within
Your stat potion should be Tempered Potion. Use these when you will do the most damage with your abilities, likely during your cooldowns and/or Bloodlust/Heroism. You can also obtain Fleeting Tempered Potion from Cauldrons that can be spawned by Alchemists.
You should keep a stock of Invigorating Healing Potions to use when at low health, and if you have a Warlock in the group, grab their Healthstones and use them as well. Do not macro these together, they are best used separately! You can also obtain Fleeting Invigorating Healing Potion from Cauldrons that can be spawned by Alchemists.
Best Food for Mistweaver Monk in The War Within
You should be eating from a Feast at all times, either Feast of the Divine Day, Feast of the Midnight Masquerade, or Hearty Feast of the Midnight Masquerade.
If Feasts are not available, eat Outsider's Provisions, Beledar's Bounty, Jester's Board, or Empress' Farewell instead.
In addition, if you can afford it, you should use Crystallized Augment Rune to increase your primary stat. Augment Runes are expensive, and disappear on death, so use them wisely!
Best Enchants for Mistweaver Monk in The War Within
| Slot | Enchantment |
| Necklace | Magnificent Jeweler's Setting (adds up to 2 sockets to a Ring or Neck) |
| Weapon | |
| Chest | Enchant Chest - Crystalline Radiance |
| Bracers | Enchant Bracer - Chant of Armored Leech |
| Legs | Sunset Spellthread |
| Boots | Enchant Boots - Scout's March |
| Rings | Enchant Ring - Radiant Haste |
| Cloak | Enchant Cloak - Chant of Leeching Fangs |
Mistweaver Monk Healing Gear and Best in Slot
This section will cover everything you need to know about equipping your character correctly.
BiS Gear for Mistweaver Monk
| Slot | Item | Source |
| Helm | Half-Mask of Fallen Storms | Forgeweaver Araz in Manaforge Omega/Matrix Catalyst/Great Vault |
| Neck | Ornately Engraved Amplifier | Tazavesh: Streets of Wonder |
| Shoulder | Glyphs of Fallen Storms | The Soul Hunters in Manaforge Omega/Matrix Catalyst/Great Vault |
| Cloak | Reshii Wraps with Haste | Campaign quests |
| Chest | Darksorrow's Corrupted Carapace | The Soul Hunters in Manaforge Omega |
| Bracers | Rune-Branded Armbands with Crit/Haste and Writhing Armor Banding | Crafted — Leatherworking |
| Gloves | Grasp of Fallen Storms | Soulbinder Naazindhri in Manaforge Omega/Matrix Catalyst/Great Vault |
| Belt | Venza's Powderbelt | Tazavesh: Streets of Wonder |
| Legs | Legwraps of Fallen Storms | Loom’ithar in Manaforge Omega/Matrix Catalyst/Great Vault |
| Boots | Interloper's Reinforced Sandals | The Soul Hunters in Manaforge Omega |
| Ring #1 | Band of the Shattered Soul | Dimensius The All Devouring in Manaforge Omega |
| Ring #2 | Logic Gate: Alpha | Plexus Sentinel in Manaforge Omega |
| Trinket #1 | Diamantine Voidcore | Fractillus in Manaforge Omega |
| Trinket #2 | Astral Antenna | Loom’ithar in Manaforge Omega |
| Weapon | Voidglass Sovereign's Blade | Nexus King Salhadaar in Manaforge Omega |
| Off-Hand | Vagabond's Torch with Crit/Haste and Darkmoon Sigil: Ascension | Crafted — Inscription |
Best Trinkets for Mistweaver Monk in The War Within Season 3
The ranking system is as follows:
- A Tier: These trinkets are by far the strongest and are always good options.
- B Tier: are slightly weaker than A but may be lacking in certain areas.
- C Tier: are middling trinkets that have either difficult-to-use effects or random procs that drastically reduce their effective value.
A-Tier
- Diamantine Voidcore
- Astral Antenna
- Ara-Kara Sacbrood
- Signet of the Priory
- So'leah's Secret Technique
B-Tier
C-Tier
- Darkfuse Medichopper
- Lily of the Eternal Weave
- Empowering Crystal of Anub'ikkaj
- Harvester's Edict
- Goldenglow Censer from Delves
The War Within Season 3 Tier Set for Mistweaver Monk
Tier Sets are a group of items that grant you bonuses depending on how many pieces you equip. These sets always drop from raids, but you can also acquire them from your Great Vault or by upgrading items via the Matrix Catalyst. The bonuses for Mistweavers are as follows:
Master of Harmony
- Monk Master of Harmony 11.2 Class Set 2pc: Gaining vitality has an increasing chance to cause your next Tiger Palm to unleash a Harmonic Surge, dealing heavy Nature damage split between your target and nearby enemies, while also healing up to 5 injured allies for a large amount.
- Monk Master of Harmony 11.2 Class Set 4pc: Casting Thunder Focus Tea guarantees that your next 2 casts of Tiger Palm will trigger a Harmonic Surge.
Conduit of the Celestials
- Monk Conduit of the Celestials 11.2 Class Set 2pc: Heart of the Jade Serpent additionally triggers for 8 seconds at 100% effectiveness after you cast Thunder Focus Tea.
- Monk Conduit of the Celestials 11.2 Class Set 4pc: Heart of the Jade Serpent increases your Haste by 15% while active and for 4 seconds afterwards.
Addons for Mistweaver Monk
Generic Addons for Monks
- ElvUI
- Boss Mods
- Deadly Boss Mods
- BigWigs
- GTFO
- Parrot or Mik's Scrolling Battle Text
- Weak Auras
- Recount / Skada / Details!
- Grid and GridClickSets (Optional)
Specific Addons for Mistweaver Monks
- Clique
WeakAuras for Mistweaver Monk
WeakAuras is an essential tool for Mistweaver Monk and Healers, offering unparalleled customization to enhance your gameplay. Rather than focusing on specific examples, we recommend exploring Wago.io, where you’ll find an extensive library of WeakAuras to suit your needs.
If you are unfamiliar with WeakAuras, it is an incredibly powerful and widely-used AddOn that allows you to create custom displays for nearly everything in the game. This includes tracking buffs, debuffs, cooldowns, Focus, resources, and much more.
To import a WeakAura, visit Wago.io and select one that fits your preferences. Click the "Copy WeakAura Import String" button to copy it to your clipboard. Next, log into the game and type /wa in the chat box to open the WeakAuras interface. Navigate to the "Import" section, press Ctrl+V to paste the copied string, and click "Import". You’re ready to go!
Mastering WeakAuras and customizing it to your playstyle is highly recommended for any serious raider. With countless options available on Wago.io, you can tailor your interface to optimize your performance and focus on what truly matters in combat.
Mistweaver Monk Frequently Asked Questions
How Much Haste Should Mistweaver Monk Use, and Do They Have Stat Caps?
Stat caps are generally not a significant concern until the later stages of an expansion. Diminishing returns on stats only begin at 30% rating, which is difficult to reach in most scenarios.
Stats like Haste, Critical Strike, Mastery, and Versatility gain or lose value based on how balanced they are with each other. For instance, as you gain more Intellect from gear, secondary stats may become more impactful relative to the flat bonus from Intellect-based trinkets.
Haste specifically increases casting speed and the tick rate of your HoTs and DoTs. While old gearing systems required reaching certain breakpoints for extra ticks, Blizzard changed this system. Now, HoTs and DoTs will always apply a proportional final tick based on any remaining duration.
While niche casting breakpoints, like fitting extra casts within Mana Tea or Enveloping Mist windows, exist, these are not significant enough to prioritize over balancing your stats.
Which Race is Best for Mistweaver Monk?
The difference between the best and worst races for Mistweaver Monk is minimal, with a performance gap of roughly 1%.
- Pandaren are currently the strongest race due to their double food buff, but this benefit is lost upon death and offers only a small advantage over other races.
- Night Elves and Blood Elves provide excellent utility in Mythic+ dungeons, with Shadowmeld allowing skips and Arcane Torrent purging enemy buffs.
Ultimately, the best race depends on personal preference and utility needs rather than raw throughput.


Digital Aura Portal - FZCO
Building A1, Dubai Digital Park, Dubai Silicon Oasis, Dubai, United Arab Emirates Premises Number 72647 - 001
Business registration number: 70647