Holy Paladin Healing Guide - Midnight (12.0.1)
Select your Specialization
In this detailed WoW The War Within Holy Paladin guide, we provide an in-depth overview of the pros and cons, rotation, abilities, gearing, and leveling for a Holy Paladin. By the end, you’ll have all the knowledge you need to excel with this class in WoW TWW.

Table of Contents
Holy Paladin Overview
Holy Paladins specialize in very strong single-target healing, being one of the few healers that can truly impact whether a single player will live or die at any given moment. They also possess several tools that help them mitigate or avoid damage, both on themselves and on other raid embers, such as Blessing of Protection and Devotion Aura. With so much utility, they are consistently one of the strongest specs in every form of content and have been that way for years.
Heading into The War Within, Holy Shock feels like a very powerful ability. Many talents were also added to increase the power of casting in order to give players desiring a casting playstyle stronger options to increase their output. That being said, Holy Power spenders have also had their power increased, making builds that consistently use Crusader Strike much more powerful as well. Overall, there are many different ways to play Holy Paladin, including the introduction of Hero Talents and the changes that come with a new expansion. If you want to cast, there are plenty of options, and if you prefer a melee playstyle, then you also have talents amplifying that playstyle. The talent tree has everything you could hope for and then some.
Holy Paladin Strengths and Weaknesses
Strengths
- Widely considered to have the best single-target healing in the game.
- Offers many utility spells such as Blessing of Protection and Blessing of Freedom that can be cast on themselves or others.
- Have very high survivability due to plate armor, as well as defensive spells like Divine Protection or Divine Shield.
- Very valuable in raiding content thanks to having a very powerful raid cooldown in Aura Mastery.
- Extremely high passive damage for a healer. Core spells like Crusader Strike and Judgment offer both damage and healing through Holy Power generation.
Weaknesses
- Can lose minor throughput when forced away from enemies.
- Generally not a very mobile healer, with only Divine Steed as a movement speed increase.
- Lacks a powerful throughput cooldown compared to other specs (relies on strong casts during Avenging Wrath).
- Struggle to heal multiple spread targets quickly since it relies heavily on Light of Dawn for Area of Effect (AoE) healing.
Holy Paladin Basic Gameplay
Holy Paladin has received some changes that will significantly alter how the spec plays in The War Within. The most notable changes will be listed below:
- Glimmer of Light — Removed from the game.
- Daybreak — Removed from the game.
- Rising Sunlight — After casting Avenging Wrath or Divine Toll, your next 2 Holy Shocks will cast 2 additional times.
Along with these changes, Holy Paladin received significant aura buffs as well as buffs to Word of Glory and Holy Shock. This has resulted in a playstyle where consuming Infusion of Light has become significantly less important. The main gameplay will consist of pressing Holy Shock as much as possible and spending Holy Power as often as possible. When neither is possible, you will aim to drop Consecration as a Herald of the Sun Holy Paladin in order to buff Eternal Flame through Strength of Conviction. Otherwise, you will then proceed to consume Infusion of Light with Holy Light or Flash of Light when healing is needed, or Judgment when no major healing is necessary.
Holy Paladin Changes in Patch 11.2
Holy Paladin has received several updates, with the most impactful being the rework to Infusion of Light :
- Infusion of Light now reduces the cast time of Holy Light by 30% and increases its healing.
- Infusion of Light makes the next Flash of Light instant and increases its healing.
These changes make Holy Light a stronger option for consuming Infusion of Light , though due to its high mana cost, Flash of Light or Judgment will often remain the more practical choice.
Tier Set Bonuses
Patch 11.2 introduces tier sets themed around each spec’s Hero Talents:
- Herald of the Sun — focuses on amplifying the effects of Sun's Avatar and Dawnlight. Minimal rotational impact.
- Lightsmith — enhances Hammer and Anvil, shifting Crusader Strike higher in priority once the full set is acquired.
Other Additions
The new artifact cloak, Reshii Wraps, was added in Patch 11.2. It will be Best-in-Slot for every class but does not alter gameplay.
Holy Paladin Leveling Guide for The War Within
Holy Paladin Leveling Playstyle
Holy Paladin is considered one of the best classes for leveling in the game. With great versatility, you can easily switch between tanking, healing dungeons, or going DPS for solo questing.
At lower levels, you'll typically find the easiest time leveling by playing either Holy or Prot, and queuing for dungeons, thanks to nearly instant queue times. Even if you're uncomfortable with healing or tanking, early leveling dungeons aren't too difficult, making them a great chance to learn! At higher levels, when questing speeds up and becomes necessary (especially for expansion campaigns), you’ll want to spec into either Ret or Prot, as they provide much higher damage than Holy.
Leveling Gear for Holy Paladin
When leveling up, always choose the piece of loot with the highest item level. The only exception to this rule is if you have a Ring or Necklace with a slightly lower item level but 2 secondary stats on it instead of 1.
Holy Paladin Healing Spec, Builds, and Talents
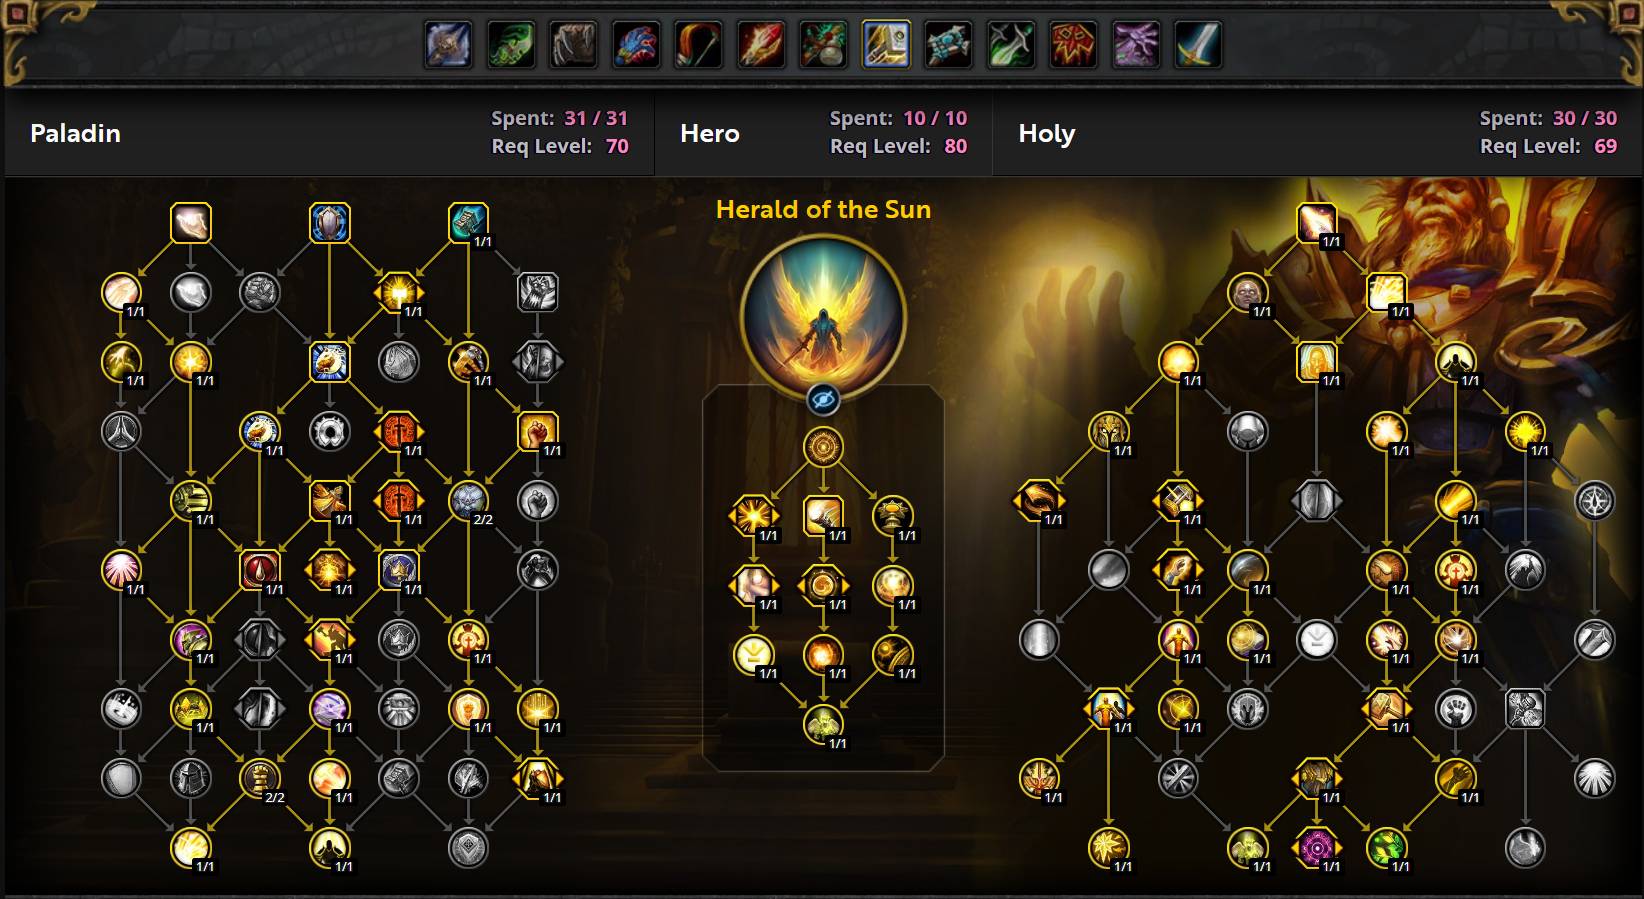

Copy the Holy Paladin talents, paste them into the game.
Herald of the Sun Standard Melee
Mythic+ Talents
Best PvP Talents for Holy Paladin
- Blessed Hands provides an additional charge of both Blessing of Freedom and Blessing of Protection, making it extremely powerful.
- Divine Vision increases the range of your Aura and reduces the cooldown of Aura Mastery, significantly boosting your survivability.
- Searing Glare can be difficult to use effectively, but when timed properly, it can greatly enhance your survivability.
The remaining options come down to personal preference.
Best Hero Talents for Holy Paladin in The War Within
Raiding Hero Talents for Holy Paladin
Herald of the Sun
Herald of the Sun focuses on enhancing healing through Eternal Flame, Sun's Avatar, and Dawnlight. Sun's Avatar provides a significant healing boost when using Avenging Wrath, making it a powerful cooldown. However, you need to be mindful of where you place your Dawnlight beams to ensure they hit as many targets as possible. It's generally best to avoid placing Dawnlight on melee players in spread situations.
Lightsmith
Lightsmith focuses on buffing allies through Sacred Weapon and Holy Bulwark, increasing your damage and granting large shields to other players. Additionally, this talent tree synergizes well with Avenging Crusader thanks to Hammer and Anvil and Blessed Assurance. However, its main drawback is the inability to control where healing is directed. The healing targets are random, which can sometimes be detrimental.
Mythic+ Hero Talents for Holy Paladin
Herald of the Sun
Herald of the Sun will be the best choice when you are at any point concerned about healing. During the start of a season, doing very high keys, or even in situations where you don't feel confident, then you will gain significantly more healing from Herald.
Lightsmith
Lightsmith excels in pure damage but may feel weaker compared to Herald of the Sun due to the lack of the additional power provided by Avenging Wrath and Sun's Avatar. In situations where healing is less of a priority, choosing Lightsmith can be a strong option, as the damage increase will be significant. However, it's important to ensure that your healing abilities are still effective without compromising your DPS casts.
Holy Paladin Healing Stat Priority
The Basics of Stats for Holy Paladin
The stat priority for a Holy Paladin depends on various factors such as spell selection, fight duration, proximity to healing targets, and talents. Generally, secondary stats are so close in value, and Intellect is so strong at current gear levels that upgrading to a higher item level item is usually a good choice. This page will help you determine which similar item-level gear might be better for you.
How Good is Haste?
In general, Haste is a good stat. However, its value can fluctuate significantly depending on the encounter. It’s tied to your Mana usage and spell selection. If you find yourself running out of Mana before a fight is over, check if you are casting too many expensive spells. If not, you may need to reduce some Haste. The goal is to balance having enough Haste to respond quickly to damage while also conserving Mana during longer fights.
Holy Paladin Mastery
The value of Mastery is dependent on your positioning relative to your healing targets. In situations where the entire group is clustered together, Mastery outperforms Critical Strike. However, in spread situations where targets are farther than 30 yards, Mastery becomes your least valuable stat.
Keep in mind that while Mastery is great for healing dungeons, it provides no benefit to your damage, unlike your other secondary stats.
Talent Choices and Stats
If you are playing a caster-focused playstyle utilizing Infusion of Light, you may want to prioritize Critical Strike over Mastery to smooth out the rotation and ensure Infusion procs are always available.
Raiding Stat Priority
The stat priority for raiding is as follows:
- Intellect
- Haste
- Mastery
- Critical Strike
- Versatility
Avenging Crusader Stat Priority
The stat priority for this build is as follows:
- Intellect
- Critical Strike
- Haste
- Mastery
- Versatility
Critical Strike becomes more important in this build due to Hammer and Anvil. It’s recommended to have a good balance of Haste and Critical Strike.
Mythic+ Stat Priority
In Mythic+, the stat priority shifts slightly:
- Intellect
- Haste
- Versatility
- Critical Strike
- Mastery
Haste is particularly valuable in Mythic+ as it reduces cooldowns for abilities like Holy Shock, Crusader Strike, and Judgment, as well as reducing the cast time of Holy Light and Flash of Light. Mastery follows closely in value, but Critical Strike also synergizes well with Infusion of Light. Versatility is more valuable in Mythic+ than in raiding as it boosts both healing and damage.
A Word About Leech
Although tertiary stats like Speed, Leech, or Avoidance appear randomly on gear, Leech is especially valuable for healers. Leech provides free healing, allowing you to focus more on healing others instead of yourself. Its value will vary based on the damage you’re taking in an encounter, but it is typically at least as valuable as your other secondary stats, if not more. Consider this when comparing lower item-level gear with Leech to higher item-level replacements without it.
Holy Paladin Healing Rotation, Cooldowns, and Abilities
Holy Paladin — Raid Melee Build
Where this build differs from typical "Casting" builds is that you will be primarily using Crusader Strike as your filler global. By talenting into Crusader's Might, you allow yourself to gain extra Holy Shock casts while still generating Holy Power and outputting extra damage.
- Cast Beacon of Virtue as much as possible during a fight. Try to line it up with heavy damage windows without keeping it on cooldown for too long. If you are having mana issues, you can cast it less frequently.
- Use Blessing of Summer as much as possible during a fight. Every buff can be safely placed upon yourself with only Blessing of Summer requiring any additional thought (when possible, aim to have it up during cooldowns).
- Keep Holy Prism on cooldown as much as possible to proc Dawnlight. When possible, you will want to use Holy Prism during Awakening to generate extra Sun's Avatar procs.
- Cast Eternal Flame when you have the Empyrean Legacy proc off cooldown.
- Spend Holy Power on Light of Dawn or Eternal Flame.
- Cast Holy Shock as much as possible.
- Aim to cast Holy Light when you have both a Divine Favor proc available and an Infusion of Light proc.
- Spend remaining Holy Power if possible.
- Cast Crusader Strike to reduce Holy Shock cooldown.
- Consume Infusion of Light when you have a proc available and nothing else to do, generally through casting Judgment.
- Cast Judgment when you cannot do any of the above.
- Cast Hammer of Wrath when you cannot do any of the above.
- Cast Consecration when you cannot do any of the above.
Holy Paladin — Mythic+ Build
Many of the priorities you use in raiding content will remain the same in Mythic+. The main exception is the increased importance of Consecration, Judgment, and Shield of the Righteous to output additional damage, as no healing is required in these scenarios.
- Cast Beacon of Virtue as much as possible during a fight. Try to line it up with heavy damage windows without keeping it on cooldown for too long. If you are having mana issues, you can cast it less frequently.
- Use Blessing of Summer as much as possible during a fight. Every buff can be safely placed upon yourself with only Blessing of Summer requiring any additional thought (when possible, aim to have it up during cooldowns or large packs).
- Keep Sacred Weapon on cooldown as much as possible.
- Keep Consecration active at all times.
- Cast Judgment as much as possible.
- Keep Holy Prism on cooldown as much as possible.
- Cast Word of Glory when you have the Empyrean Legacy proc off cooldown.
- Spend Holy Power on Word of Glory when healing is needed, or Shield of the Righteous when no healing is needed.
- Cast Holy Shock as much as possible.
- Aim to cast Holy Light when you have both a Divine Favor proc available and an Infusion of Light proc.
- Cast Crusader Strike to reduce Holy Shock cooldown.
- Spend remaining Holy Power if possible.
- Cast Hammer of Wrath when you cannot do any of the above.
- Consume Infusion of Light when you have nothing else to do and a proc available.
- Cast Consecration when you cannot do any of the above.
Keep in mind that unexpected damage may occur in Mythic+ settings. If you are constantly spending Holy Power whenever possible, you might find yourself without enough Holy Power when healing is required. For this reason, it's often wise for beginner players to cast Shield of the Righteous only when you have 4-5 Holy Power. This way, you can quickly generate additional Holy Power when healing is needed unexpectedly.
Cooldown Usage for Holy Paladins
As a Holy Paladin, you have several healing cooldowns. You should use them as we explain below:
- Avenging Wrath increases your healing done and damage done by 20% for 20 seconds. It is very useful during periods of high sustained damage.
- Divine Toll is a strong burst heal that can be used to quickly generate Holy Power, or simply get your party healthy.
- Lay on Hands should be used to save dying raid members, especially tanks.
- Blessing of Sacrifice lasts 12 seconds, transferring 30% of the damage taken by your target to you. The effect is automatically canceled if the transferred damage would cause you to fall below 20% health. This cooldown is excellent for reducing the damage taken by the tank or other raid members. Be cautious, however, because Blessing of Sacrifice can be dangerous to your own life if used without a damage reduction cooldown, such as Divine Protection or Divine Shield, or when simultaneous raid damage independently threatens your life such that the additional damage taken from Blessing of Sacrifice can lead to your death.
- Aura Mastery empowers your chosen aura, increasing its range to 40 yards and also improving its efficiency. It is a raid cooldown, and it should be used at a time designated by your healing officer or raid leader.
- Blessing of Protection can be used to clear harmful physical damage debuffs and bleeds from the target. Be mindful of the fact that bosses will not attack targets affected by Blessing of Protection, though, so only cast it on the current tank if the off-tank is prepared to take over.
- Blessing of Freedom removes movement-impairing effects from the targeted raid member, which can be very useful in certain situations.
Holy Paladin Healing Gems and Consumables
Best Gems for Holy Paladin in The War Within
We highly recommend using QuestionablyEpic to simulate your character's ideal gems and enchants, as they might differ from our general recommendations.
Raiding
The best stats for raiding Holy Paladins are Haste and Mastery, so we will be gemming for these stats.
- Use Elusive Blasphemite in one socket.
- In other sockets, ensure you have one gem of each type to maximize the Movement Speed effect, ideally Quick Ruby, Quick Onyx, Quick Sapphire, or Masterful Emerald.
- Fill in the remaining sockets with Masterful Emerald.
Mythic+
The best stats for Mythic+ Holy Paladins are Haste and Crit, so we will be gemming for these stats.
- Use Elusive Blasphemite in one socket.
- In other sockets, ensure you have one gem of each type to maximize the Movement Speed effect, ideally Quick Ruby, Quick Onyx, Quick Sapphire, or Deadly Emerald.
- Fill in the remaining sockets with Deadly Emerald.
Do note that at higher levels of keys, Versatility can gain some value due to the damage reduction it provides. This is only relevant for very high-level keys, but it is worth mentioning.
Best Flask for Holy Paladin in The War Within
Flask of Tempered Swiftness will be your go-to choice for maximizing your healing output. If you already have a very high amount of Haste on your gear, you may want to opt for Flask of Tempered Mastery instead.
Best Potion for Holy Paladin in The War Within
Use Slumbering Soul Serum to regenerate Mana if you can afford the downtime. Otherwise, Algari Mana Potion is better. Tempered Potion is the best stat potion for personal gain, but you will likely want to use Potion Bomb of Power instead for more group damage. You can obtain many of these potions, such as Fleeting Tempered Potion, from Cauldrons that can be spawned by Alchemists.
Finally, Grotesque Vial can be used while dead and be the difference between victory and defeat in an encounter.
You should keep a stock of Invigorating Healing Potions to use when at low health, and if you have a Warlock in the group, grab their Healthstones and use them as well. Do not macro these together; they are best used separately! You can also obtain Fleeting Invigorating Healing Potion from Cauldrons that can be spawned by Alchemists.
Best Food for Holy Paladin in The War Within
You should be eating Feast of the Midnight Masquerade at all times to gain extra primary stat. If you do not have access to this feast, you can instead choose to eat Outsider's Provisions, Beledar's Bounty, Jester's Board, or Empress' Farewell, which will give you more of your highest secondary stat, generally Mastery.
In addition, if you can afford it, you should use Crystallized Augment Rune to increase your primary stat. Augment Runes are expensive and disappear on death, so use them wisely!
Best Enchants for Holy Paladin in The War Within
| Slot | Enchantment |
| Necklace | Magnificent Jeweler's Setting (adds up to 2 sockets to a Ring or Neck) |
| Weapon | Enchant Weapon - Authority of Fiery Resolve |
| Chest | Enchant Chest - Crystalline Radiance |
| Bracers | Enchant Bracer - Chant of Armored Leech |
| Legs | Sunset Spellthread |
| Boots | Enchant Boots - Scout's March |
| Rings | Enchant Ring - Radiant Haste Enchant Ring - Radiant Mastery (if you have very high Haste already) |
| Cloak | Enchant Cloak - Chant of Leeching Fangs |
Holy Paladin Healing Gear and Best in Slot
This section will cover everything you need to know about equipping your character correctly.
BiS Gear for Holy Paladin
| Slot | Item | Source |
| Helm | Lightmane of the Lucent Battalion | Forgeweaver Araz/Matrix Catalyst/Great Vault |
| Neck | Duskblaze's Desperation | The Soul Hunters |
| Shoulder | Chargers of the Lucent Battalion | The Soul Hunters/Matrix Catalyst/Great Vault |
| Cloak | Reshii Wraps with Haste/Mastery | Reshii Wraps |
| Chest | Cuirass of the Lucent Battalion | Fractillus/Matrix Catalyst/Great Vault |
| Bracers | Yoke of Enveloping Hatred | The Soul Hunters |
| Gloves | Jumpstarter's Scaffold-Scrapers | Operation: Floodgate |
| Belt | Fresh Ethereal Fetters | Soulbinder Naazindhri |
| Legs | Cuisses of the Lucent Battalion | Loom’ithar/Matrix Catalyst/Great Vault |
| Boots | Interloper's Plated Sabatons | The Soul Hunters |
| Ring #1 | Band of the Shattered Soul | Dimensius The All Devouring |
| Ring #2 | Logic Gate: Omega | Forgeweaver Araz |
| Trinket #1 | Nexus-King's Command | Nexus King Salhadaar in Manaforge Omega |
| Trinket #2 | Diamantine Voidcore | Fractillus in Manaforge Omega |
| Weapon | Voidglass Sovereign's Blade | Nexus King Salhadaar |
| Shield | Ward of the Weaving-Beast | Loom’ithar |
The War Within Season 3 Tier Set for Holy Paladin
The Tier Set is comprised of 5 items, all carrying the Lucent Battalion moniker. Unique bonuses are unlocked when wearing 2 or 4 pieces from the set and change depending on your Hero Talent choice:
- Paladin Herald of the Sun 11.2 Class Set 2pc: Grants Solar Wrath after Avenging Wrath ends, extending the duration of Sun's Avatar for a few seconds.
- Paladin Herald of the Sun 11.2 Class Set 4pc: Increases the effectiveness of Holy Power spenders and grants Dawnlight depending on your chosen talents.
- Paladin Lightsmith 11.2 Class Set 2pc: Increases the healing of Hammer and Anvil and causes it to also trigger from Crusader Strike at reduced efficiency.
- Paladin Lightsmith 11.2 Class Set 4pc: Causes Hammer and Anvil to also grant a stack of Masterwork.
Regardless of Hero Talent choice, these bonuses are extremely powerful and significantly boost HPS. Equip them as soon as possible. More information about their impact on rotation can be found on the dedicated rotation page.
Addons for Holy Paladin
Generic Addons for Paladins
- ElvUI
- Boss Mods
- Deadly Boss Mods
- BigWigs
- GTFO
- Parrot or Mik's Scrolling Battle Text
- Recount / Skada / Details!
- Raeli's Spell Announcer
- Method Raid Tools
- Vuhdo
- Weak Auras
- Recommended source: Wago.io (Holy Paladin section)
- Useful for tracking and displaying buffs, debuffs, and cooldowns
WeakAuras for Holy Paladin
WeakAuras is an essential tool for Holy Paladin and Healers, offering unparalleled customization to enhance your gameplay. Rather than focusing on specific examples, we recommend exploring Wago.io, where you’ll find an extensive library of WeakAuras to suit your needs.
If you are unfamiliar with WeakAuras, it is an incredibly powerful and widely-used AddOn that allows you to create custom displays for nearly everything in the game. This includes tracking buffs, debuffs, cooldowns, Focus, resources, and much more.
To import a WeakAura, visit Wago.io and select one that fits your preferences. Click the "Copy WeakAura Import String" button to copy it to your clipboard. Next, log into the game and type /wa in the chat box to open the WeakAuras interface. Navigate to the "Import" section, press Ctrl+V to paste the copied string, and click "Import". You’re ready to go!
Mastering WeakAuras and customizing it to your playstyle is highly recommended for any serious raider. With countless options available on Wago.io, you can tailor your interface to optimize your performance and focus on what truly matters in combat.
Holy Paladin Frequently Asked Questions
Is Having Two Holy Paladins in a Raid Bad?
Having more than one Holy Paladin in a raid can be beneficial in specific boss encounters, but it’s generally not optimal. Their healing abilities and style often overlap, reducing their overall effectiveness compared to bringing a different healer. However, unless you're pushing Mythic raid progression, any healer composition can work. Always prioritize the skill and performance of your healers over their class or specialization.
Can I use my Silver Hand Transmog with a Sword and Shield?
Yes, you can transmog any one-handed sword and shield into The Silver Hand appearance. However, when using this transmog on your shield, it will not be visible. Similarly, you can transmog any two-handed weapon into The Silver Hand appearance as well.
What is the Best Race for Holy Paladins?
- Horde: Blood Elf is the best choice, providing 1% extra Critical Strike chance, additional Mana, and the utility of Arcane Torrent, which can purge enemy buffs.
- Alliance: There is no clear best race for Holy Paladins in PvE. Choose the race you prefer based on aesthetics or personal preference.
Do I always need to be in Melee range, or can I stand in ranged?
Holy Paladins should always aim to be in melee range. This ensures you can fully utilize your abilities and utility. Additionally, since the game classifies Holy Paladins as melee, you will receive melee mechanics instead of ranged ones. Even when casting spells, you should do so from melee range whenever possible.
Can My Raid Stack Two Devotion Auras?
No, with the release of The War Within, the passive and active effects of Devotion Aura no longer stack. If you have two Holy Paladins in your raid, ensure they use Devotion Aura at separate times for better overall effectiveness.
Is There a Haste Cap or Breakpoint for Holy Paladin?
There is no fixed Haste cap for Holy Paladins. The amount of Haste you need depends on your spell choices and the length of encounters. If you find yourself running out of Mana, reduce your Haste slightly or evaluate your spell usage for efficiency. Aim for a balance that allows you to respond quickly to damage while maintaining sufficient Mana for longer fights.


Digital Aura Portal - FZCO
Building A1, Dubai Digital Park, Dubai Silicon Oasis, Dubai, United Arab Emirates Premises Number 72647 - 001
Business registration number: 70647