Restoration Shaman Healing Guide - Midnight (12.0.1)
Select your Specialization
This The War Within Restoration Shaman Guide details all the major changes the Restoration Shaman class has undergone in the expansion. Shamans remain one of the most fascinating, challenging, and rewarding choices for players looking to master the power of the elements.

Table of Contents
Restoration Shaman Overview
Restoration Shaman is an extremely flexible specialization that shines when healing groups of clumped players. They have a variety of unique tools to deal with otherwise deadly influxes of damage, such as Spirit Link Totem.
Because Chain Heal has no cooldown, Restoration Shamans are one of the few healers that can area-of-effect heal continuously when dangerous, unexpected damage happens, a situation also perfectly suited to their Mastery effect, Mastery: Deep Healing, and to external Mana tools such as Innervate.
Shaman can be quite mobile with Spiritwalker's Grace, Ghost Wolf, and Gust of Wind or Spirit Walk, and deal decent damage when focusing on it, but for the most part cannot heal at the same time as they deal damage; this is considered one of the major weaknesses of the specialization.
Restoration Shaman Strengths and Weaknesses
Strengths
- Great healing, especially when your group can stack inside Healing Rain
- Can often cast while moving with Spiritwalker's Grace and jump around with Gust of Wind
- Excellent survivability with Astral Shift, Earth Elemental, Stone Bulwark Totem and passives such as Brimming with Life
- Great non-healing tools such as Skyfury, Reincarnation, Wind Rush Totem, Wind Shear, Purge, Tremor Totem, and Capacitor Totem
- Unique support tools: Ancestral Vigor, Spirit Link Totem, and Ancestral Protection Totem
Weaknesses
- Non-cooldown healing is Mana inefficient, or tied to high cast times
- Loses healing potential in situations that force the group to spread
- Only passive source of damage is Acid Rain
- No teleports like Blink or damage immunity capabilities like Divine Shield
- No tank cooldowns outside of Spirit Link Totem which has a long cooldown
Restoration Shaman Basic Gameplay
Restoration Shaman, like any healer, is all about using your abilities strategically. Rather than a fixed rotation, you will be using your flexible spell kit to adapt and overcome whatever the game throws at you.
Cooldown abilities, such as Riptide, Unleash Life and Healing Rain are very efficient, and thus important to use as many times as possible throughout a fight, while the likes of Healing Wave and Chain Heal can be thrown in at any time they are needed, as long as you still have Mana left.
Restoration Shaman Changes in Patch 11.2
Although changes to Restoration Shaman in 11.2 are limited, they are significant:
- The Healing Rain-focused tier set has been replaced by a new set with different bonuses depending on your Hero Talent tree.
- The Farseer bonus is stronger and easier to use than Totemic. Ancestors spawned by Farseer now contribute towards Ascendance and Cloudburst Totem, making it the preferred tree in 11.2.
- Healing Tide Totem heals significantly more in 5-man dungeons, making it a more powerful cooldown in Mythic+ content.
New Artifact Cloak: Reshii Wraps
The Reshii Wraps cloak, introduced in Patch 11.2, is an artifact obtained through the campaign. It fully replaces your cloak slot for the season, with no other cloaks dropping in Season 3. The cloak can be customized and upgraded to suit your role and gameplay needs.
Restoration Shaman Leveling Guide for The War Within
Restoration Shaman Leveling Playstyle
As a healer, Restoration Shaman levels more slowly than DPS or Tank specializations when playing solo. It's best played in a group—either through the dungeon queue or by teaming up to farm enemies for experience in the open world.
While healing requirements are typically low during leveling, you should still contribute damage using Acid Rain, Chain Lightning, and your single-target DPS spells.
Leveling Gear and Addons for Restoration Shaman
While leveling, always choose gear with the highest item level. The exception is for Rings and Necklaces—if a lower item level piece has two secondary stats instead of one, it’s likely better.
To avoid UI overload at max level, consider gradually incorporating basic addons as you level. This gives you time to get comfortable with them during easier content. We recommend checking out our Addons page for simple, effective suggestions.
Restoration Shaman War Mode Talents for Leveling
Below is a list of recommended PvP talents for leveling, solo content, or small group PvE when War Mode is enabled.
Restoration Shaman PvP Talents for Leveling
- Counterstrike Totem — Reflects damage you take for 15 seconds with a 45-second cooldown. Great for dealing passive damage when tanking multiple enemies.
- Rain Dance — Makes Healing Rain instant, 45% cheaper, and 30% stronger. Synergizes well with Acid Rain and Counterstrike Totem to sustain healing while mobs damage themselves.
- Totem of Wrath — Boosts the critical effect of ally spells within 40 yards by 20% for 15 seconds when you use Nature's Swiftness. Excellent for solo and group outdoor content.
Other talents may have specific uses but aren’t as broadly effective for leveling content.
Best Heirloom Items for Restoration Shaman Leveling
When choosing Heirloom gear, prioritize items with the highest Haste. Haste improves your DPS and makes your rotation feel smoother and faster.
It also helps you tag mobs more quickly—sometimes that split second determines whether you or another player gets the credit.
Restoration Shaman Healing Spec, Builds, and Talents
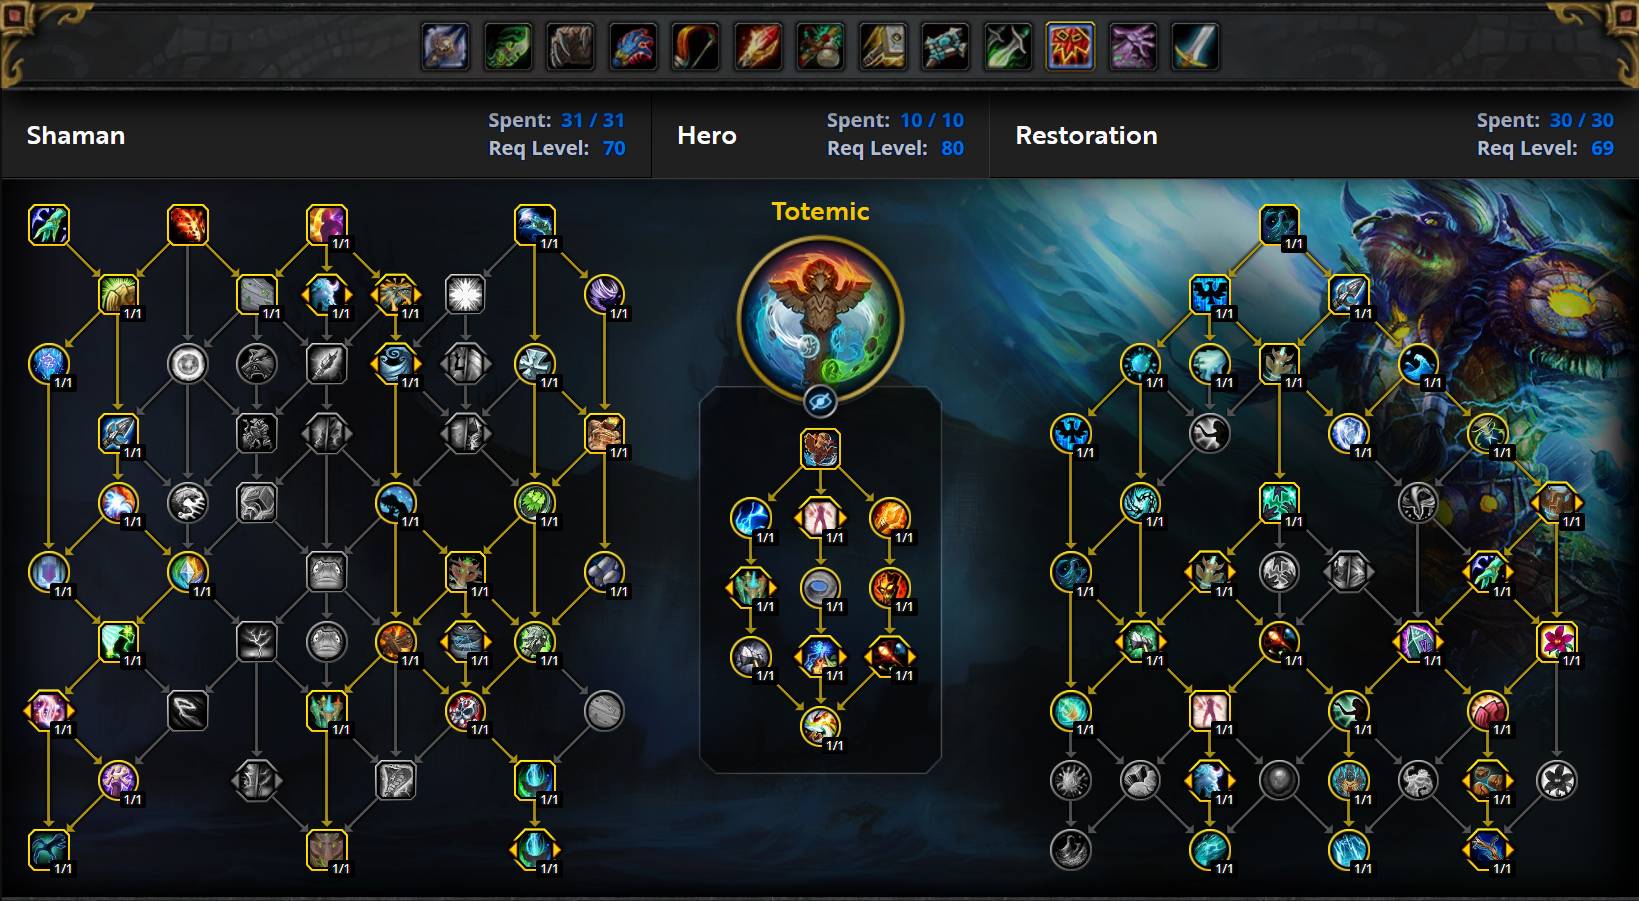

Copy the Restoration Shaman talents, paste them into the game.
Totemic Raid
Totemic Mythic+
PvP Talents (War Mode)
Enabling War Mode grants several benefits:
- Access to PvP talents in outdoor world content.
- 10% to 30% increased rewards from World Quests at max level.
- 10% to 30% more experience while leveling.
- Earn Conquest Points in the open world, which can be exchanged for powerful weekly gear.
Because of the substantial benefits, War Mode is recommended for both leveling and endgame outdoor PvE content. However, keep in mind that enabling War Mode also makes you eligible for open-world PvP. This includes the risk of being "ganked" while leveling or doing World Quests.
If you need guidance on dealing with player-versus-player combat, check the link below for tips and strategies.
Restoration Shaman PvP Talents for Leveling
- Counterstrike Totem — Reflects damage you take for 15 seconds with a 45-second cooldown. Great for dealing passive damage when tanking multiple enemies.
- Rain Dance — Makes Healing Rain instant, 45% cheaper, and 30% stronger. Synergizes well with Acid Rain and Counterstrike Totem to sustain healing while mobs damage themselves.
- Totem of Wrath — Boosts the critical effect of ally spells within 40 yards by 20% for 15 seconds when you use Nature's Swiftness. Excellent for solo and group outdoor content.
Other talents may have specific uses but aren’t as broadly effective for leveling content
Best Hero Talents for Restoration Shaman in The War Within
Raiding Hero Talents for Restoration Shaman
Farseer
Farseer has no direct synergy with Chain Heal or Healing Rain, making it well suited for Riptide and single-target-focused builds. The Ancestors spawned by Call of the Ancestors and Ancestral Swiftness contribute broadly to your healing, offering a versatile playstyle.
However, the Season 2 tier set bonus revolves around casting Healing Rain, which doesn't mesh well with Farseer's design. The removal of Primordial Wave is also a hit to Riptide-focused builds that Farseer typically favors.
Totemic
Totemic emphasizes Surging Totem (which replaces Healing Rain) and automates Chain Heal casts through Lively Totems. It especially enhances Healing Stream Totem due to Reactivity and Supportive Imbuements, which scale better with it than with Cloudburst Totem. The lower cooldown on Healing Stream allows for more frequent free Chain Heals.
Totemic reduces the need for hard-casting Healing Rain and Chain Heal manually, making it easier to play while delivering strong stacked group healing. That said, it's less effective on fights where allies are too spread out for Surging Totem to heal at least five targets consistently.
Mythic+ Hero Talents for Restoration Shaman
Farseer
Ancestors deal damage when you do, giving Farseer great flexibility in Mythic+ while also boosting single-target healing for solo situations. However, its healing potential is somewhat lower, and frequent hard casts of Healing Rain are required to maximize Acid Rain, which can be time-consuming. Its defensive toolkit is also weaker than Totemic’s.
Totemic
Totemic excels in Mythic+ with Surging Totem enabling Acid Rain to deal 30% more damage than usual, making large pulls more manageable. Wind Barrier adds strong defensive utility, while Swift Recall allows for more frequent support totem use.
Its Healing Stream Totem synergizes exceptionally well with Lively Totems, Reactivity, Supportive Imbuements, and Living Stream, offering responsive and efficient healing.
However, much of Totemic’s healing throughput depends on Surging Totem and Chain Heal, making it harder to heal allies positioned far from enemy packs, especially since the tree lacks single-target healing support.
Restoration Shaman Healing Stat Priority
The Basics of Stats for Restoration Shaman
This general stat priority works well for most healing scenarios:
- Item Level
- Critical Strike
- Versatility
- Haste = Mastery
When playing Farseer with Whispering Waves you should instead focus on:
- Item Level
- Haste = Critical Strike
- Versatility
- Mastery
Mastery gains extra value in challenging content like progression raiding or rated PvP, where players frequently drop to low health. In these situations, it can rival Versatility and Critical Strike in effectiveness.
Haste becomes more valuable if you’re focusing on damage (Battle Shaman style), soloing, Mythic+ keys, or playing non-Chain Heal builds.
Prioritize high item level gear first. These pieces offer more Intellect, which scales your spells. Even though Intellect may not be the best stat point-for-point, high item level gear usually has more total secondary stats to compensate for less optimal combinations like Mastery-heavy pieces.
However, there are exceptions. A socket is generally worth about 5 item levels. Leech on your first few gear pieces is worth a similar amount, and Avoidance has value in AoE-heavy encounters.
When healing, Mana efficiency is important, especially during long fights. This reduces the relative value of Haste, which speeds up casting but increases Mana consumption.
In high Mythic+ dungeons, Versatility's damage reduction is invaluable, often preventing fatal hits and reducing the need for self-healing under pressure.
Stat Gain Per Rating
Stat ratings scale differently per 1% effect. This also affects how quickly each stat hits diminishing returns (after 30% for non-Mastery stats):
- Critical Strike — 700 rating per 1%
- Versatility — 780 rating per 1% healing/damage increase and 0.5% damage reduction
- Haste — 660 rating per 1%
- Mastery — 233 rating per 1%, starts at 24%
- Leech — 1020 rating per 1%
- Avoidance — 545 rating per 1%
- Speed — 250 rating per 1%
Mastery starts at 24% effectiveness thanks to a base modifier, and scales differently due to its high starting value. For Restoration Shamans, Skyfury increases Mastery effect by 6%, pushing the soft cap higher.
Consider carrying extra rings and necklaces to help balance your stats and avoid hitting diminishing returns. Here are the soft cap thresholds for common stats:
- Critical Strike — 21,000
- Versatility — 23,400
- Haste — 19,800
- Mastery — 21,000
Stat Details for Restoration Shamans
Intellect: Your primary stat, found on almost all gear. It increases your Spell Power, enhancing all healing and damage spells.
Critical Strike: Boosts your healing throughput and provides Mana regeneration via Resurgence. It's the top stat for raw healing performance, though exceeding 100% crit on Tidal Waves-boosted Healing Surge can be wasteful.
Versatility: Increases healing and damage dealt while reducing damage taken. It doesn’t scale as aggressively as Crit, but its defensive bonus and damage support make it extremely valuable—especially in PvP.
Haste: Reduces cast times and global cooldowns, and increases tick rates of HoTs, DoTs, and totems. It's excellent for damage and short fights but loses value in Mana-intensive healing scenarios where slower, more efficient casts are preferred.
Mastery: Mastery: Deep Healing increases your healing based on how low the target’s health is. It’s strong in progression content and PvP but doesn’t scale well with item level.
Leech: Heals you for a portion of the healing or damage you deal. Great for passive survivability, especially during group-wide damage.
Avoidance: Reduces AoE damage taken. Can be a lifesaver in high-end content with heavy group damage mechanics.
Speed: Slightly increases movement speed. While not critical, it helps with repositioning and dodging mechanics.
Restoration Shaman Healing Rotation, Cooldowns, and Abilities
Restoration Shaman Pre-Pull Checklist
- Apply Water Shield to yourself.
- Apply Earth Shield to the tank and yourself (with Elemental Orbit if talented).
- Optional: If the fight starts with high damage, pre-cast Healing Rain, Riptide, and possibly Cloudburst Totem.
Restoration Shaman Rotation
- Refresh Earth Shield before expiration, especially with Reactive Warding.
- Use Cloudburst Totem or Healing Stream Totem before or during high group damage.
- Cast Riptide on cooldown.
- Use Unleash Life to empower your next heal.
- If Cloudburst Totem is not available, use Healing Stream Totem when allies are injured.
Unleash Life works well with:
- Downpour
- Chain Heal when High Tide is active
- Riptide
Restoration Shaman Area Heals
- Earthen Wall Totem — Use with Totemic Recall when possible.
- Healing Rain — Efficient when 6 or more injured allies can stay inside it.
- Downpour — Use inside Healing Rain for strong group healing.
- Wellspring — Use when multiple allies are injured; moderate cooldown.
- Chain Heal — Best used with High Tide, Tidebringer, or Nature's Swiftness.
Restoration Shaman Situational Spells
- Healing Surge — High-cost, fast heal for emergencies.
- Healing Wave — Efficient single-target heal, good synergy with Whispering Waves.
- Lightning Bolt — Low-cost, single-target damage.
- Chain Lightning — Low-cost AoE damage.
- Flame Shock — DoT with good value for its Mana cost.
- Lava Burst — Stronger with talents; good burst damage.
Consider using mouseover macros to reduce keybinds and increase responsiveness in group play.
Restoration Shaman Cooldowns
- Spirit Link Totem — Powerful group health stabilizer; synergizes well with Darkness and other personal cooldowns.
- Healing Tide Totem — Strong passive group heal to use during high-damage windows.
- Ascendance — Amplifies your healing and redistributes it to nearby allies; ideal with multiple active HoTs.
- Nature's Swiftness — Instant, Mana-free spell every minute; great for emergency or burst healing.
Detailed Analysis of Restoration Shaman Cooldowns and Abilities
Understanding and using your cooldowns correctly is critical to successful healing. Knowing when to use each cooldown can often be the difference between a clean fight and a wipe.
Spirit Link Totem
A unique and versatile cooldown. It equalizes health percentages of players inside the totem and provides 15% damage reduction. Great for splitting massive incoming damage or preparing the group for large hits. Pairs well with Darkness and allows efficient group healing through AoE spells. The Spouting Spirits talent enhances its effect with a large burst heal.
Healing Tide Totem
A core throughput cooldown. Heals all allies within 40 yards and scales better with fewer targets. Use it freely as it doesn’t require channeling. Current Control can reduce its cooldown, improving flexibility, though its supporting talents are not very strong overall.
Ascendance
This cooldown mirrors your healing and distributes it to nearby players. For best effect, activate with existing HoTs in play and follow with high-output spells like Downpour, Wellspring, and Chain Heal with High Tide.
Spiritwalker's Tidal Totem
Grants three instant, half-cost Healing Surges. While decent, it's generally weaker in PvE, especially compared to Healing Tide Totem which already provides strong group healing on its own.
Nature's Swiftness
Provides an instant, free cast once per minute. Best paired with Chain Heal (especially with Tidebringer) or other high-impact spells. Great for Mana conservation or burst healing during heavy damage phases.
Totemic Recall
Instantly resets your most recent totem (under 3-minute base cooldown). Excludes major cooldowns like Spirit Link Totem and Healing Tide Totem, but works well with Earthen Wall Totem, Cloudburst Totem, and Healing Stream Totem.
Cloudburst Totem
Use on cooldown or delay strategically for big healing moments. Pairs well with Wellspring, Downpour, and Chain Heal under High Tide. Can gain a second charge via talents but only one can be active at a time.
Unleash Life
Empowers your next heal. Best used with Chain Heal (with High Tide), Downpour, Healing Rain, or Riptide. Less effective with Wellspring due to potential overhealing and reduced benefit from Mastery.
Restoration Shaman Healing Gems and Consumables
Best Gems for Restoration Shaman
Gems are crafted through Jewelcrafting and can be slotted into any gear that has sockets. You can use as many gems as you have sockets available.
You can guarantee up to two sockets each in your necklace and rings by using Magnificent Jeweler's Setting, crafted by Jewelcrafters. This provides a total of six guaranteed sockets across those three items.
Additional sockets can randomly appear on your head, wrist, and waist gear, or you can socket them yourself using S.A.D., an item obtained through Great Vault non-gear tokens.
You should always aim to include one Algari Diamond, preferably a maximum quality Elusive Blasphemite. After that, make sure to include at least one gem of each type to activate the full Movement Speed bonus:
Once all gem types are accounted for, fill any remaining sockets with Versatile Ruby for optimal secondary stat gain.
Best Flask for Restoration Shaman in The War Within
The Flask of Alchemical Chaos provides the highest total stat gain. However, because Haste (in Raids) and Mastery (in Mythic+) are generally less valuable than Critical Strike or Versatility for Restoration Shamans, it is often better to use:
- Flask of Tempered Aggression for Raiding
- Flask of Tempered Versatility for Mythic+
Best Potion for Restoration Shaman in The War Within
Use Slumbering Soul Serum for Mana regeneration if you can afford downtime. Otherwise, Algari Mana Potion is preferred for faster recovery. For stat boosts, Tempered Potion is best for personal performance, though Potion Bomb of Power provides more value for group-wide damage output.
Some potions, such as Fleeting Tempered Potion, can also be obtained from Cauldrons placed by Alchemists.
In emergencies, Grotesque Vial is especially useful because it can be used while dead—potentially turning the tide of an encounter.
Always carry a supply of Invigorating Healing Potions for survivability. If a Warlock is in your group, make sure to get their Healthstone as well. These should not be macroed together—use them separately for maximum value. Fleeting Invigorating Healing Potion is also available from Alchemist Cauldrons.
Best Food for Restoration Shaman in The War Within
Since Haste and Mastery are very strong, use secondary stat food if either is your highest stat. Recommended options:
- The Sushi Special feast
- Or personal food like Outsider's Provisions, Beledar's Bounty, Jester's Board, or Empress' Farewell
Augment Runes for Restoration Shamans
If affordable, use Crystallized Augment Runes to increase your primary stat. These are expensive and disappear upon death, so use them wisely!
Best Weapon Rune for Restoration Shaman in The War Within
The best temporary weapon oil is Algari Mana Oil, offering a solid boost to Mana regeneration. However, in most situations, you’ll typically be using the Earthliving Weapon talent instead for its consistent healing benefits.
Best Enchants for Restoration Shaman in The War Within
| Slot | Enchantment |
| Necklace | Magnificent Jeweler's Setting (adds up to 2 sockets to a Ring or Neck) |
| Weapon | |
| Chest | |
| Bracers | |
| Legs |
Daybreak Spellthread (Raid) Sunset Spellthread (M+) |
| Boots | |
| Rings | |
| Cloak |
Restoration Shaman Healing Gear and Best in Slot
This section will cover everything you need to know about equipping your character correctly.
BiS Gear for Restoration Shaman
| Slot | Item | Source |
| Helm | Aspect of Channeled Fury (Tier) | Forgeweaver Araz in Manaforge Omega |
| Neck | Bloodstained Memento | Priory of the Sacred Flame |
| Shoulder | Fangs of Channeled Fury (Tier) | The Soul Hunters in Manaforge Omega |
| Cloak | Reshii Wraps | Campaign |
| Chest | Harvested Attendant's Uniform | Forgeweaver Araz in Manaforge Omega |
| Bracers | Glyph-Etched Vambraces | Crafted — Leatherworking |
| Gloves | Claws of Channeled Fury (Tier) | Soulbinder Naazindhri in Manaforge Omega |
| Belt | Colossal Lifetether | Loom’ithar in Manaforge Omega |
| Legs | Tassets of Channeled Fury (Tier) | Loom’ithar in Manaforge Omega |
| Boots | Interloper's Chain Boots | The Soul Hunters in Manaforge Omega |
| Ring #1 | Band of the Shattered Soul | Dimensius The All Devouring in Manaforge Omega |
| Ring #2 | Logic Gate: Alpha | Plexus Sentinel in Manaforge Omega |
| Trinket #1 | Astral Antenna | Loom’ithar in Manaforge Omega |
| Trinket #2 | So'leah's Secret Technique | Tazavesh: So'Leah's Gambit |
| Main-Hand | Voidglass Kris | Fractillus in Manaforge Omega |
| Off-Hand | Vagabond's Torch | Crafted — Inscription |
Best Trinkets for Restoration Shaman in The War Within Season 3
Take note that a trinket's worth might vary wildly between types of content. For example, there are trinkets not listed below that are specifically created and tailored for PvP, while PvE players mostly chase stat sticks, as those improve healing (and damage) reliably, without the burst and bust characteristic of proc or on-use trinkets.
Every trinket not listed below, when at its maximum upgrade level possible, can be considered as being of lower than C-tier.
The ranking system is as follows:
- S Tier: the strongest and most generally useful trinkets; these are always good choices;
- A Tier: these trinkets are slightly weaker than the S Tier traits, but are still solid choices;
- B Tier: a below-average trinket that should be picked only in the absence of an S or A Tier trinket;
- C Tier: only use these if you have no other option.
S-Tier
- Astral Antenna
- So'leah's Secret Technique
- Signet of the Priory
- Empowering Crystal of Anub'ikkaj
- Loom'ithar's Living Silk
A-Tier
- Ara-Kara Sacbrood
- Algari Alchemist Stone
- Lily of the Eternal Weave
- Darkfuse Medichopper
- First Class Healing Distributor
- Diamantine Voidcore
B-Tier
- Mister Pick-Me-Up
- Essence-Hunter's Eyeglass
- Manaforged Aethercell
- Araz's Ritual Forge
- Twisted Mana Sprite
C-Tier
- Mug's Moxie Jug
- Eye of Kezan
- Carved Blazikon Wax
- Reverb Radio
- Nexus-King's Command
- Burin of the Candle King
- House of Cards
The War Within Season 3 Tier Set for Restoration Shaman
Farseer Set Bonuses
Shaman Farseer 11.2 Class Set 2pc: Ancestral Swiftness summons an empowered Ancestor for 15 seconds that deals 10% increased damage and healing.
This empowered Ancestor appears in addition to the regular one from Ancestral Swiftness and behaves identically, while any Ancient Fellowship procs will continue to summon regular Ancestors.
As Ancestors are the core source of healing for Farseer, this is a very strong bonus that significantly boosts healing output without changing gameplay.
Shaman Farseer 11.2 Class Set 4pc: Ancestral Swiftness increases your spell damage and healing by 25%, reduces mana costs by 25%, and increases the recharge rate of Lava Burst and Riptide by 50% for 8 seconds.
This set bonus greatly amplifies healing potential. Once obtained, try to delay Ancestral Swiftness to align with major raid damage events so the powerful buff is active during healing cooldowns.
Totemic Set Bonuses
Shaman Totemic 11.2 Class Set 2pc: After consuming all Whirling Element motes, you cast Downpour at 200% effectiveness at your Surging Totem’s location.
This bonus rewards good play, activating when you finish spending all Whirling Elements. Track your motes to time Downpour for peak healing impact — typically by using Chain Heal (directly or through Lively Totems) followed by Healing Surge to trigger it.
Shaman Totemic 11.2 Class Set 4pc: After casting Downpour, your next Chain Heal, Healing Wave, or Healing Surge casts again at 150% effectiveness. This buff can stack twice, amplifying healing on each enhanced cast.
You’ll generally want to use this buff on Chain Heal to take advantage of its smart healing and minimize overhealing. Combining the buff with High Tide and Unleash Life will maximize healing throughput for enormous burst potential.
Addons for Restoration Shaman
Generic Addons
- ElvUI
- Weak Auras
- Boss Mods
- BigWigs Bossmods
- Deadly Boss Mods
- Name Plates
- KUI Nameplates
- TidyPlates
- Damage Meters
- Details
Extra AddOns
- Doom Cooldown Pulse
- Angry Assignments
- Alternative Raid Frames
- Cell
- Vuhdo
- Grid2
- HealBot
- Raid / External Cooldown Tracking
- Method Raid Tools
Restoration Weak Auras
- Cloudburst Totem Stored Healing Tracker
- Undulation Activation Threshold Tracker
- High Tide Activation Threshold Tracker
- Tidebringer Flow Tracker
- Ancestor Duration Tracking
- Flow of the Tides Riptide Tracker
- Totemic Recall Tracker
WeakAuras for Restoration Shaman
WeakAuras is an essential tool for Restoration Shaman and Healers, offering unparalleled customization to enhance your gameplay. Rather than focusing on specific examples, we recommend exploring Wago.io, where you’ll find an extensive library of WeakAuras to suit your needs.
If you are unfamiliar with WeakAuras, it is an incredibly powerful and widely-used AddOn that allows you to create custom displays for nearly everything in the game. This includes tracking buffs, debuffs, cooldowns, Focus, resources, and much more.
To import a WeakAura, visit Wago.io and select one that fits your preferences. Click the "Copy WeakAura Import String" button to copy it to your clipboard. Next, log into the game and type /wa in the chat box to open the WeakAuras interface. Navigate to the "Import" section, press Ctrl+V to paste the copied string, and click "Import". You’re ready to go!
Mastering WeakAuras and customizing it to your playstyle is highly recommended for any serious raider. With countless options available on Wago.io, you can tailor your interface to optimize your performance and focus on what truly matters in combat.
Restoration Shaman Frequently Asked Questions
Best Hero Talents for Restoration Shamans?
Totemic is the best choice for ease of play and stacked healing, while Farseer provides more min-max potential and excels in single-target or spread healing scenarios.
Does Chain Heal Require High Tide and Tidebringer to Be Used?
No,Chain Heal is still an effective healing ability even outside of these buffs. While High Tide and Tidebringer greatly enhance it, you should still use Chain Heall whenever area healing is required, as long as targets are close together and you have enough Mana.
Is There a Haste Cap for Restoration Shamans?
No, there is no Haste cap. Haste makes your spells cast faster and improves your rotation smoothness, but it comes at the cost of higher Mana consumption.
What is the Best Loa for Zandalari Restoration Shamans?
The best option is Embrace of Pa'ku, as it provides a Critical Strike buff that enhances healing efficiency.
Can I Level as Restoration?
You can, but it is not recommended.
- Damage output is significantly lower than other specs.
- Drop gear with Mastery and use trinkets with damage procs to improve leveling speed.
If you plan to heal dungeons while leveling, queue for dungeons while questing to make the process smoother.
Are Restoration Shamans Good in Raids?
Yes! They bring unique, powerful abilities, such as:
- Spirit Link Totem for group-wide damage reduction.
- Spouting Spirits and Ancestral Protection Totem for extra healing and survivability.
- Strong cooldown-based healing with Ascendance, Ancestral Guidance, and Cloudburst Totem.
- Skyfury as a new raid buff.
Does Earth Shield Interact with Chain Heal?
Yes, but only the first target hit by Chain Heal receives the 20% bonus healing from Earth Shield. It does not boost the entire Chain Heal spell.
Which Raid Frames Should I Use?
Popular choices include:
- Cell
- VuhDo
- Grid2
- ElvUI
Blizzard’s default UI does not offer enough customization to properly track important healing information.
Does High Tide Activate from Free Casts During Innervate?
Yes! Any casts made while underInnervate still count toward High Tide’s activation, even though they cost 0 Mana.
Are Restoration Shamans Good in PvP?
Yes, they are among the most versatile healers, offering:
- Skyfury for a group-wide buff.
- Roots and slows for crowd control.
- Strong healing and mobility tools.
- A ranged interrupt, which is rare for healers.
Are Two-Handed Weapons Viable?
Yes, but with some conditions:
- PvE: Using a high-item-level two-handed weapon is viable if it has good secondary stats or a powerful effect.
- PvP: A shield is mandatory for extra armor and survivability.
What is the Best Race for Restoration Shamans?
- Horde: Tauren (PvE) or Orc (PvP).
- Alliance: Dwarf is the top choice due to Stoneform and Might of the Mountain.
How Does Deeply Rooted Elements Work?
- It has a cumulative 0.24% chance per cast to proc.
- Every Lightning Bolt or Chain Lightning cast increases the chance of triggering.
- The proc chance resets after activation.
Are Restoration Shamans Good in Mythic+?
Yes! They are the top healer for Mythic+ due to:
- High reactive healing output.
- Skyfury buff for extra DPS.
- Strong personal and party utility (interrupts, stuns, and mobility tools).
- Sustained DPS from Acid Rain and Master of the Elements.
Should I Use Earth Elemental as a DPS Cooldown?
No. While it can deal some damage, its AI is unreliable, and it’s better used as a survivability tool due to the health increase and Primordial Bond’s defense boost.


Digital Aura Portal - FZCO
Building A1, Dubai Digital Park, Dubai Silicon Oasis, Dubai, United Arab Emirates Premises Number 72647 - 001
Business registration number: 70647