Affliction Warlock DPS Guide - Midnight (12.0.1)
Select your Specialization
In this Affliction Warlock Guide, we delve into the current state of one of the most powerful and iconic damage dealers in World of Warcraft — the Warlock. Get ready to master the tips and tricks for Affliction Warlock gameplay with our comprehensive guide.

Table of Contents
Affliction Warlock Overview
Affliction Warlocks excel at maintaining both single-target and multi-target damage. Their primary source of damage comes from applying damaging DoTs (damage-over-time effects), enabling them to effectively cleave targets spread across an area—something many other specializations struggle with or can't do at all. Like the other Warlock specs, Affliction Warlocks also bring the Demonic Gateway ability to raids, offering an invaluable mobility cooldown that can greatly enhance group movement and positioning.
Affliction Warlock Strengths and Weaknesses
Strengths
- High sustained damage through Damage over Time management
- Great multi-target pressure
- Strong self-healing
- Very good funnel and priority damage
Weaknesses
- Requires ramp-up time for maximum damage
- Low Burst damage (outside of Hellcaller) which requires a setup period
- Damage profile centered around sustained output with relatively weak cooldowns
- Vulnerable to interrupts and dispels
Affliction Warlock Basic Gameplay
Affliction Warlock is a spec centered around Damage over Time effects, cooldown periods that require a setup to get the most out of them, and a relative amount of pet management. At its core, the gameplay is about generating and spending the Warlock's iconic resource: Soul Shards.
Affliction Warlock is a specialization focused on Damage over Time (DoT) effects, with cooldowns that require strategic setup to maximize their potential, along with some pet management. At its core, the gameplay revolves around generating and spending the Warlock’s signature resource: Soul Shards.
The basic rotation is straightforward: keep Corruption and Agony active on your target(s), use Soul Shards to cast Malefic Rapture or Seed of Corruption, and fill in the gaps with Shadow Bolt during downtime.
Affliction Warlock 11.2 Changes
Patch 11.2 brings many updates to Warlocks and specifically to the Affliction specialization:
- Corruption is now instant cast baseline and applies its first tick of damage immediately for all Warlock specs. As a result, Xavian Teachings has been removed.
- Unstable Affliction damage increased by 68%.
- Shadow Bolt and Drain Soul damage increased by 25% in PvE.
- Summon Darkglare damage increased by 35% in PvE.
- Haunt damage increased by 50% in PvE, and its damage amplification is now 12%.
- Tormented Crescendo now stacks up to 3.
- Focused Malignancy PvE bonus doubled from 40% to 80%.
- Wither periodic damage increased by 15% in PvE.
- Blackened Soul damage increased by 30%.
- Xalan's Ferocity and Xalan's Cruelty values tripled to 6%.
- Wicked Reaping damage increased by 75% in PvE.
- Demonic Soul damage increased by 55% in PvE.
- Soul Anathema damage increased by 40% in PvE.
Hero Class Tier Set Bonuses
Season 3 introduces tier set bonuses tied to Hero Trees instead of specializations. This shift alters the balance and favors certain Hero Trees across all Warlock specs.
Hellcaller Season 3 Set Bonus
This set emphasizes Wither and Blackened Soul passive damage. While the damage profile changes, gameplay impact is minimal aside from maximizing Shard use during Malevolence and favoring Bleakheart Tactics over Hatefury Rituals.
- 2-piece set bonus: Warlock Hellcaller 11.2 Class Set 2pc
- 4-piece set bonus: Warlock Hellcaller 11.2 Class Set 4pc
Soul Harvester Season 3 Set Bonus
This set provides additional passive damage with little to no impact on rotation.
- 2-piece set bonus: Warlock Soul Harvester 11.2 Class Set 2pc
- 4-piece set bonus: Warlock Soul Harvester 11.2 Class Set 4pc
Reshii Wraps
Season 3 also introduces a new Legendary Cloak for all players: Reshii Wraps. Its effect changes depending on your role. This best-in-slot item is unlocked through the main storyline and can be upgraded weekly up to item level 730. It also comes with a meta socket to slot different Fibers, which determine your secondary stats.
Affliction Warlock Leveling Guide for The War Within
Affliction Warlock Leveling Playstyle
As a DoT specialization, Affliction Warlock provides an efficient leveling experience by tagging multiple enemies with either Agony or Corruption while moving toward the next target or area. The damage-over-time effects, combined with the pet, are typically strong enough to leave enemies significantly weakened or even eliminate them by the time they are finished off with AoE spells.
Curses, crowd control abilities, and the pet acting as an off-tank help mitigate incoming damage, encouraging an aggressive playstyle. Additionally, personal defensive cooldowns provide a layer of safety, even when overpulling.
For tougher foes like Elites or Rares, sustaining the Voidwalker is often the main priority while gradually wearing the enemy down, as the pet's threat generation cannot keep up with heavy burst damage from spenders.
Gear Options
When leveling, always prioritize selecting the piece of loot with the highest item level. If multiple items have the same item level, choose the one with stats that best suit your specialization. However, if your current item is an Heirloom, it should not be replaced.
Pet Choice for Affliction Warlock Leveling
Summon Imp is your first available demon and is most effective in raid environments. While not particularly useful for leveling, it's your only option during the early levels.
If you're leveling solo, Summon Voidwalker can be a great choice, as it alleviates a lot of the pressure on you. Avoiding casting pushback can also help speed up your leveling process.
Summon Felhunter is a solid option if you're leveling in a group or tackling dungeons. The extra interrupt it provides is valuable for handling troublesome caster mobs.
Affliction Warlock DPS Spec, Builds, and Talents
Copy the Affliction Warlock talents, paste them into the game.
Single Target Talents
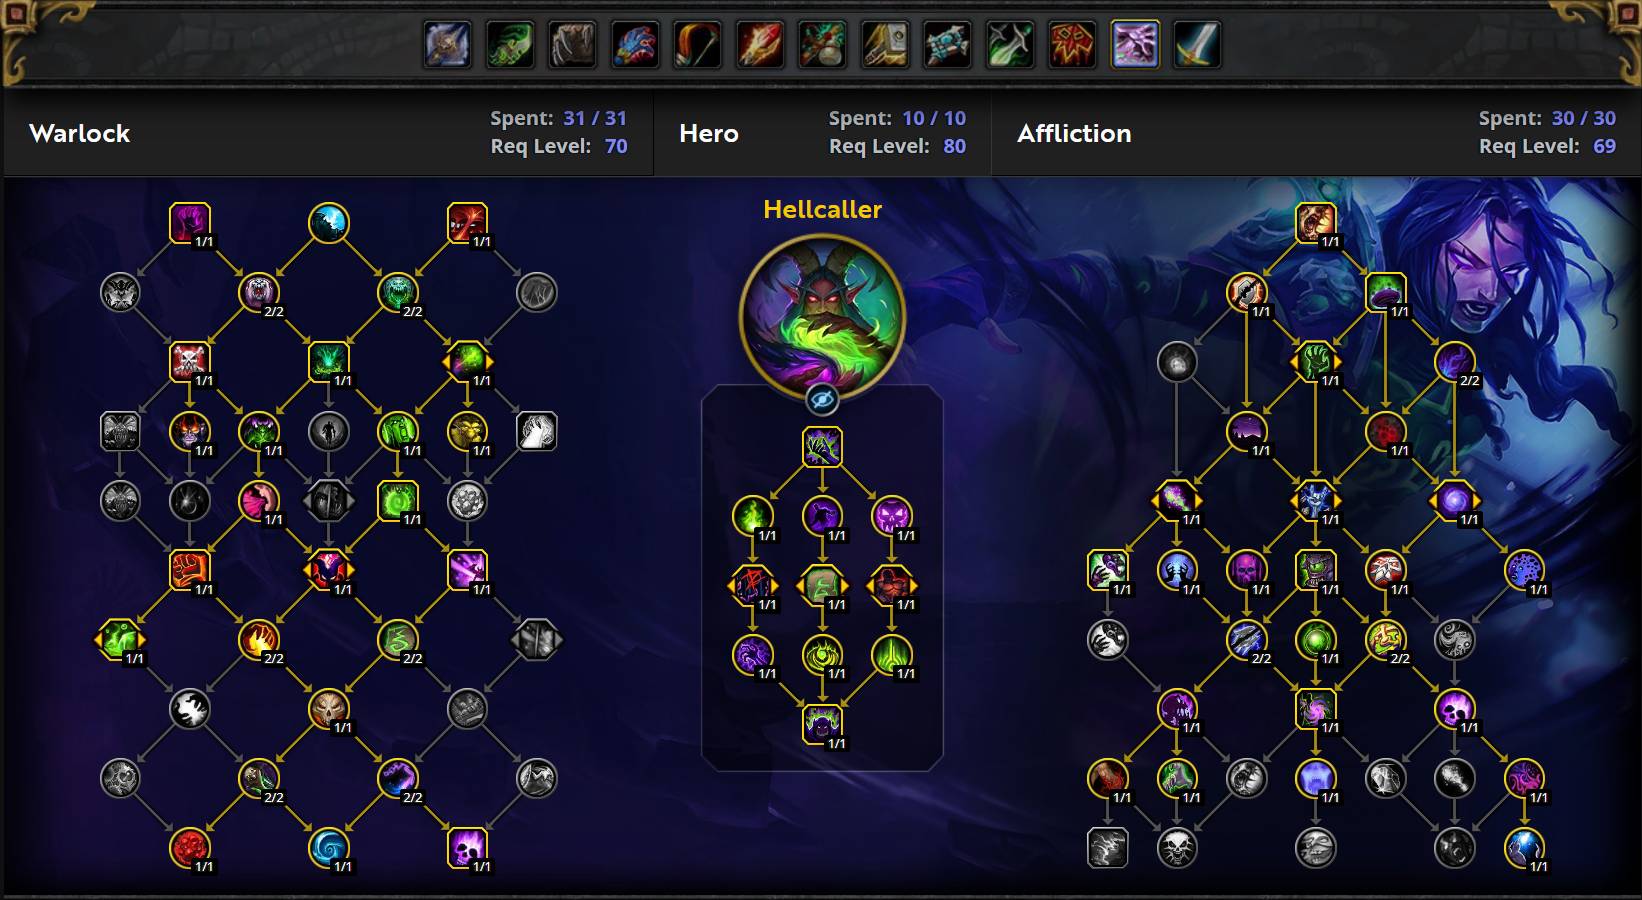
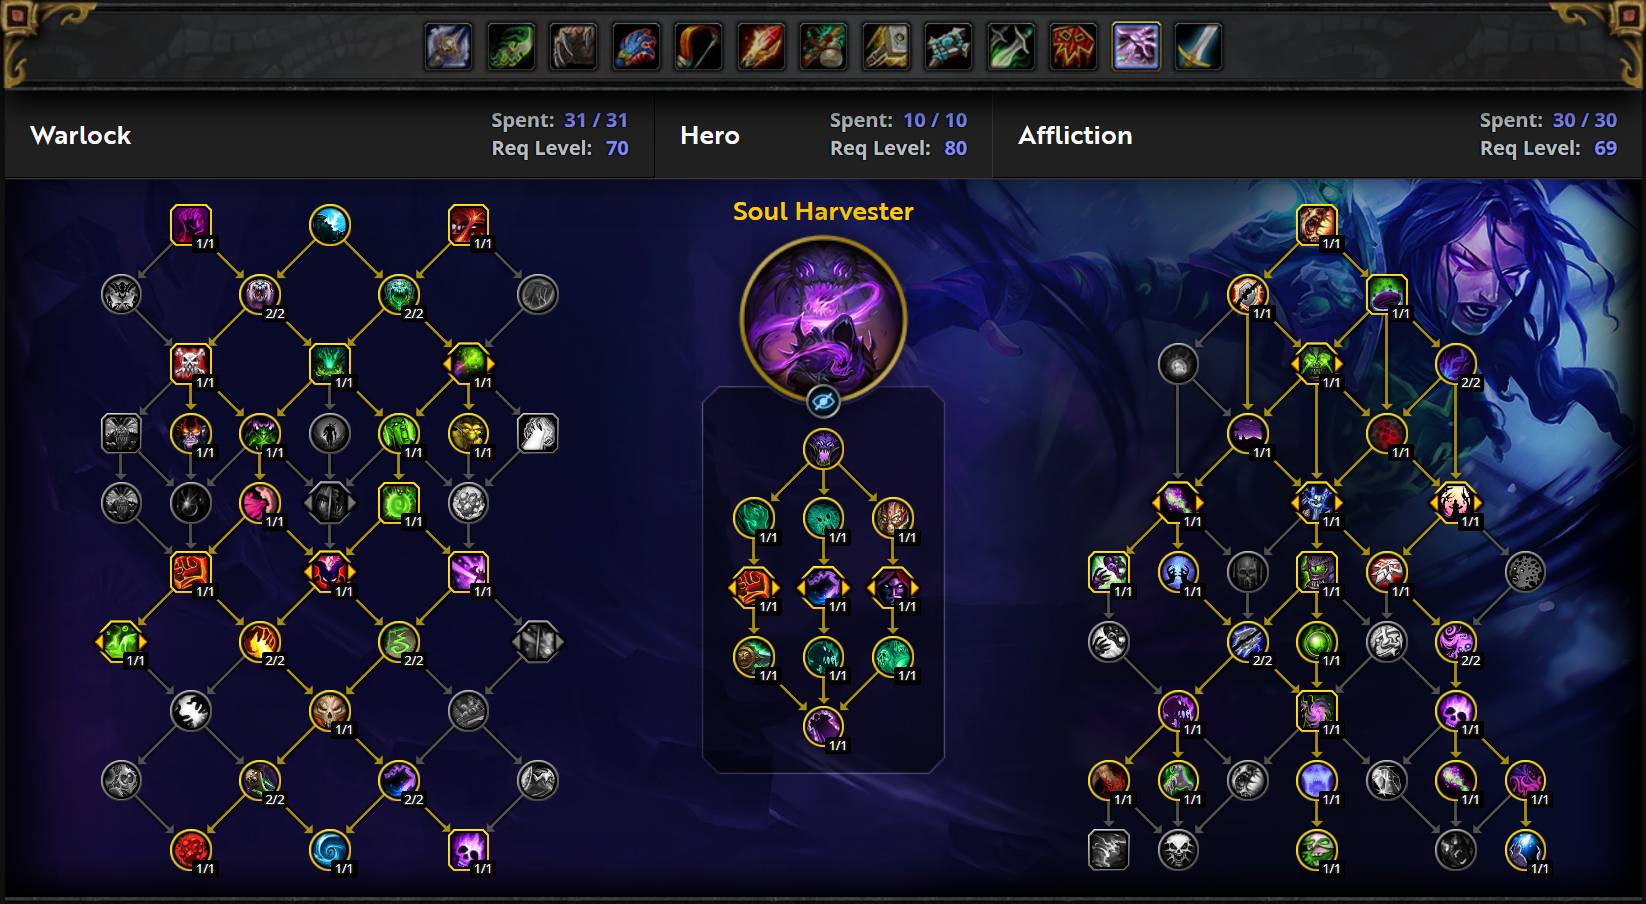
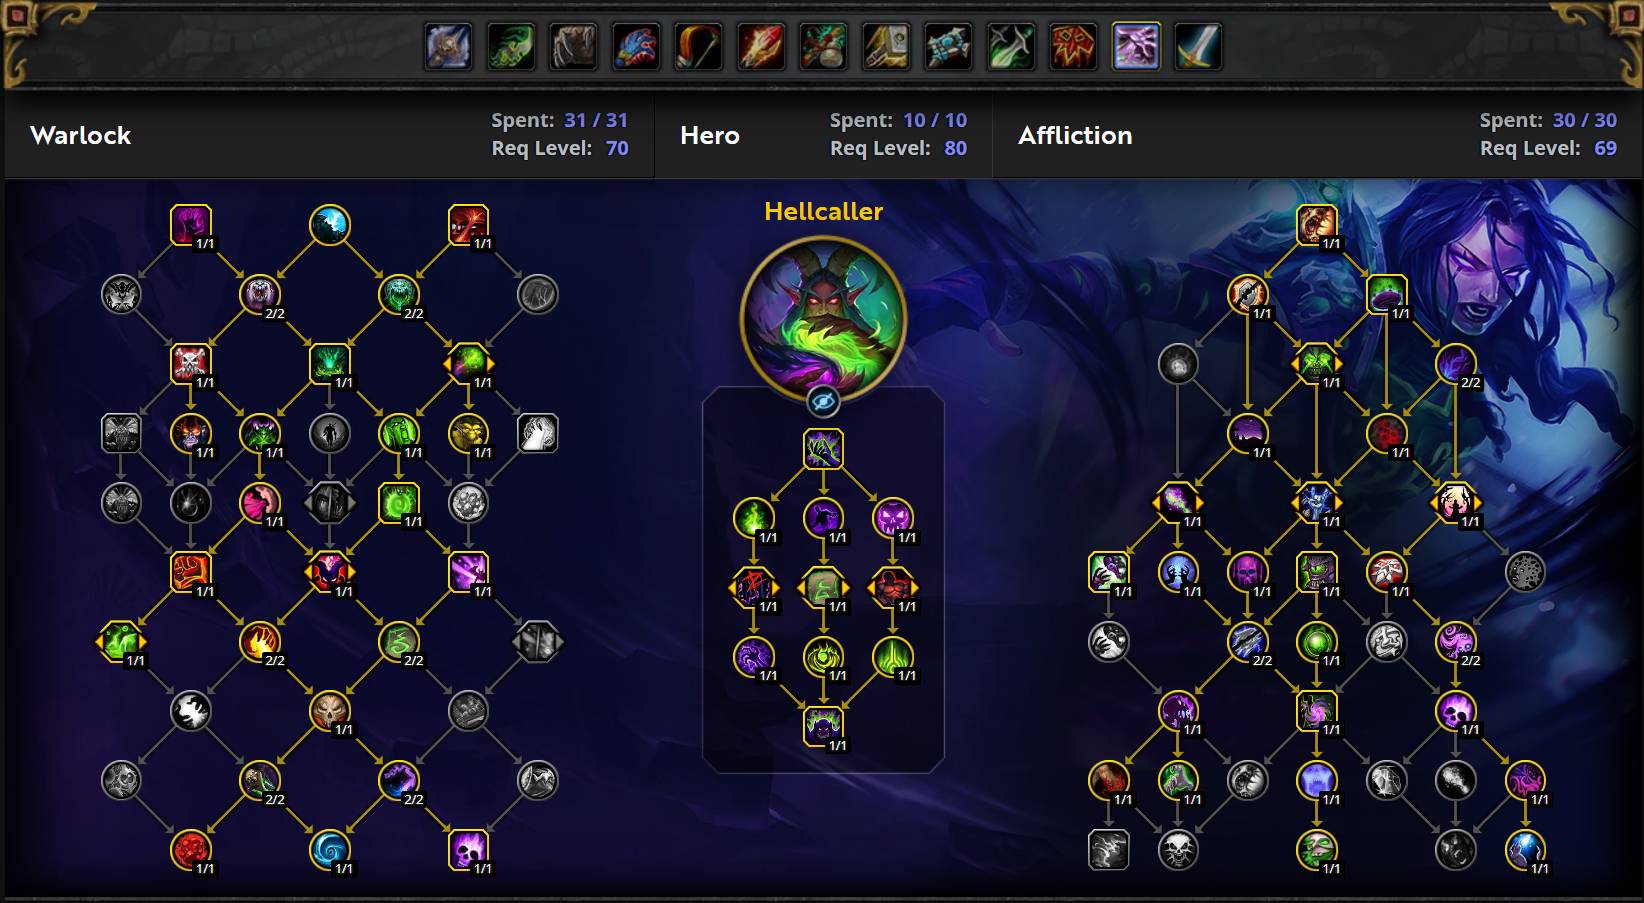
AoE Soul Harvester Talents
AoE Hellcaller Talents
Raiding
Please note that the builds mentioned above don’t take into account specific encounters in the current raid tier. However, we have a dedicated page that offers boss-by-boss talent recommendations, which you can find linked below.
Mythic+
For Mythic+ specific advice, which generally requires a setup that works well for both single-target and AoE, be aware that this can be influenced by affixes, party composition, and pull layout. Check out our dedicated Mythic+ page for more information:
How to Use Affliction Warlock Talents
As several talent choices impact your gameplay, we recommend visiting our rotation page linked below to learn how to adjust your playstyle and priority based on the talents you select:
Choosing Warlock Class Talents
While there are a few talents that boost DPS, the path progression in the talent tree is generally flexible, allowing you to choose or skip utilities depending on the situation. Below, we highlight key talents and suggest what to pick to progress down the tree.
For detailed information on each talent, refer to the spell summary page:
Hero Tree Talents
A standout feature of the new expansion is the Hero Talent Tree system, which further customizes your specialization with unique twists that impact both the visual and, to a lesser extent, the playstyle.
Affliction Warlock players can choose between Hellcaller and Soul Harvester.
For a full overview of both trees and their use cases, follow the link below:
PvP Talents (War Mode)
In our Talents section, you can also enable "War Mode," which provides the following benefits:
- PvP talents are enabled in the outdoor world.
- A 10% increase in World Quest rewards at maximum level.
- 10% more experience gained while leveling.
- Earn Conquest Points, which can reward gear weekly.
Given the perks of War Mode for leveling and PvE content, we recommend enabling it. Although it opens you up to the risk of open-world PvP and potential "ganks" while leveling or doing World Quests, the benefits generally outweigh the drawbacks.
Best Hero Talents for Affliction Warlock in The War Within
This section is specifically about Hero Talents in The War Within.
Raiding Hero Talents for Affliction Warlock
The current recommendation for Hero Talents is Soul Harvester.
Soul Harvester is the preferred choice for single target and small target cleave due to its tuning and overall design. It excels in sustained output unless an encounter places disproportionate emphasis on 1-minute burst windows over sustained damage.
Hellcaller provides stronger burst damage around 1-minute marks and generally performs better in AoE at higher target counts, but at the cost of significantly lower single target damage overall.
Mythic+ Hero Talents for Affliction Warlock
The current recommendation for Hero Talents is Soul Harvester.
Soul Harvester offers superior priority damage and slightly better funneling capabilities, making it an ideal choice for groups that already have specialized AoE DPS and are focused on key target damage.
Hellcaller, with its emphasis on burst windows and large-scale AoE, is suited for Mythic+ scenarios and is somewhat easier to play. However, it does not provide a significantly higher AoE output in practice.
Affliction Warlock DPS Stat Priority
The Basics of Stats for an Affliction Warlock
The stat priority for an Affliction Warlock is as follows:
- Intellect
- Mastery & Critical Strike
- Haste
- Versatility
This stat priority was determined using a SimulationCraft profile with standard BiS gear and normalized stats. It represents a typical "average" player’s gear, but it's important to review this information carefully. We highly recommend simming yourself to determine which stats provide the maximum benefit, as this can change based on your specific ratios.
As players acquire higher item levels, their stat priorities may shift due to varying scaling.
These statistics were obtained through a combination of common sense, in-game testing, and simulations using SimulationCraft.
Diminishing Return on Secondary Stats
At the release of Shadowlands, Blizzard introduced a diminishing return system with various tiers, which results in an increased penalty on stat amounts as you reach higher percentages:
- From 0% to 30%, there is no penalty.
- From 30% to 39%, there is a 10% penalty.
- From 39% to 47%, there is a 20% penalty.
- From 47% to 54%, there is a 30% penalty.
- From 54% to 66%, there is a 40% penalty.
- From 66% to 126%, there is a 50% penalty.
You can get up to 126% from the gear rating. In practical terms, this will not significantly affect your results when using tools like SimulationCraft or Raidbot, as they already account for these penalties.
Statistics Explanations for Affliction Warlock
Intellect is your primary stat, and you should prioritize it in all of your upgrades. It increases your Spell Power, which in turn boosts the damage of your spells.
Mastery — Mastery: Potent Afflictions increases the damage of your Damage over Time (DoT) abilities (Agony, Corruption, Seed of Corruption, and Unstable Affliction) as well as Malefic Rapture. Mastery does not affect your pets or Soul Shard generation.
Haste reduces the cast time of your spells and increases the number of ticks for your DoTs, which lowers the ramp-up damage from Agony. Haste also reduces the global cooldown and improves the scaling of your pets. Since more DoT ticks generate additional Soul Shards, Haste is the stat with the most impact on resource generation.
Critical Strike increases the chance for your spells and abilities to critically hit.
Versatility provides a flat increase to your damage done and reduces the damage you take.
Affliction Warlock DPS Rotation, Cooldowns, and Abilities
Soul Harvester Single Target Rotation
Affliction Warlocks focus on applying multiple damage-over-time effects to their targets, while also managing procs and using Soul Shards as a resource. A significant part of optimization involves maintaining these active effects and ensuring proper Soul Shard usage.
- Maintain your Agony, Unstable Affliction, and Corruption effects at all times.
- Maintain 4 stacks of Shadow Embrace.
- Apply Malefic Rapture if you are at maximum Soul Shards.
- Cast Haunt whenever available.
- Delay Phantom Singularity to cast it with Soul Rot.
- Ensure you have 2 or fewer Soul Shards before casting Phantom Singularity.
- Cast Soul Rot whenever available, with either Phantom Singularity or Vile Taint active on the target.
- Cast Malefic Rapture during the Phantom Singularity window.
- Cast Malefic Rapture to avoid capping Soul Shards.
- Cast Drain Soul as a filler.
Soul Harvester Single Target Opener
- Pre-cast Haunt.
- Apply Unstable Affliction.
- Apply Agony.
- Apply Corruption.
- Cast Malefic Rapture.
- Cast Phantom Singularity.
- Cast Soul Rot.
- Use your trinkets and racials.
- Cast Nightfall → Drain Soul.
- Cast Summon Darkglare to extend all periodic damage effects.
Soul Harvester AoE Rotation
- Cast Vile Taint.
- Maintain Agony and Corruption. If there are 3+ targets stacked together, use Seed of Corruption to apply and maintain Corruption.
- Maintain Unstable Affliction on the primary target.
- Cast Malefic Rapture if already at 5 Soul Shards to avoid capping.
- Cast Malefic Rapture if above 2 Soul Shards before Soul Rot comes off cooldown.
- Cast Soul Rot.
- Cast Malefic Rapture during the Vile Taint window.
- Cast Shadow Bolt as a filler.
Hellcaller Single Target Rotation
- Maintain your Agony, Unstable Affliction, and Wither effects at all times.
- Maintain 4 stacks of Shadow Embrace.
- Apply Malefic Rapture if you are at maximum Soul Shards.
- Cast Haunt whenever available.
- Cast Vile Taint whenever available.
- Cast Malevolence after Vile Taint.
- Cast Soul Rot whenever available with either Phantom Singularity or Vile Taint active on the target.
- Cast Malefic Rapture during the Vile Taint window.
- Cast Malefic Rapture to avoid capping Soul Shards.
- Cast Drain Soul as a filler.
Hellcaller Single Target Opener
- Pre-cast Haunt.
- Apply Unstable Affliction.
- Apply Agony.
- Apply Wither.
- Get to 4 stacks of Shadow Embrace with Drain Soul.
- Cast Malevolence.
- Cast Vile Taint.
- Cast Soul Rot.
- Use your trinkets and racials.
- Cast Summon Darkglare to extend all periodic damage effects.
Pandemic and Learning to Efficiently Refresh DoTs
Pandemic is a hidden mechanic that allows you to refresh certain damage-over-time (DoT) effects early without any penalty. You can refresh your DoTs when they have less than 30% of their maximum duration remaining. This will extend the new DoT's duration by adding the full duration of the new DoT to the remaining duration of the current one.
For example, if you cast a fresh Agony while your current one has a duration of 3.5 seconds, the new Agony will now have 21.5 seconds left.
The Pandemic values for safe refreshes for your other DoTs are as follows:
- Agony: 5.4 seconds
- Corruption: 4.2 seconds
- Unstable Affliction: 6.3 seconds
When talented with Creeping Death, the Pandemic values change as follows:
- Agony: 4.5 seconds
- Corruption: 3.5 seconds
- Unstable Affliction: 5.4 seconds
Important Notes for Affliction Warlock
Soul Shards
All Warlocks use Soul Shards as their primary resource. Managing your Shards effectively is crucial for success, as overcapping can result in a potential loss of damage.
Malefic Rapture Usage
Malefic Rapture may seem straightforward at first glance, but it has several key implications that aren't immediately obvious.
Due to its linear scaling with each additional damage-over-time effect on a target, maximizing output requires casting it when the most damage-over-time effects are active. This means it's closely tied to talent cooldowns such as Vile Taint, Phantom Singularity windows, and to some extent Summon Darkglare and Soul Rot.
To optimize damage output, it's advisable to pool resources and cast as many Malefic Rapture spells as possible within these windows, essentially creating 1-minute cooldown loops, with only a few Malefic Rapture casts outside of these windows to prevent capping Soul Shards.
Agony
Agony is by far your most important spell, as it is the primary source of Soul Shard generation in the regular rotation. It also provides significant sustained damage. However, the trade-off is that Agony has a long ramp-up period before reaching full effectiveness. This means that if Agony drops off one of your primary targets for any reason, you will lose a substantial amount of DPS.
Maintaining your active Agony casts is the most crucial priority for this specialization, and failing to do so can be the most punishing mistake you can make.
Demon Choice
After the changes in 9.2, Succubus (or Incubus) now has a clear advantage in terms of single-target damage, assuming no frequent swaps to distant targets. However, your pet choice is often influenced by the unique utility each pet offers:
- For defensive dispels and regular swaps between distant targets, Imp provides the highest uptime.
- Use Felhunter whenever an interrupt or purge effect is required.
- Voidwalker can offer additional AoE damage due to its Torment ability, but its most significant utility is its taunt.
- Succubus offers crowd control and a permanent slow on a single target, which can be useful in certain situations.
Affliction Warlock DPS Gems and Consumables
This section covers your character's optimal gems, food, and flasks.
Best Gems for Affliction Warlock in The War Within
The War Within introduced epic meta gems with effects proportional to the number of different gem types socketed at any given time. This incentivizes players to use their first four gems to maximize the effect.
The two meta gems of choice are Culminating Blasphemite (Damage) and Elusive Blasphemite (Utility). Generally, Elusive Blasphemite offers more tangible benefits and is more practical, as the damage gained from Culminating Blasphemite is around 0.3% in Best-in-Slot gear.
When it comes to itemization, due to the relatively low stats offered by gems, the strategy is to gem with less important stats to round out the character. Combinations with Versatility and another secondary stat are typically preferred.
The gems most commonly found in Best-in-Slot setups are as follows:
- Emerald: Masterful Emerald and Versatile Emerald
- Ruby: Versatile Ruby and Quick Ruby
- Onyx: Deadly Onyx
- Sapphire: Masterful Sapphire
- Amber: Masterful Amber or Versatile Amber
Best Flask for Affliction Warlock in The War Within
You should be drinking the Flask of Alchemical Chaos at all times.
Best Potion for Affliction Warlock in The War Within
Stat Potions
Your primary stat potion should be Tempered Potion. Use this during moments when you deal the most damage with your abilities, typically during your cooldowns and/or Bloodlust or Heroism. You can also obtain Fleeting Tempered Potion from cauldrons spawned by Alchemists.
Healing Potions
Keep a stock of Invigorating Healing Potions to use when at low health. If you have a Warlock in your group, be sure to grab their Healthstones as well. However, do not macro these together, as they are best used separately! Additionally, you can acquire leeting Algari Healing Potion from cauldrons spawned by Alchemists.
Best Food for Affliction Warlock in The War Within
Feasts
You should always eat from a feast whenever possible. The best options include:
Alternative Food Options
If feasts are not available, consider eating one of the following:
Augment Runes
If you can afford it, use Crystallized Augment Runes to increase your primary stat. However, keep in mind that these runes are expensive and will disappear upon death, so use them wisely!
Weapon Runes for Affliction
Algari Mana Oil is the best temporary oil in any situation.
Affliction Warlock DPS Enchants
| Slot | Enchantment |
| Necklace | Magnificent Jeweler's Setting (adds up to 2 sockets to a Ring or Neck) |
| Weapon |
Enchant Weapon - Authority of the Depths (Pure Single Target) Enchant Weapon - Authority of Radiant Power (All around) |
| Chest | Enchant Chest - Crystalline Radiance |
| Bracers | |
| Legs | Sunset Spellthread |
| Boots |
Enchant Boots - Scout's March (Mobility) Enchant Boots - Defender's March (Small Defensive) |
| Rings | |
| Cloak |
Affliction Warlock DPS Gear and Best in Slot
This section will cover everything you need to know about equipping your character correctly.
BiS Gear for Affliction Warlock
| Slot | Item | Source |
| Helm | Cowl of Branching Fate (723) | Tazavesh, the Veiled Market |
| Neck | Salhadaar's Folly (723) | Nexus King Salhadaar in Manaforge Omega |
| Shoulder | Inquisitor's Gaze of Madness (723) | The Soul Hunters in Manaforge Omega/Matrix Catalyst/Great Vault |
| Cloak | Reshii Wraps (723) | 11.2 Campaign |
| Chest | Inquisitor's Robes of Madness (723) | Fractillus in Manaforge Omega/Matrix Catalyst/Great Vault |
| Bracers | Consecrated Cuffs (720) with Writhing Armor Banding and Critical Strike + Mastery | Crafted — Tailoring |
| Gloves | Inquisitor's Clutches of Madness (723) | Soulbinder Naazindhri in Manaforge Omega/Matrix Catalyst/Great Vault |
| Belt | Durable Information Securing Container with Static Charge (701) | Delves |
| Legs | Inquisitor's Leggings of Madness (723) | Loom’ithar in Manaforge Omega/Matrix Catalyst/Great Vault |
| Boots | Interloper's Silken Striders (723) | The Soul Hunters in Manaforge Omega |
| Ring #1 | Logic Gate: Alpha (723) | Plexus Sentinel in Manaforge Omega |
| Ring #2 | Band of the Shattered Soul | Dimensius The All Devouring in Manaforge Omega |
| Trinket #1 | Araz's Ritual Forge (723) | Forgeweaver Araz in Manaforge Omega |
| Trinket #2 | Azhiccaran Parapodia (723) | Eco-Dome Al'dani |
| Weapon | Voidglass Kris (723) | Fractillus in Manaforge Omega |
| Off-Hand | Vagabond's Torch (720) with Darkmoon Sigil: Ascension and Critical Strike + Versatility | Crafted — Inscription |
Best Trinkets for Affliction Warlock in The War Within Season 3
Raiding Trinket Tier List for Affliction Warlock
This Trinket Tier List is biased towards single-target, as this tends to be the more relevant aspect of Raiding. In the case of Trinkets performing similarly in single-target, the option with AoE/Multitarget scaling will be ranked higher.
A "Tier" as defined by this list is around 0.5% DPS, meaning that S-Tier Trinkets are around 0.5% better than A-Tier Trinkets, and so on.
Any trinket not shown on this list is generally considered worse than all other trinkets available on this list.
S-Tier
A-Tier
B-Tier
- Diamantine Voidcore
- Ara-Kara Sacbrood
- Empowering Crystal of Anub'ikkaj
- Gigazap's Zap-Cap
- So'leah's Secret Technique
C-Tier
Mythic+ Trinket Tier List for Affliction Warlock
This Trinket Tier List is focused more on AoE damage, as a large portion of Mythic+ is AoE damage.
A "Tier" as defined by this list is around 0.5% DPS, meaning that S-Tier Trinkets are around 0.5% better than A-Tier Trinkets, and so on.
Any trinket not shown on this list is generally considered worse than all other trinkets available on this list.
S-Tier
A-Tier
B-Tier
C-Tier
The War Within Season 3 Tier Set for Affliction Warlock
Hellcaller Season 3 Set Bonus
This set focuses on Wither and Blackened Soul passive damage. While the overall damage profile changes, gameplay remains mostly the same aside from maximizing Shard consumption during Malevolence and preferring Bleakheart Tactics over Hatefury Rituals.
- 2-piece bonus: Warlock Hellcaller 11.2 Class Set 2pc
- 4-piece bonus: Warlock Hellcaller 11.2 Class Set 4pc
Soul Harvester Season 3 Set Bonus
This set adds more passive damage, but does not significantly affect rotational gameplay.
- 2-piece bonus: Warlock Soul Harvester 11.2 Class Set 2pc
- 4-piece bonus: Warlock Soul Harvester 11.2 Class Set 4pc
Addons for Affliction Warlock
Generic Addons for Warlocks
- ElvUI
- Weak Auras
- Boss Mods
- BigWigs Bossmods
- Deadly Boss Mods
Name Plates
- KUI Nameplates
- TidyPlates
- Plater
Damage Meters
- Skada
- Details!
Extra AddOns
- Mik's Scrolling Battle Text
- xCT+ Combat Text
- DeathNote
- Doom CooldownPulse
- Angry Assignments
- Exorsus Raid Tools
Macros for Affliction Warlock
Pet Macros
These macros allow you to manage your demon, as playing with your Pet Stance on Assist is the preferred way to play.
- /petattack
This orders your demon to attack your target.
- /petfollow
This orders your demon to follow you.
- /petmoveto
This orders your demon to move to a location specified by you. This macro is especially useful for situations where you need your pet in a predetermined position in order to accomplish a given task — such as an interrupt on a otherwise out of range target — but can also be used to maximize Felguard cleave/Felstorm damage, just be aware that any imparted commands will also make your Dreadstalkers, Vilefiend (if talented) and Tyrant move, resulting in a much bigger loss when used improperly.
Dot Mouseover
- #showtooltip Corruption
- /use [@mouseover,harm] [harm] Corruption
Casts Corruption on current mouseover target if hostile and alive, else cast it on your current target.
Banish Focus
- #showtooltip Banish
- /use [mod:shift,@focus] [] Banish
Cast Banish on focus target by holding also shift, else cast it on your current target.
Soulstone Mouseover
- #showtooltip Soulstone
- /target [@mouseover] Soulstone
- /use Soulstone
- /targetlasttarget
Workaround macro for the current bug related to mouseover dead allies. The Macro itself will target the mouseover in order to cast Soulstone then target the previous target.
Demonic Circle
- #showtooltip
- /stopcasting
- /use [mod:shift] Demonic Circle(Summon); [nomod] Demonic Circle: Teleport(Teleport)
Place the Demonic Circle while holding shift, or teleport to the circle without any modifiers, while cancelling any ongoing casts. This saves you the trouble (and the time!) of interrupting your spell cast manually.
Mortal Coil/Howl of Terror
- #showtooltip
- /use [known:Mortal Coil,@mouseover,exists] Mortal Coil; [known:Mortal Coil] Mortal Coil; [known:Howl of Terror] Howl of Terror
Depending on the talent selected Mortal Coil will be casted on mouseover if available, otherwise on current target. If Howl of Terror is talented, it will be cast instead.
Vile Taint/Phantom Singularity
- #showtooltip
- /use [known:Phantom Singularity] Phantom Singularity; [known:Vile Taint,@cursor] Vile Taint
This macro will cast Phantom Singularity on the current target or Vile Taint at your mouse cursor, depending on your talent choices.
WeakAuras for Affliction Warlock
WeakAuras is an essential tool for Affliction Warlock and DPS players, offering unparalleled customization to enhance your gameplay. Rather than focusing on specific examples, we recommend exploring Wago.io, where you’ll find an extensive library of WeakAuras to suit your needs.
If you are unfamiliar with WeakAuras, it is an incredibly powerful and widely-used AddOn that allows you to create custom displays for nearly everything in the game. This includes tracking buffs, debuffs, cooldowns, Focus, resources, and much more.
To import a WeakAura, visit Wago.io and select one that fits your preferences. Click the "Copy WeakAura Import String" button to copy it to your clipboard. Next, log into the game and type /wa in the chat box to open the WeakAuras interface. Navigate to the "Import" section, press Ctrl+V to paste the copied string, and click "Import". You’re ready to go!
Mastering WeakAuras and customizing it to your playstyle is highly recommended for any serious raider. With countless options available on Wago.io, you can tailor your interface to optimize your performance and focus on what truly matters in combat.
Affliction Warlock Frequently Asked Questions
Which Pets or Demons Should I Use?
For Dungeons and Mythic+, the Felhunter is generally the best choice, as its interrupt is crucial for preventing dangerous casts, especially in higher-level Mythic+ dungeons. Interrupts can be the difference between a successful run and a wipe.
In Raids, the Imp is typically favored, especially if you need to use Singe Magic or there are frequent target swaps during the encounter.
For leveling or if you plan to use Grimoire of Sacrifice but don't need an interrupt, the Voidwalker is recommended. Sacrificing it grants Shadow Bulwark, which is a defensive cooldown that boosts your survivability.
The Succubus can be a good choice if you prefer higher single-target damage or need a permanent 50% slow on a single target.
Is Phantom Singularity Affected by Darkglare?
Yes, Phantom Singularity is affected by Darkglare, and so is Vile Taint.
When Should I Use Seed of Corruption?
Seed of Corruption should be used when you have 3 or more stacked targets to apply your Corruption debuff. Once there are at least 8 targets, it becomes your primary Soul Shard spender.
If you have the Sow the Seeds talent, simulations suggest that Seed of Corruption should be used at 3 targets.
Why Does My Darkglare Fail to Extend My DoTs Occasionally?
Sometimes, Darkglare fails to extend your DoTs if the target breaks line of sight or becomes untargetable in the same global cooldown as you cast Summon Darkglare.
How Much of a Specific Stat, Like Haste, is Required?
The amount of a particular stat, such as Haste, needed for optimal performance depends on your character and gear setup. The stat priority can vary greatly depending on your current distribution of secondary stats, Azerite Traits, and item level. To get the most accurate answer, it's best to use a simulation tool that caters to your specific gear and setup.
What Piece is Better, X or Y?
When comparing two pieces of gear, the best approach is to simulate it for your specific character. What might be an upgrade for one person could be different for another, as your overall gear affects each individual item’s value. This applies to all gear, trinkets, Azerite Traits, and talents. In some cases, like a specific fight, a certain set of talents may be optimal, and you can use resources like Warcraft Logs to check what top players are using in those situations.
Which Race is Best for Affliction Warlock?
Racial traits can have a small impact on your overall DPS, but the difference is minimal in most cases. If you're aiming for maximum output, using simulation charts based on your character's current gear and traits will help you decide on the best race.


Digital Aura Portal - FZCO
Building A1, Dubai Digital Park, Dubai Silicon Oasis, Dubai, United Arab Emirates Premises Number 72647 - 001
Business registration number: 70647