Devastation Evoker DPS Guide - The War Within 11.1
Select your Specialization
The The War Within brings new changes for all classes, and the Devastation Evoker is no exception. However, among all the classes, the Devastation Evoker has seen the fewest changes. In this WoW The War Within Devastation Evoker guide, we will cover everything you need to know about this spec, including its skills, talents, gear, and more.

Table of Contents
Devastation Evoker Overview
Evokers are highly mobile ranged DPS that can sustain very high uptime while moving with the usage of core abilities. Evoker is the only class with a range of 25 yards, which is something that will take getting accustomed to. There is a good amount of depth in the talent tree to allow you to specialize for single target, cleave, and AoE combat scenarios. For these, you will utilize the Red and Blue Dragonflights' schools of Magic.
Evokers utilize a resource called Essence, which regenerates over time. You spend Essence on Disintegrate and Pyre to deal single-target or AoE damage, respectively.
Evokers also have a class-specific spell set called Empowered Spells. As you cast the spells, they power up, having different interactions based on how long you Empower them. Devastation has access to two Empowered Spells in the form of Fire Breath and Eternity Surge.
While your spell prioritization may seem simple at a glance, the talents you pick change how you will use these spells, adding more depth to the class and your combat choices.
Devastation Evoker Strengths and Weaknesses
Strengths
- Can save team members with Rescue.
- Very mobile.
- Can specialize for specific damage profiles and perform well for their chosen type.
- Can deal very high amounts of damage to new targets.
- Can remove a wide array of effects on players with Expunge to remove Poisons and Cauterizing Flame& to remove Bleeds, Poisons, Curses, and Diseases.
Weaknesses
- Can die easily due to low HP.
- Two personal defensive cooldowns which must be used before the damage happens in order to utilize them properly.
- 25 yard range takes some getting used to.
Devastation Evoker Basic Gameplay
The Devastation Evoker playstyle is very fluid, and you will always be casting something that interacts with your next cast. Some examples are listed below:
- casting Blue Spells with Charged Blast talented will increase the damage of your next Pyre;
- casting Empowered spells during Dragonrage with Animosity talented will extend its duration;
- casting Fire Breath with Leaping Flames talented will make your next Living Flame hit additional targets (based on the Empower level);
- healing other players with Scarlet Adaptation will increase the damage of your next Living Flame;
- the cooldown of your empowered spells is reduced when you spend Essence with the Causality talent.
As you can see, there is a good amount of depth in your combat rotation from just a few of these interactions, making this a more involved and interesting DPS specialization to play.
Changes to Devastation Evoker in The War Within
Devastation is receiving some minor buffs to the overall spec, including a flat percentage aura damage increase and the new talent Azure Celerity. These changes are accompanied by buffs to the Flameshaper Hero tree, bringing it closer to the performance of Scalecommander.
While these improvements significantly boost Flameshaper's total output, it still lags behind Scalecommander in most scenarios. The exceptions are very short encounters or fights with brief, high-damage amplification windows. However, Flameshaper also has fewer Hover charges to work with, making its viability still somewhat questionable.
Devastation Evoker Leveling Guide for The War Within
Due to its high burst AoE damage, Devastation Evoker excels at leveling through questing by pulling large groups of mobs and quickly bursting them down. Additionally, its short cooldown defensives, such as Renewing Blaze, allow for rapid health recovery, making mass pulls much less risky compared to other specs.
Tag as many mobs as needed with Azure Strike. Once they are grouped together, cast a high-rank Fire Breath and then spam Pyre. Since Pyre is uncapped AoE, all targets will be efficiently burned down together.
Devastation Evoker Gear Options
While leveling, prioritizing higher item level gear is generally the best approach. However, there is one exception: if a ring or necklace has only one secondary stat instead of two, it may be better to choose a lower item-level piece that offers both secondary stats.
Devastation Evoker PvP Talents for Leveling
- Obsidian Mettle allows you to safely cast spells while enemies attempt to knock you back. It can also be useful for gathering Windswept Herbalism nodes.
- Unburdened Flight helps when trying to escape a pack of enemies without being slowed by Daze.
- The third PvP talent is a personal choice, but Swoop Up is recommended as it provides extra mobility when in combat and unable to use Dragonriding.
While Devastation Evoker PvP talents do not offer significant advantages for leveling, they can make combat slightly easier and more efficient.
Devastation Evoker DPS Spec, Builds, and Talents
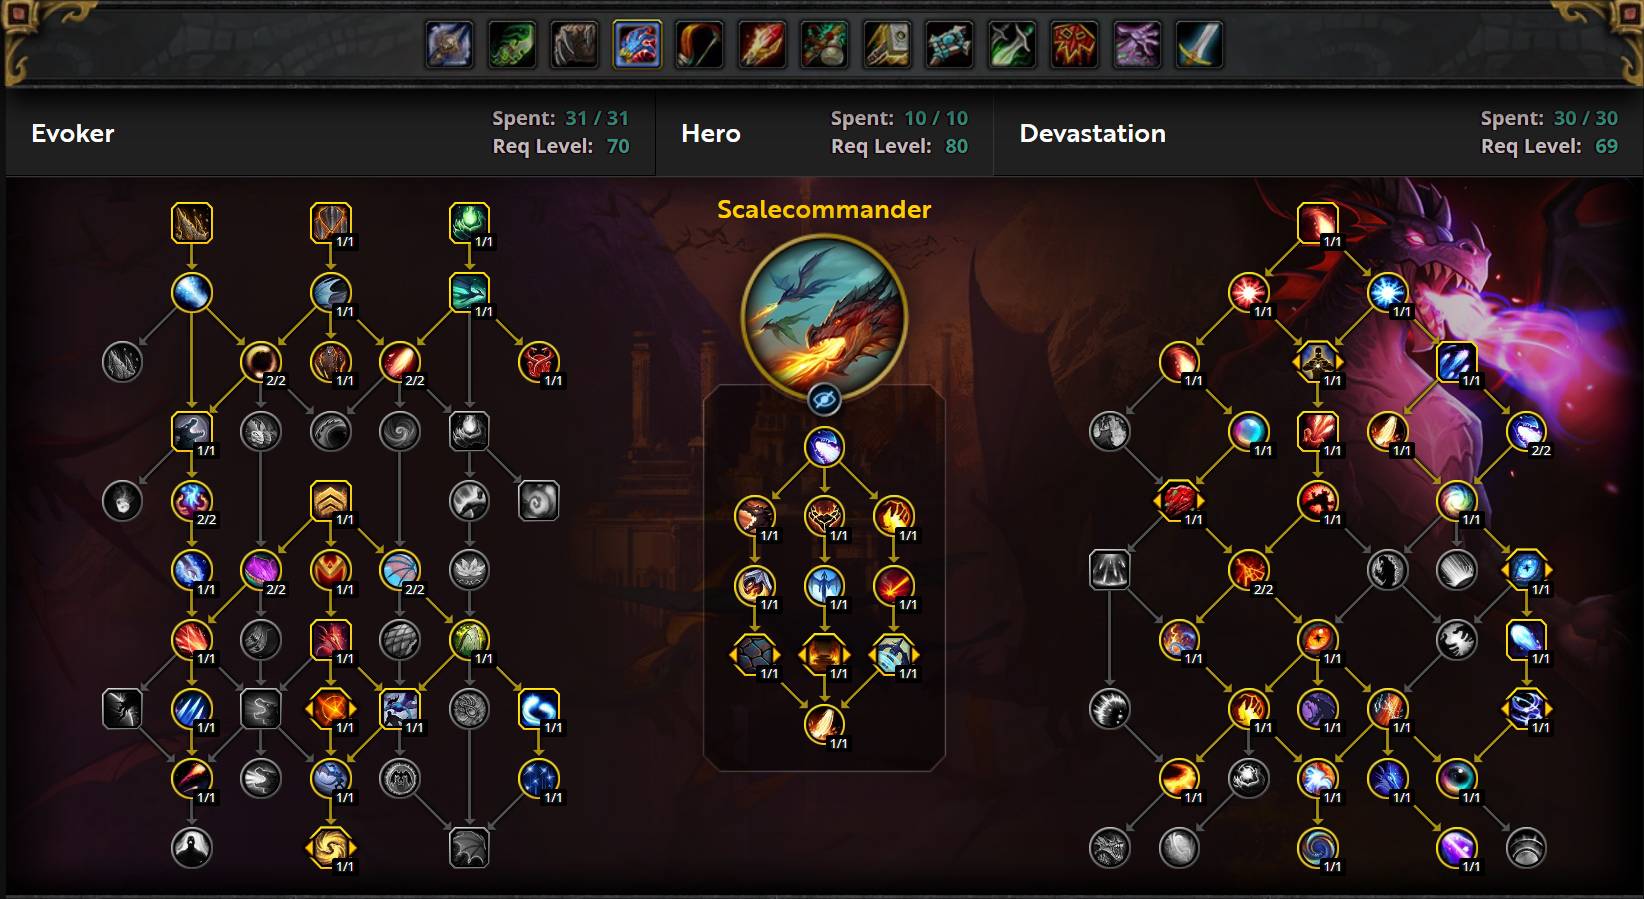
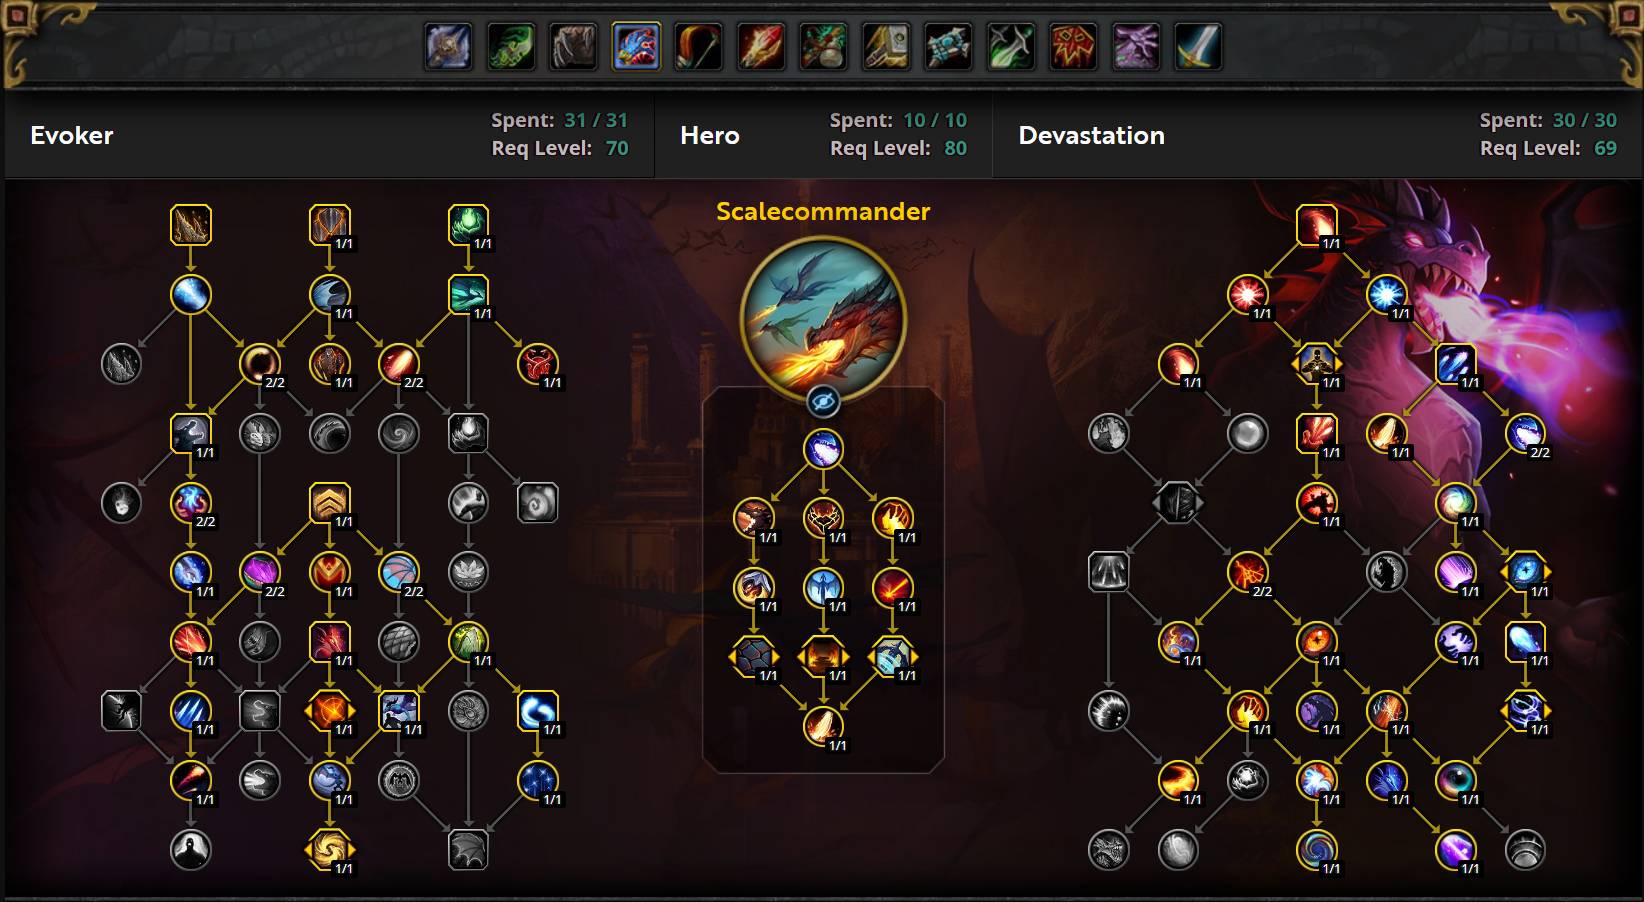
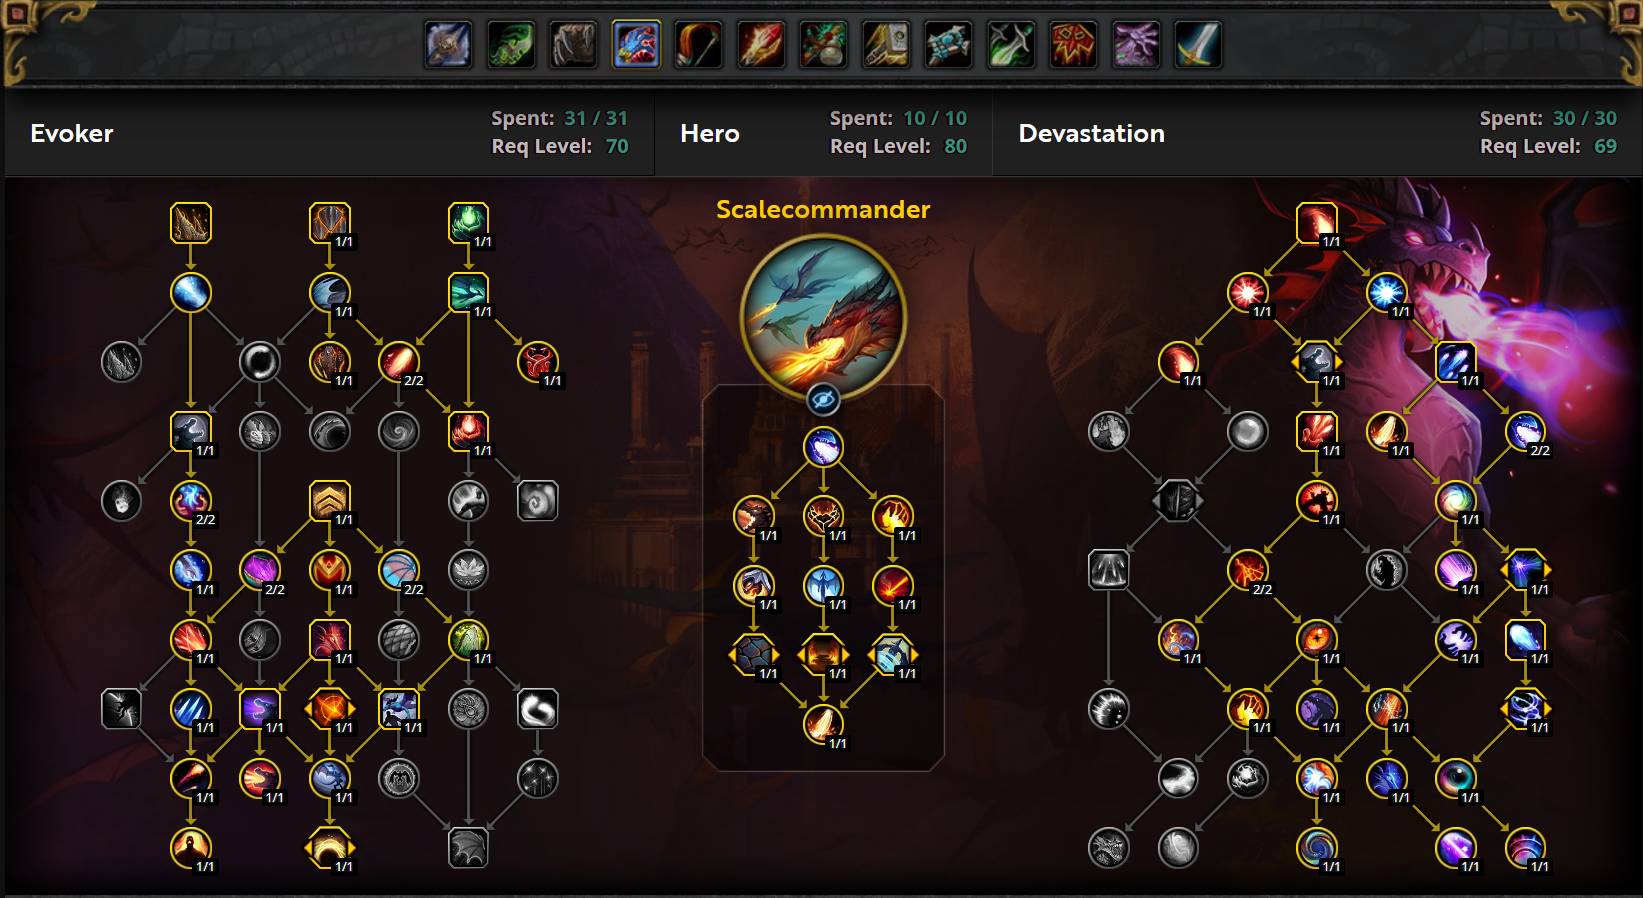
Copy the Devastation Evoker talents, paste them into the game.
Single-Target Talents
AoE/Mythic+ Talents
Delve
PvP Talents (War Mode)
Opting into War Mode makes you eligible for open-world PvP but also grants several benefits:
- World Quests at maximum level have 10% increased rewards (30% if you are Alliance).
- You gain 10% increased Experience while leveling (30% if you are Alliance).
- Allows you to earn Conquest Points towards weekly gear rewards.
- Enables the use of PvP talents in the open world.
With these benefits, enabling War Mode is recommended for leveling and maximizing rewards at max level. However, it also makes you eligible for open-world PvP, increasing the risk of being "ganked" while leveling or doing World Quests.
Best Hero Talents for Devastation Evoker in The War Within
Raiding Hero Talents for Devastation Evoker
Flameshaper
Flameshaper is the weaker of the two choices currently and only excels in scenarios with damage amplification modifiers, it is unlikely you will see much use for this in raid or mythic+ without further tuning.
Scalecommander
Scalecommander, both numerically and in terms of playstyle, is superior to Flameshaper. It offers better single-target damage, stronger cleave, and more sustained AoE.
Having the triple Disintegrate beam also feels great. Additionally, Scalecommander is the more beginner-friendly choice, as it does not introduce additional spells to the rotation or require major adjustments to master.
Mythic+ Hero Talents for Devastation Evoker
Flameshaper
Flameshaper will potentially be great at lower keys when mobs have lower health pools and are not likely to live very long, but if Devastation Evoker is going to be played at a high end M+ scenario, it is unlikely to be the optimal hero tree.
Scalecommander
Scalecommander offers significantly more benefits in Mythic+ dungeons, including greater sustain and much better priority target damage.
Mass Disintegrate provides substantial free cleave damage with minimal single-target loss, a major advantage that Flameshaper currently lacks. Because of this, Scalecommander is the preferred Hero tree for players aiming to push higher keys.
Devastation Evoker DPS Stat Priority
The Basics of Stats for Devastation Evoker
The general stat priority on armor pieces for a Devastation Evoker is:
- Item Level
- Critical Strike
- Versatility/Mastery/Haste are very similar, with Crit slightly ahead. You will balance these depending on your current gear.
On Jewelry (and pieces without Intellect on them), the priority is as follows:
- Item Level
- Critical Strike
- Versatility/Mastery/Haste – same as on non-jewelry pieces. You'll stack Crit slightly more than other stats but will end up with a balanced spread.
Intellect provides significantly more DPS than secondary stats. As a result, Item Level is typically better than having optimal secondary stats, provided the piece also increases Intellect. Rings and Trinkets are exceptions, as they are influenced by factors like total secondary stats and trinket effects.
While this serves as a general guideline for gearing, simulating your character is always the best way to determine the ideal gear for any given combat scenario.
Getting a Better Understanding of Devastation Evoker Stats
Intellect is your primary stat and should be prioritized in all upgrades. It provides Spell Power, which increases the damage of your spells.
Mastery (Mastery: Giantkiller) increases the damage of your spells based on the current health of your target. The higher the target's health, the greater the benefit. You also gain the full effect during Dragonrage when the Tyranny talent is selected.
Critical Strike increases the chance for your abilities to deal 200% damage, which increases to 220% with the Spellweaver's Dominance talent. This synergizes with Eye of Infinity, generating more Essence.
Haste increases your spell-casting speed (including Empowered Spells) and the tick rate of your periodic effects.
Versatility boosts all damage and healing dealt while also reducing incoming damage.
Devastation Evoker DPS Rotation, Cooldowns, and Abilities
Single-Target Rotation for Devastation Evoker
This priority list describes the optimal single-target Rotation for Devastation Evoker
- Fire Breath – Use at empower level 1 on cooldown to maintain the damage over time effect.
- Shattering Star – Ensure you have at least 3 Essence pooled before casting to follow up with back-to-back Disintegrate in the damage amplification window.
- Eternity Surge – Use on cooldown.
- Deep Breath – Use on cooldown.
- Hover – Use to maintain uptime whenever movement is required.
- Living Flame – Use as a filler and to spend stacks of Iridescence after casting Fire Breath.
Single-Target Opener for Devastation Evoker in The War Within
- Living Flame – Pre-cast so that it lands on pull.
- Deep Breath – Cast.
- Dragonrage – Cast.
- Shattering Star – Cast.
- Fire Breath – Cast with Tip the Scales.
- Eternity Surge – Cast.
- Disintegrate – Cast until you run out of Essence.
- Proceed with your normal rotation according to the list below.
AoE Rotation for Devastation Evoker
- Azure Strike – Cast to gain stacks of Charged Blast while mobs are being grouped up.
- Fire Breath – Cast at max rank.
- Dragonrage – Cast; the three Pyre casts from this will benefit from Iridescence.
- Eternity Surge – Cast at rank 1.
- Disintegrate – Cast after your empowered spells to trigger Mass Disintegrate.
- Pyre – Cast until out of Essence.
- Eternity Surge – Cast at rank 1-3 depending on the number of enemies engaged.
- Azure Strike – Cast as a filler and to generateEssence Burst procs, which will be spent on Pyre.
- Living Flame – Cast with Burnout procs when Leaping Flames stacks are up from Fire Breath to maximize Essence Burst stacks.
- Shattering Star – Cast to generate a charge of Essence Burst.
- Cast empowered spells on cooldown and avoid overcapping Essence.
Dragonrage and Animosity Interaction
With the adjustment to the Animosity talent, we are no longer able to get more than 16 seconds of additional uptime from empowered spells cast during Dragonrage. This means that it is not as necessary to have both empower spells ready to cast the moment you activate it.
This change will take a little getting used to, as it will heavily affect both our opener and our immediate cast sequence inside our cooldown burst window, which we will go over below.
In the single-target and AoE sections, you will find a highly detailed priority list breakdown of the Rotation, as well as optimal openers.
Devastation Evoker DPS Gems and Consumables
Best Gems for Devastation Evokers
The best stats for Devastation Evokers are Crit and Haste, so that is what we will be gemming for.
You should use Culminating Blasphemite in one socket. Then, ensure you have one gem of each type in other sockets to maximize the Movement Speed effect, ideally Quick Emerald/Quick Onyx/Quick Sapphire/Quick Ruby. Fill in the remaining sockets with Quick Ruby.
Best Flask for Devastation Evoker in The War Within
You should be drinking the Flask of Alchemical Chaos at all times.
Best Potion for Devastation Evoker in The War Within
Your stat potion should be Tempered Potion. Use these when you will do the most damage with your abilities, likely during your cooldowns and/or Bloodlust/Heroism. You can also obtain Fleeting Tempered Potion from Cauldrons that can be spawned by Alchemists.
You should keep a stock of Algari Healing Potion to use when at low health, and if you have a Warlock in the group, grab their Healthstone and use them as well. Do not macro these together, they are best used separately! You can also obtain Fleeting Algari Healing Potion from Cauldrons that can be spawned by Alchemists.
Best Food for Devastation Evoker in The War Within
Since our secondary stats are stronger per-point than our primary stat, you should be eating secondary stat food at all times, either Beledar's Bounty, Outsider's Provisions, Jester's Board, Empress' Farewell personal food, or the The Sushi Special Feast. They are all identical.
In addition, if you can afford it, you should use Crystallized Augment Runes to increase your primary stat. Augment Runes are expensive, and disappear on death, so use them wisely!
Best Enchants for Devastation Evokers
| Slot | Enchantment |
| Necklace | Magnificent Jeweler's Setting (adds up to 2 sockets to a Ring or Neck) |
| Weapon | Enchant Weapon - Council's Guile |
| Chest | Enchant Chest - Crystalline Radiance |
| Bracers | Enchant Bracer - Chant of Armored Avoidance |
| Legs | Sunset Spellthread |
| Boots | |
| Rings | Enchant Ring - Radiant Critical Strike |
| Cloak | Enchant Cloak - Chant of Winged Grace |
Devastation Evoker DPS Gear and Best in Slot
This section will cover everything you need to know about equipping your character correctly.
BiS Gear for Devastation Evoker
| Slot | Item | Source |
| Helm | Sanitized Scraphood | Stix Bunkjunker in Liberation of Undermine |
| Neck | Semi-Charmed Amulet | Rik Reverb in Liberation of Undermine |
| Shoulder | Opulent Treasurescale's Gleaming Mantle | Rik Reverb/Matrix Catalyst/Great Vault |
| Cloak | Consecrated Cloak | Inscription |
| Chest | Opulent Treasurescale's Tunic | Sprocketmonger Lockenstock/Matrix Catalyst/Great Vault |
| Bracers | Glyph-Etched Vambraces | Leatherworking |
| Gloves | Opulent Treasurescale's Gold-Counters | Cauldron of Carnage/Matrix Catalyst/Great Vault |
| Belt | Dealer's Covetous Chain | Chrome King Gallywix in Liberation of Undermine |
| Legs | Opulent Treasurescale's Petticoat | Stix Bunkjunker/Matrix Catalyst/Great Vault |
| Boots | Opulent Treasurescale's Boots | Matrix Catalyst any mythic track boots |
| Ring #1 | The Jastor Diamond | Chrome King Gallywix in Liberation of Undermine |
| Ring #2 | Bloodoath Signet | Theater of Pain |
| Trinket #1 | House of Cards | One-Armed Bandit in Liberation of Undermine |
| Trinket #2 | Mug's Moxie Jug | Mug'Zee in Liberation of Undermine |
| Main Hand | Best-in-Slots | One-Armed Bandit in Liberation of Undermine |
Trinket Recommendations for Devastation Evoker
- Eye of Kezan — This trinket provides passive Mastery and a stacking Intellect buff, upon reaching maximum stacks, the trinket will deal damage to the target each time it procs.
- Mug's Moxie Jug — An Intellect stat stick with a proc that grants a small amount of stacking Critical Strike applying an additional stack with each subsequent cast.
- House of Cards — An Intellect on use trinket which provides Mastery when used, the trinket has a small window of variance in the amount of mastery it gives, with the minimum mastery granted increasing after each use, up to 3 times. This trinket can feel a little weird to use due to its 90 second cooldown.
- Signet of the Priory — An Intellect on use trinket that provides you with your highest secondary stat for 20 seconds on use, whilst also granting anyone else in your party or raiding using the trinket a small amount of the same stat for the duration of the buff.
- Synergistic Brewterializer — An Intellect stat stick that gives your spells a chance to spawn a barrel near your targets location, any damage dealt to this barrel will cause it to detonate dealing damage split between all nearby enemies.
- Carved Blazikon Wax — An Intellect stat stick that will proc a Versatility buff for 15 seconds, when it procs a blazing candle will spawn on the ground, standing within its circle will increase the buff effect by roughly 10% for as long as you're within it.
- Geargrinder's Spare Keys — The traditional on use nuke trinket of the tier, passive Intellect with a large on use for fire damage with a 2 minute cooldown.
- Entropic Skardyn Core — A Critical Strike stat stick with a proc that spawns a fragment, when collected this fragment will grant you a large amount of Intellect for 15 seconds.
- Suspicious Energy Drink — The best Delve trinket of the tier, providing passive Intellect and a proc which grants you Mastery for 10 seconds, increased if your current health is below 35%, the health threshold increase is not really something to consider.
The War Within Season 2 Tier Set for Devastation Evoker
- 2-piece set bonus: Evoker Devastation 11.1 Class Set 2pc
- 4-piece set bonus: Evoker Devastation 11.1 Class Set 4pc
The set bonus follows the gambling theme of the new raid tier, giving your abilities a chance to proc the Jackpot, firing a Shattering Star at 3 nearby enemies. This does not adjust our playstyle at all
Addons for Devastation Evoker
General Addons for Evoker
- ElvUI
- Boss Mods
- Deadly Boss Mods
- BigWigs
- GTFO
- Weak Auras
- Details!
- Method Raid Tools
Specific Addons for Devastation Evokers
- Currently, no additional addons are needed to play this specialization to its full potential.
WeakAuras for Devastation Evoker
WeakAuras is an essential tool for Devastation Evoker and DPS players, offering unparalleled customization to enhance your gameplay. Rather than focusing on specific examples, we recommend exploring Wago.io, where you’ll find an extensive library of WeakAuras to suit your needs.
If you are unfamiliar with WeakAuras, it is an incredibly powerful and widely-used AddOn that allows you to create custom displays for nearly everything in the game. This includes tracking buffs, debuffs, cooldowns, Focus, resources, and much more.
To import a WeakAura, visit Wago.io and select one that fits your preferences. Click the "Copy WeakAura Import String" button to copy it to your clipboard. Next, log into the game and type /wa in the chat box to open the WeakAuras interface. Navigate to the "Import" section, press Ctrl+V to paste the copied string, and click "Import". You’re ready to go!
Mastering WeakAuras and customizing it to your playstyle is highly recommended for any serious raider. With countless options available on Wago.io, you can tailor your interface to optimize your performance and focus on what truly matters in combat.
Devastation Evoker Frequently Asked Questions
How should I move and DPS?
Evokers have multiple tools to maintain DPS while moving:
- Hover is your best option, allowing you to cast spells while moving after its short animation.
- Deep Breath can be used if you are out of Essence and need to move, but only when multiple targets are present.
- Azure Strike is another quick-cast option during movement.
Is Devastation Evoker a good Power Infusion target?
Yes! Power Infusion aligns perfectly with Dragonrage, as both share the same cooldown. The additional Haste provided by Power Infusion helps extend your Dragonrage window by allowing extra empowered spell casts. While it depends on your raid composition and the encounter, Devastation Evoker is one of the strongest candidates for Power Infusion.
When should I use Dragonrage?
The timing of Dragonrage depends on the combat duration:
- 1-minute combat: Use Dragonrage about 34 seconds before the fight ends, ensuring it lasts through the combat duration. If Bloodlust is used at the start, activate Dragonrage immediately.
- 3-minute combat: Plan for two uses at 00:26 and 2:26 to optimize uptime.
- 4:30-minute combat: Use it as soon as possible to fit three uses into the fight. While this may seem inefficient at first, missing a full use would be more detrimental.
What is Hover Weaving?
Hover is not affected by the global cooldown (GCD), allowing you to cast a spell while Hover activates. For instance, when moving for a mechanic, you can cast Azure Strike and activate Hover during the GCD. This enables you to cast more impactful spells immediately after the short animation of Hover, optimizing your damage output on the move.
How often does Essence regenerate?
Essence regenerates at a base rate of 1 Essence every 5 seconds. This rate is influenced by talents and your Haste stat, which can increase the regeneration speed.
When should I use Pyre over Disintegrate?
Generally, use Pyre when facing more than three targets. However, with Charged Blast, the stack count can lower this threshold to two targets. At 20 stacks, Pyre will always outperform Disintegrate on two targets. For the most accurate breakpoint, simulate your character, but 20 stacks is a safe rule of thumb.
How much Mastery should I have?
Aim to maximize your Mastery, but avoid exceeding 97.5%, as diminishing returns start to kick in at this point. Balancing your secondary stats is essential for optimal performance. Simulating your character is the best way to determine the ideal balance.