Shadow Priest DPS Guide - Midnight (12.0.1)
Select your Specialization
At first glance, The War Within seems to have transformed every class and specialization beyond recognition. However, that’s not entirely the case. The previously revamped talent trees are still in use, and tier set bonuses function as they always have. Nevertheless, some aspects of Shadow Priests have changed. Let’s take a closer look at the "new" yet familiar Priest class in our The War Within Shadow Priest Guide.

Table of Contents
Shadow Priest Overview
In The War Within, Shadow Priest continues on the builder-spender design while also having some interesting damage over time and AoE mechanics. The talent tree offers ways to build your own Shadow Priest, where you can choose between two different core cooldowns (Void Eruption or Dark Ascension) and then capping it off with thematic Idol spells aligned to the Old Gods. The spec has lots of options, and playstyle can vary widely depending on the talents, so there is a lot to talk about!
Shadow Priest Strengths and Weaknesses
Strengths
- Flexibility with cooldown style choice.
- Great self-healing through Mental Fortitude, Vampiric Touch and Devouring Plague, scaling well with additional targets.
- Powerful sustained priority target AoE damage with Psychic Link and Voidform.
- Archon and Voidweaver are both competitive Hero Talent options in all forms of content.
- Access to one of the best single player external DPS cooldown, Power Infusion. Can now be given away easily with Twins of the Sun Priestess.
Weaknesses
- DoT management can require a lot of focus and can be reliant on Shadow Crash hitting correctly to deal reasonable AoE damage.
- Need to plan out movement specifically, cannot just stop casting whenever you want for optimal damage.
- Poor interrupt for PvE content.
- Lots of spells and abilities, which could be overwhelming depending on talents.
- One of the weaker specs when it comes to mitigating damage taken without losing DPS.
- Average Single Target damage.
- Struggles dealing damage to short-lived enemies.
Shadow Priest Basic Gameplay
Shadow Priest gameplay combines the basic builder-spender idea used in other specs while twisting in being an active DoT class with lots of cooldowns to use. The basics of the rotation involve getting as much uptime as possible on your cooldowns while making sure to keep up all 3 of your DoTs on as many active targets as possible, especially Devouring Plague.
Shadow Priest Changes in Patch 11.2
Patch 11.2.0 introduced several updates to the Shadow Priest talent tree. While most adjustments do not alter the overall playstyle, there are a few notable changes worth highlighting. In addition to these, a number of spells also received tuning changes.
Archon and Voidweaver Tier Set Bonuses
With Season 3, tier set bonuses are now Hero Talent-specific, providing unique effects depending on your chosen Hero Talent. These bonuses generally amplify the strengths of each Hero Talent rather than changing gameplay.
Archon Season 3 Set Bonus
The Archon set bonus focuses on extending the high-damage portion of cooldowns by adding more casts of Halo and buffing Devouring Plague. This does not change playstyle, but enhances performance.
- 2-piece bonus: Priest Archon 11.2 Class Set 2pc
- 4-piece bonus: Priest Archon 11.2 Class Set 4pc
Voidweaver Season 3 Set Bonus
With Voidweaver, the new set bonus turns you into a Void Blast machine. Casting more Void Blasts dramatically increases the size of Entropic Rift, enhancing its black hole-like qualities. Additionally, the damage of your next Void Torrent scales based on the size of the rift when it collapses.
- 2-piece bonus: Priest Voidweaver 11.2 Class Set 2pc
- 4-piece bonus: Priest Voidweaver 11.2 Class Set 4pc
Reshii Wraps
Throughout Season 3, Priests will use a new legendary cloak, Reshii Wraps. This is the only cloak available this season and comes with unique role-specific effects. Players can insert Fibers into the cloak to determine the secondary stat and its amount. Fibers drop in Rare and Epic qualities, with Epic ones crafted by Tailors.
Shadow Priest Leveling Guide for The War Within
Shadow Priest Leveling Playstyle
Shadow Priest offers a unique leveling experience with multiple playstyle options depending on your pacing preference. As a damage-over-time (DoT) specialist, you can pull large groups of mobs and let your DoTs whittle them down, or you can focus on quick burst damage depending on your chosen talents.
Leveling Gear for Shadow Priest
When gearing your Shadow Priest, always prioritize gear with higher Intellect, as it significantly enhances your spell power and efficiency. Generally, the higher the item level, the better.
If two items offer the same amount of Intellect, aim for gear with Haste, Mastery, or ideally both, for better overall performance while leveling.
Shadow Priest War Mode Talents for Leveling
Below are the recommended War Mode / PvP talents for leveling:
- Catharsis: Your strongest open-world PvP talent. Track this buff so you know when you're capped on Shadow Word: Pain damage.
- Driven to Madness: Increases the uptime of your main cooldown. Don’t be afraid to use it frequently instead of saving it for big fights.
- Mind Trauma: Be sure to full channel Mind Flay: Insanity to maximize its effectiveness.
Shadow Priest DPS Spec, Builds, and Talents
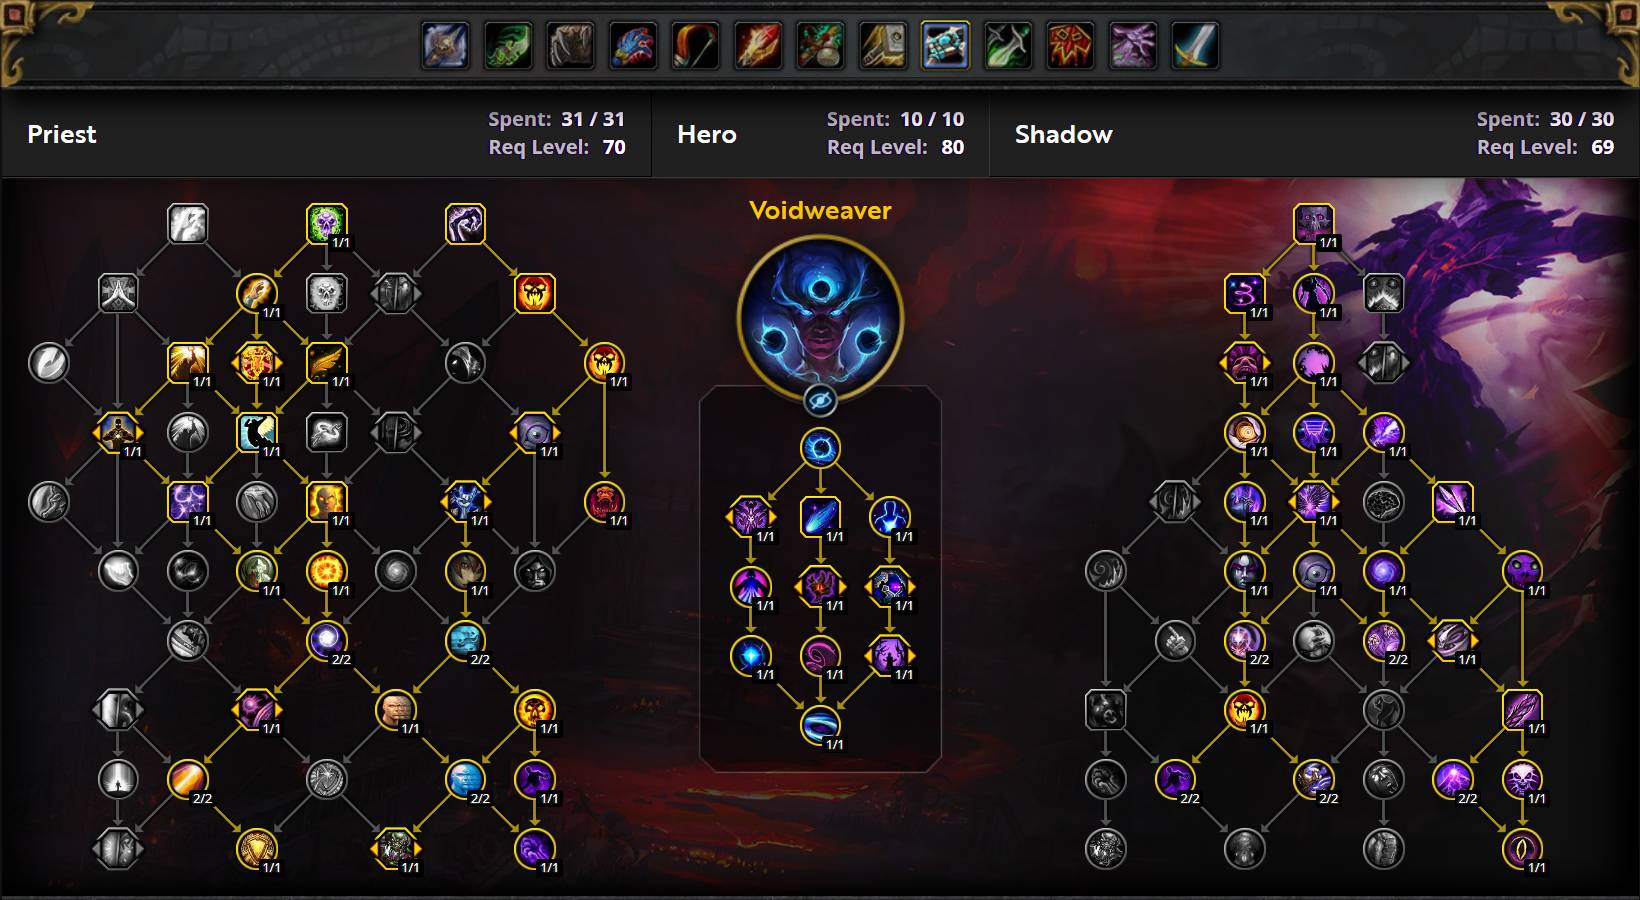

Copy the Shadow Priest talents, paste them into the game.
Voidweaver Single-Target
Voidweaver Mythic+
PvP Talents (War Mode) for Shadow Priest
In the open world, enabling War Mode grants several benefits:
- PvP talents are enabled outdoors.
- 10% or more increase in World Quest rewards at max level.
- 10% or more experience gained while leveling.
- Earn Conquest Points, which can be exchanged for weekly gear rewards.
Thanks to these bonuses, it's recommended to enable War Mode while leveling and during solo PvE content to maximize efficiency and rewards. However, doing so makes you eligible for open-world PvP, which means you may be attacked by other players during your journey.
Shadow Priest War Mode Talents
Here is a ranking of the most effective PvP talents for leveling and general open-world PvE play:
- Catharsis: Offers a solid damage boost in solo content and 1v1 scenarios.
- Driven to Madness: Reduces cooldowns, allowing you to use your major abilities more often.
- Mind Trauma: Excellent when paired with Surge of Insanity and Mind Flay. Fully channeling Mind Flay: Insanity makes this a powerful and fun choice.
Best Hero Talents for Shadow Priest in The War Within
Raiding Hero Talents for Shadow Priest
As a Shadow Priest, you can choose between Archon or Voidweaver in raid environments. Both have unique strengths and are viable at all levels of content.
Archon
Archon revolves around casting Halo to extend cooldowns and boost damage. This build works best with Void Eruption and Mind Flay builds, especially enhancing Mind Flay: Insanity for high damage.
Compared to Voidweaver, Archon excels at consistent damage and mobility, thanks to access to Void Bolt during cooldowns.
For utility, Archon provides Word of Supremacy for 5% more stamina and group healing every minute through Halo. Note that both Word of Supremacy and Concentrated Infusion only affect you and don't stack if multiple Archons are present.
Voidweaver
Voidweaver delivers solid damage by creating an Entropic Rift when casting Void Torrent. This pairs well with Dark Ascension, which amplifies both the rift and follow-up Void Blast casts. It's especially strong in fights where Devour Matter can be fully utilized.
Compared to Archon, Voidweaver tends to deal less consistent damage and is more affected by boss movement and poor add positioning.
Voidweaver’s gameplay relies heavily on Entropic Rift hitting your main targets. Movement-heavy encounters may lower its effectiveness.
However, its utility outshines Archon in raids, with better personal defensives via Void Leech or Embrace the Shadow, and Dark Energy enabling casting Void Torrent while moving.
Mythic+ Hero Talents for Shadow Priest
In Mythic+ content, both Archon and Voidweaver are viable, depending on group composition and dungeon strategy. At higher key levels, Archon generally performs better due to superior sustained AoE with Void Eruption.
Archon
Archon excels in high Mythic+ keys by offering excellent AoE damage if packs are pulled around cooldowns and mobs live long enough. In lower keys, this can be less effective if enemies die too quickly, depending on group and gear.
Utility includes Incessant Screams for extra crowd control, Word of Supremacy for more stamina, and group healing through Halo.
Voidweaver
Voidweaver is great for more controlled dungeons where you fight one pack at a time. Its 30-second burst windows are ideal for PUGs or lower key levels (12 or below).
As keys go higher, Voidweaver struggles compared to Archon unless fights are carefully planned. However, it remains viable, especially during Voidbound Affix weeks with the bonus from Devour Matter.
Its utility remains strong, mirroring raid benefits: self-healing talents, slow on Entropic Rift with No Escape, or cast-while-moving Void Torrent via Dark Energy.
Shadow Priest DPS Stat Priority
As a Shadow Priest, your choice of Hero Talent and encounter type plays a major role in determining your ideal secondary stats. Generally, Haste and Mastery are your top priorities, with Critical Strike and Versatility trailing behind. The preference between Haste and Mastery—and by how much—depends on your build and the content you're tackling.
General Stat Priority:
- Intellect
- Mastery (Single Target) or Haste (AoE)
- The other of Haste or Mastery
- Critical Strike
- Versatility
Intellect is your best stat by a large margin, meaning higher item level gear often outweighs better secondary stats, as long as Intellect increases. After Intellect, aim for Haste and/or Mastery on as many pieces as possible. Haste synergizes strongly with most of your abilities, while Mastery enhances all your spells and rewards good gameplay. Critical Strike tends to rank just below these, slightly outperforming Versatility in terms of damage output.
Optimizing Secondary Stats
For detailed recommendations tailored to Archon or Voidweaver Hero Talents, you can use tools that allow you to toggle and simulate setups. Your selected Hero Talent tree will significantly influence what stats perform best.
If you're new to Shadow Priest or not focused on high-end optimization, follow the general stat priority above until you're more geared.
Moving Stats Around
Early in the season, your options to optimize stats are more limited. However, you can shift your stats in several ways:
- Swapping out gems
- Changing enchants
- Finding alternative gear (often in Waist or Cloak slots)
There are many valid gear combinations, and you shouldn't blindly copy others. Focus on meeting the goals outlined by your spec and talents, recognizing there are several viable item paths.
Diminishing Returns on Stats
Secondary stats have diminishing returns past certain thresholds. This doesn't mean you should aim for the caps, but be aware of them when stacking one stat heavily.
Thresholds for diminishing returns at level 80:
- Critical Strike: 21,000 rating (35%, includes 5% baseline)
- Haste: 19,800 rating (30%)
- Versatility: 23,400 rating (30%)
- Mastery: 21,000 rating (19%) – due to Mastery’s 0.5 conversion rate and 4% base Mastery
When nearing these thresholds, it may be wise to adjust enchants or gems to other stats for better efficiency
Shadow Priest DPS Rotation, Cooldowns, and Abilities
Single Target Priority List for Shadow Priest
- Keep Vampiric Touch and Shadow Word: Pain active by using Vampiric Touch to apply both DoTs. Refresh these during the proper pandemic window (see below).
- Cast Shadowfiend.
- Cast Dark Ascension.
- Cast Power Infusion.
- Sync any trinkets you have with your cooldowns (see trinket section).
- Cast Shadow Word: Death if the target has an absorb shield for Devour Matter.
- Cast Void Blast while available if Devouring Plague is active or Entropic Rift is about to expire.
- Spend Insanity on Devouring Plague with high priority if it is not active, about to expire, or you are about to cap out on Insanity.
- Cast Void Torrent to open up Entropic Rift.
- Cast Devouring Plague if Entropic Rift is active or if the target will die soon.
- Cast Vampiric Touch to proc Unfurling Darkness while Dark Ascension is not active. This should only be done while the Unfurling Darkness debuff is not active to indicate you are not on cooldown. You should aim to spend this immediately after proccing the buff but can save for up to 8 seconds.
- Cast Shadow Word: Death if Deathspeaker is active.
- Fully deplete Mind Blast charges. Hold charges a few seconds before Void Torrent.
- Cast Mind Spike: Insanity if Devouring Plague will be active when the cast finishes.
- Cast Vampiric Touch to proc Unfurling Darkness. This should only be done while the Unfurling Darkness debuff is not active to indicate you are not on cooldown. You should aim to spend this immediately after proccing the buff but can save for up to 8 seconds.
- Cast Shadow Word: Death if the target is below 20% health.
- Cast Mind Spike.
- Use the following spells in order should you need to move and do not have any other casts to use: Shadow Word: Death, or Shadow Word: Pain.
Single-Target Opener for Shadow Priest
Note that this opener assumes you get unlucky with procs and does not account for getting any of Deathspeaker, Shadowy Insight, or Mind Devourer procs. Be sure to follow the priority list below. These openers are just a snapshot of the opener up until your first cast of Void Torrent.
This opener assumes you started with the default prepull Insanity depending on your talents (see the chart below).
The placement of the trinkets selected in the table above is optimized for just using a single on-use trinket. When using double on-use trinkets, you should check with sims to know which order it prefers to use them in. Results in the table below will not always be accurate when selecting two on-use trinkets due to the trinket lock-out.
Before combat starts, make sure you have Shadowform and Power Word: Fortitude active.
- Cast Halo before the pull.
- Pre-Cast Vampiric Touch.
- Cast Shadowfiend.
- Cast Vampiric Touch to consume Unfurling Darkness.
- Cast Dark Ascension.
- Use your combat potion Tempered Potion.
- Use Power Infusion and any stat-based racial abilities. Make sure to cast Power Infusion on an ally if using Twins of the Sun Priestess.
- Cast Devouring Plague.
- Cast Void Torrent.
- Cast Void Blast twice.
- Continue with the priority list as described below.
Note: The pandemic window for our DoTs is 30% of the total duration. This means to get optimal value out of refreshing DoTs, you want to wait until they are at or below the following thresholds:
- Vampiric Touch - 6.3 seconds;
- Shadow Word: Pain (with Misery) - 6.3 seconds;
- Devouring Plague does not work like a traditional DoT spell, but it will add the old DoT damage to the new DoT damage as well as the time till the next tick;
Devouring Plague does not follow the same refresh rules as these two DoTs. Instead, it rolls their damage over and adds duration based on time to the next tick. The way you typically want to play around with this is to maximize the uptime of the DoT as much as possible without capping on Insanity. You want to do this for optimal uptime on our Mastery bonus.
AoE Priority List for Shadow Priest
When dealing damage in AoE, it is crucial to make sure you are casting spells onto targets that have Devouring Plague active. This ensures the damage from Psychic Link is being boosted as much as possible through spells like Mastery: Shadow Weaving or Insidious Ire.
- Keep Vampiric Touch and Shadow Word: Pain active by using Vampiric Touch to apply both DoTs. Use Shadow Crash if available when you need to refresh and you do not need to hold for adds coming in less than 15 seconds.
- Cast Shadowfiend.
- Cast Dark Ascension.
- Cast Power Infusion.
- Sync any trinkets you have with your cooldowns (see trinket section).
- Cast Shadow Word: Death if the target has an absorb shield for Devour Matter.
- Cast Void Blast while available if Devouring Plague is active or Entropic Rift is about to expire.
- Spend Insanity on Devouring Plague on the priority target if it is not active, about to expire, or you are about to cap out on Insanity.
- Cast Void Torrent to open up Entropic Rift.
- Cast Devouring Plague if Entropic Rift is active.
- Cast Vampiric Touch to proc Unfurling Darkness while Dark Ascension is not active when fighting 5 or fewer targets. This should only be done while the Unfurling Darkness debuff is not active to indicate you are not on cooldown. You should aim to spend this immediately after proccing the buff but can save for up to 8 seconds.
- Cast Shadow Word: Death if Deathspeaker is active.
- Fully deplete Mind Blast charges. Hold charges a few seconds before Void Torrent.
- Cast Mind Spike: Insanity if Devouring Plague will be active when the cast finishes.
- Cast Vampiric Touch to proc Unfurling Darkness. This should only be done while the Unfurling Darkness debuff is not active to indicate you are not on cooldown. You should aim to spend this immediately after proccing the buff but can save for up to 8 seconds.
- Cast Shadow Word: Death if the target is below 20% health.
- Cast Halo.
- Cast Mind Spike.
- Use the following spells in order should you need to move and do not have any other casts to use: Shadow Crash, Shadow Word: Death, or Shadow Word: Pain.
In addition to the AoE priority list above, keep in mind these important target swaps:
- 6+ targets: Drop specifically casting Vampiric Touch to proc Unfurling Darkness.
- 12+ targets: Threshold for manually DoTing targets, typically not worth ever going over this unless it is as the pack is being gathered with Fade (including the 8 from Shadow Crash).
For specific tips about playing Shadow Priest in Mythic+, feel free to check out that dedicated page below. From a rotation standpoint, things will follow the priority list above.
Pre-Pull Rotation
Depending on your talents, you can cast spells to start with more Insanity. You can also use certain toys to attack mobs pre-pull as well. Starting with The War Within, Divine Star and Shadow Crash do not give Insanity if cast outside of combat. Shadow Crash will grant it, but it will be refunded if you are not in combat by the time it lands.
The goal of this is to reach your first Devouring Plague faster than you would normally. Note that based on talents, this is how SimC behaves.
- Halo + Shadow Crash = 16 Insanity
- Halo = 10 Insanity
- Shadow Crash = 6 Insanity
As an Archon, when casting Halo pre-pull, you need to ensure the first wave hits your target after it is engaged in combat so you do not lose out on damage and a stack of Resonant Energy. If you struggle with timing, you can delay this until after your opening Vampiric Touch for a very small loss in damage.
Another micro-optimization is playing more around Twist of Fate. Particularly in the opener, getting this buff active for the start of an encounter, especially if lusting on the pull, can be valuable. One way to try and proc this is by speccing into Renew and/or Prayer of Mending and casting this on tanks before the pull starts. This is a pretty low-effort way to potentially get procs of this on pull. You can even use this trick elsewhere, like during downtime or intermissions, to try and proc it as well.
Aside from that, here are your normal opener activities:
- As a Blood Elf, you can use Arcane Torrent before pulling. Do not use this during your Rotation after this.
- Make sure Shadowform is active.
- Make sure Power Word: Fortitude is active.
Shadow Priest DPS Gems and Consumables
Best The War Within Gems for Shadow Priest
In The War Within, you'll have two categories of gems to choose from: Rare and Epic. Rare gems offer either a single stat or a combination of two secondary stats. Epic gems are significantly stronger, but you can only equip one per character.
Gems can be socketed into your Helm, Bracer, or Belt via the S.A.D. item from the Great Vault. Additionally, Jewelcrafters can apply up to two sockets to a Neck or Ring using the Magnificent Jeweler's Setting.
For your Epic gem in Season 2, the recommended choice is Elusive Blasphemite for the added utility. While Culminating Blasphemite offers slightly more damage (about 0.2% DPS), the movement speed loss makes Elusive the stronger overall choice. Using this gem incentivizes having one of each colored gem socketed.
Elusive Blasphemite with full colored sockets grants up to 10% movement speed, significantly boosting your mobility as a Shadow Priest.
Note: Elusive Blasphemite counts as temporary movement speed. It does not stack with effects like Angelic Feather, Body and Soul, or Stampeding Roar.
There are five distinct colors for Rare gems:
- Emerald: Haste
- Ruby: Critical Strike
- Onyx: Mastery
- Sapphire: Versatility
- Amber: Stamina
As a Shadow Priest, aim to use each color except Amber for the best performance. The DPS loss from including Amber is minimal (about 0.2%), and it adds an extra 2% movement speed when paired with Elusive Blasphemite.
Optimal Gems by Color:
- Emerald: Masterful Emerald
- Ruby: Masterful Ruby or Quick Ruby
- Onyx: Quick Onyx
- Sapphire: Masterful Sapphire or Quick Sapphire
- Amber (optional): Masterful Amber or Quick Amber
Example Gem Progression:
- Elusive Blasphemite
- Masterful Emerald
- Quick Onyx
- Masterful Ruby
- Masterful Sapphire
- Masterful Amber (optional)
- Masterful Emerald in the remaining 3–4 sockets
For the final 4 sockets, choose between Masterful Emerald if you're lacking Haste or Quick Onyx if Haste is already solid. Early in your gearing process, you'll likely prioritize Haste, while later you may prefer more Mastery. Generally, Mastery performs better in single-target situations, while Haste excels in AoE.
Best The War Within Flasks for Shadow Priest
The default flask choice is Flask of Alchemical Chaos, primarily due to its strong interaction with Tempered Potion and other Tempered Flasks. Using a single-stat Tempered Flask can reduce the relative value of your potion usage, making them slightly less appealing.
For Season 2, where there are several haste-scaling effects, Flask of Tempered Swiftness is a very close second, especially for Archon builds looking for more consistency.
Best Potion for Shadow Priest
The best combat potion for all content is Tempered Potion.
Healing Potions for Shadow Priest
Your primary healing potion will be Invigorating Healing Potion. For emergencies, you can also carry a Grotesque Vial.
Food Buffs for Shadow Priest
For food buffs this season, a Feast such as Feast of the Midnight Masquerade is preferred. If using personal food,Chippy Tea is a solid option, with Beledar's Bounty offering a more affordable and easier-to-make alternative.
If you're pushing high-level progression content, consider crafting Hearty versions of most food options. These provide the same effects but persist through death (despite tooltip inconsistencies). Note: It costs 5 regular food items to make 1 hearty version.
Weapon Runes for Shadow Priest
For temporary weapon enhancement, use Algari Mana Oil.
Augment Runes for Shadow Priest
For progression content, aim to use Crystallized Augment Rune to gain additional Intellect—equivalent to about a 1% DPS boost.
Best Enchants for Shadow Priest in The War Within
| Slot | Enchantment |
| Necklace | Magnificent Jeweler's Setting (adds up to 2 sockets to a Ring or Neck) |
| Weapon | Enchant Weapon - Authority of the Depths |
| Chest | Enchant Chest - Crystalline Radiance |
| Bracers | Enchant Bracer - Chant of Armored Avoidance |
| Legs | Sunset Spellthread |
| Boots | Enchant Boots - Scout's March |
| Rings | Enchant Ring - Radiant Haste |
| Cloak | Enchant Cloak - Chant of Leeching Fangs |
Shadow Priest DPS Gear and Best in Slot
This section will cover everything you need to know about equipping your character correctly.
BiS Gear for Shadow Priest
| Slot | Item | Source |
| Helm | Dying Star's Veil (TIER) | Forgeweaver Araz / Matrix Catalyst |
| Neck | Duskblaze's Desperation | The Soul Hunters in Manaforge Omega |
| Shoulder | Sinlight Shoulderpads | Halls of Atonement |
| Cloak | Reshii Wraps | Reshii Wraps |
| Chest | Dying Star's Cassock (TIER) | Fractillus / Matrix Catalyst |
| Bracers | Consecrated Cuffs | Crafted — Tailoring |
| Gloves | Dying Star's Caress (TIER) | Soulbinder Naazindhri / Matrix Catalyst |
| Belt | Singularity Cincture | Dimensius The All Devouring in Manaforge Omega |
| Legs | Dying Star's Leggings (TIER) | Loom’ithar in Manaforge Omega |
| Boots | Interloper's Silken Striders | The Soul Hunters in Manaforge Omega |
| Ring #1 | Whispers of K'aresh | Eco-Dome Al'dani |
| Ring #2 | Signet of the False Accuser | Halls of Atonement |
| Trinket #1 | Araz's Ritual Forge | Forgeweaver Araz in Manaforge Omega |
| Trinket #2 | Lily of the Eternal Weave | Eco-Dome Al'dani |
| Weapon | Voidglass Kris | Fractillus in Manaforge Omega |
| Off-Hand | Vagabond's Torch | Crafted — Inscription |
Best Trinkets for Shadow Priest in The War Within Season 3
Top Trinkets for Raiding
In a raiding environment, trinkets are prioritized for their consistent single-target damage while also being able to take into account average fight durations for certain on-use trinkets.
NOTE: To keep things brief, not every trinket is listed below, only ones that are particularly relevant or popular. If a trinket is excluded from this list, it is likely well below D-Tier.
S-Tier
A-Tier
- Diamantine Voidcore (with set bonus)
- Lily of the Eternal Weave
- Signet of the Priory
- Azhiccaran Parapodia
- Ara-Kara Sacbrood
B-Tier
- So'leah's Secret Technique
- Mug's Moxie Jug (Season 2 Trinket)
- Empowering Crystal of Anub'ikkaj
- Incorporeal Essence-Gorger
- Diamantine Voidcore (without set bonus)
C-Tier
- Eye of Kezan (6m+ fights - Season 2 Trinket)
- Void-Touched Fragment
- Naazindhri's Mystic Lash
- Sunblood Amethyst
- Gigazap's Zap-Cap
Top Trinkets for Mythic+
Inside Mythic+ dungeons, you typically want to use trinkets that are good for maximizing overall dungeon damage. This is not always just slamming full AoE trinkets, as Bosses will still take up a significant portion of the key.
NOTE: To keep things brief, not every trinket is listed below, only ones that are particularly relevant or popular. If a trinket is excluded from this list, it is likely well below D-Tier.
S-Tier
A-Tier
- Signet of the Priory
- Araz's Ritual Forge
- Lily of the Eternal Weave
- Azhiccaran Parapodia
- Empowering Crystal of Anub'ikkaj
- Diamantine Voidcore (with set-bonus)
B-Tier
- Ara-Kara Sacbrood
- So'leah's Secret Technique
- Diamantine Voidcore (without set-bonus)
C-Tier
- Gigazap's Zap-Cap
- Naazindhri's Mystic Lash
- Incorporeal Essence-Gorger
- Mug's Moxie Jug (Season 2 Trinket)
- Void-Touched Fragment
The War Within Season 3 Tier Set for Shadow Priest
In Season 3, set bonuses are specific to your chosen Hero Talent, meaning your tier set effects will differ depending on which Hero Talent you select. These effects generally enhance the unique strengths and playstyle of each Hero Talent.
Based on item stats and available drops this season, it’s recommended to skip the Shoulders and use the remaining pieces — Head, Chest, Leggings, and Gloves — to complete your 4-piece set bonus. While the Shoulders are still solid, prioritize completing your set bonus over optimizing slots.
Archon Season 3 Set Bonus
This set bonus focuses on extending the high-damage portion of your cooldowns by adding extra Halo casts and increasing Devouring Plague damage. There’s no significant playstyle change associated with this bonus.
Priest Archon 11.2 Class Set 2pc: Increases the frequency of Halo casts and empowers your cooldown windows for stronger Devouring Plague output.
Priest Archon 11.2 Class Set 4pc: Further enhances Halo effectiveness and extends your cooldown uptime for sustained damage.
Voidweaver Season 3 Set Bonus
With the Voidweaver set, you become a Void Blast machine. Casting more Void Blasts expands the size of your Entropic Rift, emphasizing its black hole-like qualities. Additionally, your next Void Torrent gains bonus damage based on how large the Rift was when it collapses.
Priest Voidweaver 11.2 Class Set 2pc: Increases Void Blast frequency and causes Entropic Rift to grow larger with each cast.
Priest Voidweaver 11.2 Class Set 4pc: Boosts Void Torrent damage based on the final size of your Entropic Rift when it collapses.
Addons for Shadow Priest
Generic Addons for Priests
- Boss Mods
- Deadly Boss Mods
- BigWigs
- Weak Auras
- Details!
Specific Addons for Shadow Priests
- Twintop's Insanity Bar
- Weak Auras
- Publik's Shadow Priest WeakAura Set
- Suggested WeakAuras:
- Simple Cast Bar Replacement
- Potion and Healthstone Tracking
- Void Eruption + Void Bolt
- Count of Vampiric Touch debuffs active
- Surge of Insanity in X DP Casts tracker
- Voidweaver Mind Blast Pooling Reminder
- Vampiric Touch with Unfurling Darkness
- Plater Nameplates
- Vampiric Touch Nameplate Color Changer
- Devouring Plague Nameplate Color Changer
- Publik's Plater Profile (Includes the VT Color Changer)
- Method Raid Tools
- Recommended for the Time to Die tracker
WeakAuras for Shadow Priest
WeakAuras is an essential tool for Shadow Priest and DPS players, offering unparalleled customization to enhance your gameplay. Rather than focusing on specific examples, we recommend exploring Wago.io, where you’ll find an extensive library of WeakAuras to suit your needs.
If you are unfamiliar with WeakAuras, it is an incredibly powerful and widely-used AddOn that allows you to create custom displays for nearly everything in the game. This includes tracking buffs, debuffs, cooldowns, Focus, resources, and much more.
To import a WeakAura, visit Wago.io and select one that fits your preferences. Click the "Copy WeakAura Import String" button to copy it to your clipboard. Next, log into the game and type /wa in the chat box to open the WeakAuras interface. Navigate to the "Import" section, press Ctrl+V to paste the copied string, and click "Import". You’re ready to go!
Mastering WeakAuras and customizing it to your playstyle is highly recommended for any serious raider. With countless options available on Wago.io, you can tailor your interface to optimize your performance and focus on what truly matters in combat.
Shadow Priest Frequently Asked Questions
Should I Always Finish a Mind Flay Cast?
No, Mind Flay is a filler spell and should not always be finished. You can safely cancel Mind Flay after any global cooldown (GCD) as long as it completes a full tick of damage. Since Mind Flay deals damage in six ticks over its 4.5-second duration, each GCD (reduced by Haste) accounts for two ticks. Canceling after a GCD avoids losing any damage while allowing you to prioritize higher-value spells.
Is There a Haste Cap for Shadow Priest?
No, there’s no specific Haste cap for Shadow Priests. However, past 30% Haste, Critical Strike, or Versatility, these stats begin to face diminishing returns (19% for Mastery). You should aim to get as much Haste as possible, as it’s highly beneficial for Shadow, but balancing it with other stats based on your gear and content is key. For detailed recommendations, check the stat priority guide.
When Should I Refresh My DoTs?
DoTs like Vampiric Touch and Shadow Word: Pain benefit from the Pandemic mechanic, allowing them to be refreshed at 30% or less of their duration without wasting ticks:
- Shadow Word: Pain: Refresh at or below 4.8 seconds remaining (16-second duration).
- Vampiric Touch: Refresh at or below 6.3 seconds remaining when talented into Misery (21-second duration).
Devouring Plague is unique. When refreshed, any remaining damage is rolled over into the new DoT, so it can be refreshed at any time without penalty. Ideally, refresh it with 1 second remaining to maximize Mastery: Shadow Weaving uptime.
How Do You Use Devouring Plague in AoE?
- With Mind's Eye: Funnel Devouring Plague casts onto a priority target to boost AoE damage.
- With Distorted Reality: Spread Devouring Plague across targets for greater overall damage. Funnel damage only when using Mind Devourer procs or when Insanity is available to maintain uptime on priority targets.
Does Applying DoTs to Secondary Targets Increase Single-Target DPS?
Sometimes, applying DoTs to secondary targets can boost single-target DPS, but it depends on talents like Idol of Yogg-Saron or Idol of N'Zoth, as well as mechanics like Auspicious Spirits or Maddening Touch.
- Secondary target DoTs can generate additional resources or procs, but the scaling is non-linear and decays with more targets.
- Generally, the gain is minimal and not worth prioritizing unless funnel mechanics are in play.
Is Mind Flay Gone?
Yes, Mind Flay is replaced when talented into Mind Spike. With Surge of Insanity, it further changes to Mind Spike: Insanity, modifying the playstyle entirely.
Which Race is Best for Shadow Priest?
The differences in DPS between races are minimal, so you should choose based on aesthetics or utility. For example:
- Stoneform (Dwarves) and Shadowmeld (Night Elves) provide excellent utility without directly increasing DPS.
Pick the race that offers the most situational benefits or that you personally prefer.
How Do You Make It Clear What Has DoTs Active?
Using the Plater addon can make tracking DoTs much easier. With additional scripts, you can:
- Change nameplate colors for targets affected by Vampiric Touch or Devouring Plague.
These visual cues ensure you maintain DoT uptime effectively.
Is Mind Flay a Must-Pick for Shadow Priest?
No, Mind Flay is completely replaced by Mind Spike if you talent into it. Additionally, Mind Spike: Insanity becomes your new filler ability when paired with Surge of Insanity. This talent setup completely removes Mind Flay from your rotation.
How Do You Sim Shadow Priest?
Use Raidbots to simulate your character. Simming is essential for determining the best gear, stats, and talents based on your specific setup. Since stat weights can vary based on your current gear, simming ensures optimal decisions for your character’s performance.


Digital Aura Portal - FZCO
Building A1, Dubai Digital Park, Dubai Silicon Oasis, Dubai, United Arab Emirates Premises Number 72647 - 001
Business registration number: 70647