Demonology Warlock DPS Guide - The War Within 11.1
Select your Specialization
The Demonology Warlock in WoW The War Within is one of the most iconic classes in the game. In this Demonology Warlock guide, we will share everything you need to know about this specialization, including its rotation, recent changes, hero talents, builds, and much more.

Table of Contents
Demonology Warlock Overview
Demonology Warlock is a versatile specialization centered around summoning waves of expendable minions to do your bidding while generating resources in-between. While the specialization does have some ramp-up time, it does feel smooth and fast once it is running at full steam. Demonology Warlocks are especially strong in encounters that have stable mobility rather than helter-skelter movement.
Like all Warlock specializations, Demonology brings Demonic Gateway, a powerful raid cooldown that can transport your entire group 40 yards instantly.
Demonology Warlock Strengths and Weaknesses
Strengths
- Strong single target damage and cooldowns
- High mobility
- Very high AoE burst with enough resources
- Efficient cleave damage
Weaknesses
- Requires time to gain a steady flow of resources
- Lack of funnel capabilities compared to other Warlock specs
- Non-existent spread cleave
- Being dependent to pets and guardians their AI can sometimes be problematic
Demonology Warlock Basic Gameplay
Demonology Warlock is a spec designed around continuously summoning temporary demons to do your bidding with relatively short cooldowns, some of them requiring a precise setup and a good amount of pet management. At its core, the gameplay is about generating and spending the Warlock's iconic resource: Soul Shards.
Demonology is the spec that embodies the rule of Always-Be-Casting the most but is also straightforward and intuitive. Keep generating Soul Shards through Shadow Bolt and Demonbolt and spend those resources on Call Dreadstalkers and Hand of Gul'dan.
Demonology Warlock 11.1 Changes
- Drain Life: Now deals 4 times the previous damage while still healing for 5 times the damage dealt.
Several talents alongside Doom functionality were changed:
- Doom duration is reduced for each Soul Shard spent during that time;
- consequently Doom Eternal has been redesigned to give a chance to generate a Demonic Core
- Demonic Calling chance to proc has been doubled from 10 to 20%.
Demonology Warlock Leveling Guide for The War Within
Demonology Warlock Leveling Playstyle
Demonology Warlocks rely heavily on their Felguard to handle combat while leveling. The Felguard is both durable and powerful, making it a key asset in dealing with enemies. While Demonology lacks many ways to quickly tag mobs—primarily relying on pets or Demonic Core-generated Demonbolts—its true strength lies in its high burst potential in AoE situations. Additionally, Warlock spells generate relatively low threat compared to other specializations, allowing for efficient mob control.
By utilizing Curses, crowd control abilities, and pet off-tanking, incoming damage can be significantly reduced, encouraging a more aggressive playstyle. Personal defensive cooldowns further enhance survivability, providing a safety net even when over-pulling enemies.
For tougher foes such as Elites or Rares, Demonology's damage revolves around summoning multiple demons and guardians. This enables the use of all cooldowns while maintaining safety, as the Felguard can hold aggro. However, for harder-hitting enemies, occasional use of Health Funnel may be necessary to keep the pet alive.
Gear Options
While leveling, always prioritize equipping the piece of gear with the highest item level. If multiple items have the same item level, choose the one with stats that best complement your specialization. If you are using an Heirloom, it should generally not be replaced.
Pet Choice for Demonology Warlock Leveling
Summon Imp is your first available demon and is most effective in raid environments. While not particularly useful for leveling, it's your only option during the early levels.
If you're leveling solo, Summon Voidwalker can be a great choice, as it alleviates a lot of the pressure on you. Avoiding casting pushback can also help speed up your leveling process.
Summon Felhunter is a solid option if you're leveling in a group or tackling dungeons. The extra interrupt it provides is valuable for handling troublesome caster mobs.
Demonology Warlock DPS Spec, Builds, and Talents

Copy the Destruction Warlock talents, paste them into the game.
Single Target Talents
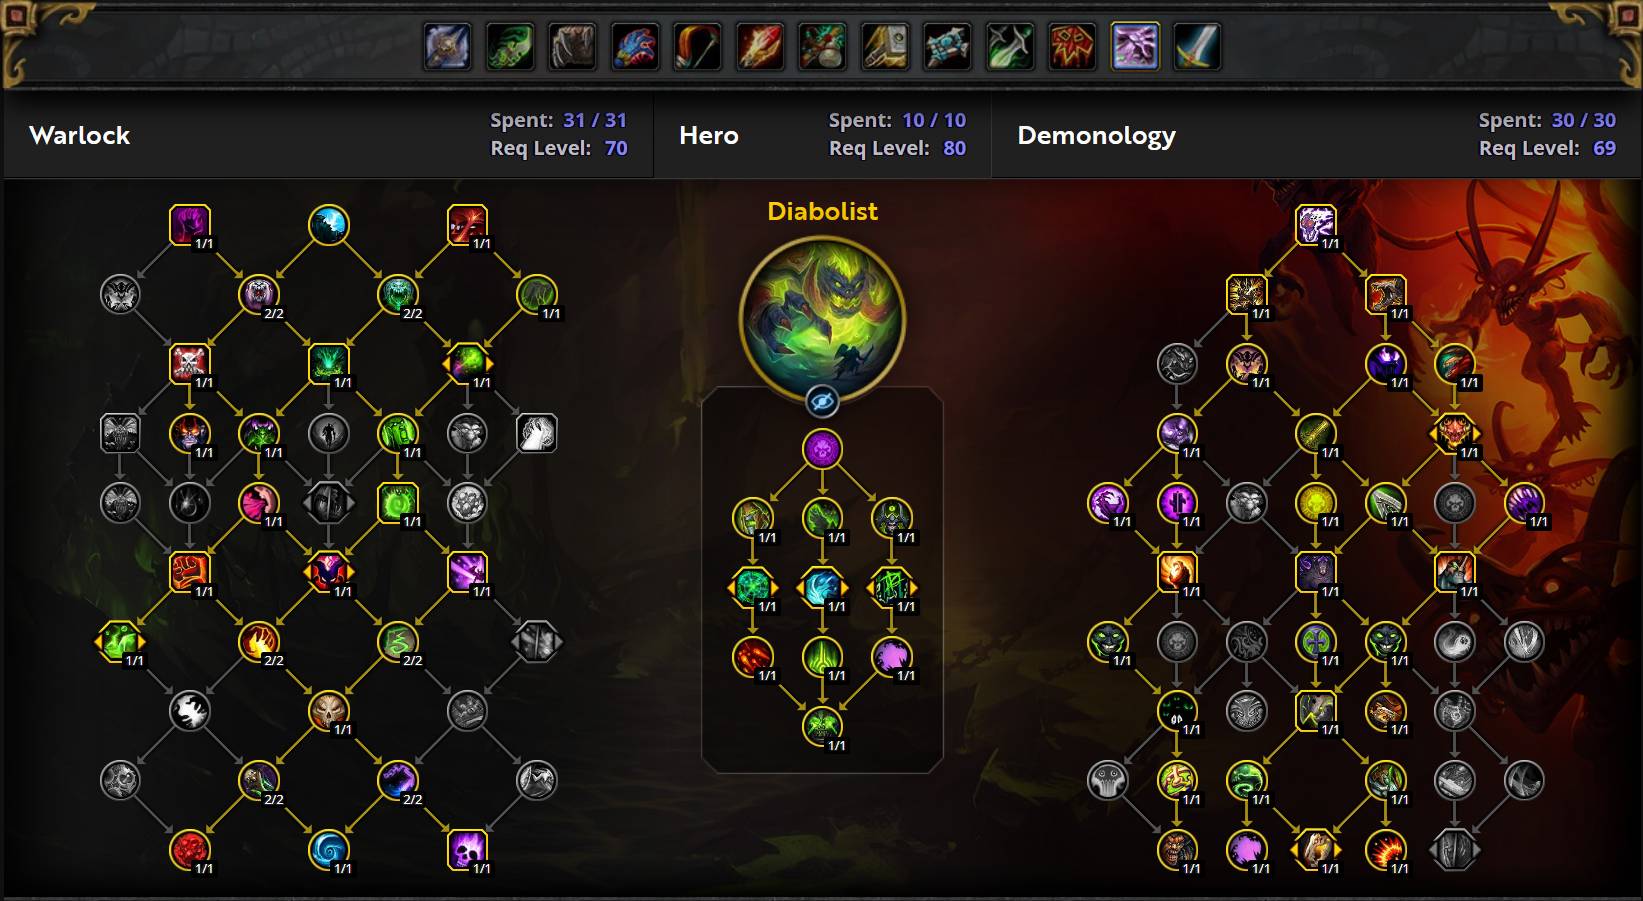
AoE Diabolist Talents
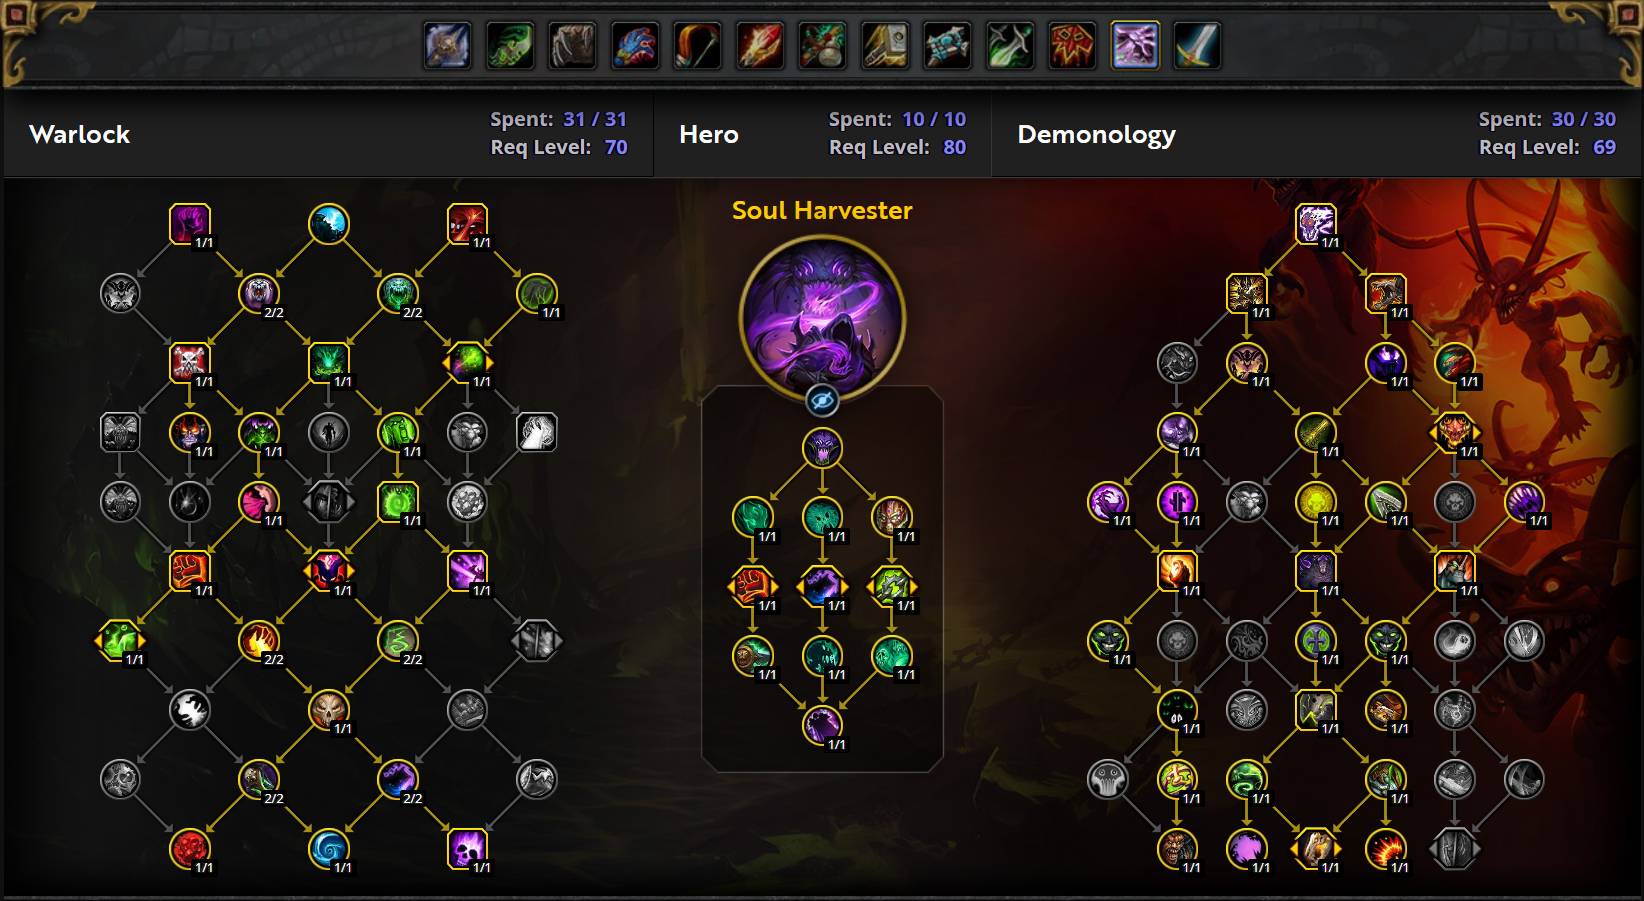
AoE Soul Harvester Talents
Raiding
When preparing for raids, talent selections may vary depending on the specific encounters. While general builds provide a solid foundation, optimizing talents for each boss fight can improve performance. Understanding fight mechanics and adjusting your build accordingly can be beneficial.
Mythic+
Mythic+ dungeons require a versatile setup capable of handling both single-target and AoE scenarios. Factors such as affixes, party composition, and pull strategies can influence talent choices. Adapting to each dungeon's requirements ensures optimal performance in various encounters.
How to Use Demonology Warlock Talents
Several talent choices impact gameplay, influencing your rotation and priorities. It is important to understand how each talent modifies your playstyle to maximize efficiency. Proper talent selection enhances damage output and overall effectiveness in different combat situations.
Picking Warlock Class Talents
Beyond a few key DPS-increasing nodes, the talent tree progression remains flexible, allowing customization based on situational needs. Some utility options may be more valuable in specific encounters, and selecting the right talents can provide strategic advantages. Key talents will be highlighted, along with suggestions for progressing through the tree.
Hero Tree Talents
With the introduction of the Hero Talent Tree system, specialization gains unique enhancements that influence both visuals and gameplay. Demonology Warlocks can choose between Diabolist and Soul Harvester, each providing distinct benefits tailored to different playstyles.
PvP Talents (War Mode)
Enabling War Mode grants several benefits, including:
- Activation of PvP talents in the open world.
- 10% increased World Quest rewards at max level.
- 10% additional experience gained while leveling.
- Earn Conquest Points, which can be exchanged for gear.
Due to these benefits, enabling War Mode is generally recommended for leveling and PvE content. However, it also opens the possibility of encountering enemy players in open-world PvP, which can add an extra layer of challenge.
Best Hero Talents for Demonology Warlock in The War Within
Raiding Hero Talents for Demonology Warlock
The current recommended Hero Talent for Demonology Warlocks is Diabolist.
Diabolist offers stronger burst potential, especially during Tyrant windows and Ruination. However, its effectiveness can be impacted by downtime due to the way Demon cycling functions.
Soul Harvester is slightly behind in overall performance but provides additional value when enemies die, triggering Shared Fate. While it may not be as burst-oriented as Diabolist, it still remains a viable option.
Ultimately, the difference between the two choices is minor, allowing players to select based on personal preference and playstyle.
Mythic+ Hero Talents for Demonology Warlock
The current recommended Hero Talent for Demonology Warlocks is Diabolist.
Diabolist provides powerful damage spikes, particularly during Overlord and Pit Lord summonings, while also enhancing Tyrant output. However, its effectiveness can be affected by downtime, and the inability to strategically bank Ruination for specific moments reduces its overall consistency.
Soul Harvester, on the other hand, offers additional splash damage, primarily through Sataiel's Volition, which helps accelerate Implosions and contributes to steady AoE pressure.
Ultimately, the differences between these two choices are minimal, allowing players to select based on their personal playstyle and encounter requirements.
Hero Talents Rotation for Demonology Warlock
Diabolist
Diabolist gameplay revolves around the rapid cycling of demons through Diabolic Ritual, with powerful spells serving as the primary payoff. While this playstyle offers strong burst potential, it is particularly susceptible to downtime, which can result in missing the activation of key empowered abilities. Despite this, the Hero Talent tree does not drastically alter the fundamental gameplay of Demonology.
Soul Harvester
Soul Harvester focuses on precise Hand of Gul'dan targeting to maximize damage through Demonic Soul and Soul Anathema. Additionally, Demonic Core procs provide extra passive damage via Wicked Reaping and Quietus. A notable talent, Sataiel's Ambition, increases the chance of generating Demonic Cores through Implosion, accelerating Soul Shard cycling for improved resource management.
Demonology Warlock DPS Stat Priority
The Basics of Stats for Demonology Warlock
The stat priority for a Demonology Warlock is as follows:
- Intellect
- Haste ≅ Critical Strike
- Mastery
- Versatility
This stat priority is based on SimulationCraft profiles using BiS gear with normalized stats, providing a general guideline. However, personal stat priorities can vary depending on gear and ratios, so it is highly recommended to simulate your character to determine the most beneficial stats.
Haste is generally the most desirable secondary stat. In single-target situations, Critical Strike and Versatility gain value as more damage comes directly from the player rather than pets. Mastery, which primarily enhances pet and guardian damage, becomes increasingly valuable in multitarget situations where AoE effects like Implosion contribute significantly.
Stat priorities may shift as item levels increase due to scaling differences.
Diminishing Returns on Secondary Stats
A diminishing return system applies to secondary stats, with different penalty tiers:
- 0% to 30%: No penalty
- 30% to 39%: 10% penalty
- 39% to 47%: 20% penalty
- 47% to 54%: 30% penalty
- 54% to 66%: 40% penalty
- 66% to 126%: 50% penalty
It is not possible to exceed 126% from gear rating. However, SimulationCraft and Raidbots already account for these penalties, so this system should not significantly impact gearing decisions when using these tools.
Statistics Explanations for Demonology Warlock
- Intellect is your primary stat, increasing Spell Power and boosting all spell damage.
- Haste speeds up spell casting and increases the attack frequency of demons (except Wild Imps). It also enhances Soul Shard generation through Demonic Core, making it a highly valuable stat.
- Mastery, via Mastery: Master Demonologist, increases the damage dealt by your demons. It gains importance in multitarget scenarios.
- Critical Strike increases your chance to land critical hits, which deal double damage by default. Certain effects can enhance critical strike damage further.
- Versatility provides a flat increase to all damage dealt and reduces incoming damage.
Demonology Warlock DPS Rotation, Cooldowns, and Abilities
Diabolist Single Target Rotation
Demonology Warlock revolves around generating and maintaining demonic forces. The more active demons you summon, the higher your damage output. Additionally, having more demons increases the frequency of Demonic Core procs, which in turn fuels Soul Shard generation and allows for even more demon summoning.
- Cast Summon Demonic Tyrant, ensuring that all major demons and at least three sets of three Wild Imps are active.
- Use Grimoire: Felguard whenever available.
- Cast Summon Vilefiend whenever available.
- Use Demonic Strength whenever available.
- Cast Call Dreadstalkers whenever available.
- Use Hand of Gul'dan if you have 4-5 Soul Shards.
- Cast Hand of Gul'dan if you have more than 2 Soul Shards and Mother of Chaos has triggered Infernal Bolt.
- Use Demonbolt if you have 2 or more stacks of Demonic Core.
- Cast Power Siphon if you have 2 or fewer stacks of Demonic Core.
- Use Hand of Gul'dan when you have 3 Soul Shards.
- Cast Shadow Bolt to generate Soul Shards.
Currently, it is a minor DPS loss to have the Felguard cast Felstorm in single-target situations.
Diabolist Single Target Opener
- Pre-cast Power Siphon with 2 Wild Imps out.
- Pre-cast Shadow Bolt.
- Cast Shadow Bolt.
- Cast Grimoire: Felguard.
- Cast Summon Vilefiend.
- Cast Shadow Bolt.
- Cast Shadow Bolt.
- Cast Call Dreadstalkers .
- Cast Demonbolt.
- Cast Hand of Gul'dan.
- Cast Shadow Bolt.
- Cast Hand of Gul'dan.
- Continue generating Shards with Shadow Bolt or Demonic Core procs, but make sure to start casting the last Hand of Gul'dan when there are at least 3 seconds (or 2 global cooldowns) remaining on Call Dreadstalkers .
- Cast Summon Demonic Tyrant.
- Cast Demonic Strength.
Diabolist AoE Rotation
Demonology has little variation in playstyle when multiple targets are present. Implosion is the only ability that is not a part of the single-target rotation, which we must take note of. When dealing with multiple stacked targets, we will often use Implosion for additional damage. This also enables more Demonic Core procs in the short term, which we can use for more resources to fuel Hand of Gul'dan.
- Cast Summon Vilefiend.
- Cast Call Dreadstalkers whenever available.
- Cast Demonic Strength whenever available.
- Cast Hand of Gul'dan if you have 4-5 Soul Shards.
- Cast Hand of Gul'dan if you have more than 2 Soul Shards and Mother of Chaos triggered Infernal Bolt.
- Cast Implosion to detonate Wild Imps on 2+ targets.
- Cast Demonbolt if you have 3+ stacks of Demonic Core.
- Cast Power Siphon to generate Demonic Core.
- Cast Shadow Bolt to generate Soul Shards.
If you have talented heavily into additional AoE, such as the talent Bilescourge Bombers, you should use such abilities more or less on cooldown, or when you judge you will get the maximum benefit out of them.
Hellcaller AoE Rotation
Demonology has little variation in playstyle when multiple targets are present. Implosion is the only ability that is not a part of the single-target rotation, which we must take note of. When dealing with multiple stacked targets, we will often use Implosion for additional damage. This also enables more Demonic Core procs in the short term, which we can use for more resources to fuel Hand of Gul'dan.
- Cast Summon Vilefiend.
- Cast Call Dreadstalkers whenever available.
- Cast Demonic Strength whenever available.
- Cast Hand of Gul'dan if you have 4-5 Soul Shards.
- Cast Implosion to detonate Wild Imps on 2+ targets.
- Cast Demonbolt if you have 3+ stacks of Demonic Core.
- Cast Power Siphon to generate Demonic Core.
- Cast Shadow Bolt to generate Soul Shards.
Cooldown Usage for Destruction Warlock
Tyrant
Summon Demonic Tyrant is our main cooldown. The Demonic Tyrant lasts for 15 seconds and extends the lifespan of all your existing demons during its uptime, while freezing the energy consumption of up to 10 Wild Imps (15 with Reign of Tyranny). It also has an aura that increases all of your demons' damage by 15% for the duration.
Summon Demonic Tyrant should not be used recklessly. Properly setting up for the Demonic Tyrant is key to maximizing its effectiveness. Here are some tips to follow before using each Demonic Tyrant:
- Ensure Summon Demonic Tyrant is used while your Dreadstalkers are active.
- Ensure Summon Demonic Tyrant is used while your Summon Vilefiend is active.
Guillotine
In its current implementation, Guillotine can be a little unintuitive to maximize. Below are the rules that define the spell behavior:
- Guillotine cannot be cast while the Felguard is performing Demonic Strength.
- During Guillotine, the Felguard will NOT cast Felstorm or Legion Strike, but can perform Soul Strike if talented.
Because of these rules, one sequence is easy to learn and does not require any addon tracking, as follows (assuming Demonic Strength is talented):
- Start the engagement, allowing the Felguard to charge and start casting their Felstorm.
- Try to cast Demonic Strength, which will only trigger when the Felguard has finished Felstorm.
- Likewise, try to cast Guillotine, which will only succeed once the Felguard has finished Demonic Strength.
Alternatively, there are plenty of WeakAuras that can track Felguard actions.
Destruction Warlock Mechanics
Doom
The latest iteration of Doom provides a more nuanced gameplay experience with optimization opportunities, particularly in multitarget scenarios. To maximize its contribution, it is important to understand the damage trigger conditions: Doom will deal damage when the target dies or when the debuff duration ends. Therefore, it is crucial to cast Demonbolt at different targets when possible, especially those at lower health.
In single-target situations, it is important to note that each subsequent Demonic Core Demonbolt cast will reduce the Doom duration by 3 seconds baseline (5 seconds with Doom Eternal talented), which discourages casting Demonbolt if the debuff duration is equal to or lower than those values.
Implosion
To better understand Implosion usage, it is important to outline how the spell works.
Implosion damage consists of two components:
- The damage on the main target, which is directly proportional to the remaining energy of the Wild Imps being imploded at the time of the cast.
- The damage on the secondary target, which will always deal the full value, regardless of the Wild Imps' energy at the moment of the Implosion.
When factoring in the cost of 1 global cooldown, the Implosion cast itself incurs an opportunity cost of 0.75 shards per activation (which could otherwise be spent on casting Shadow Bolt).
Therefore, the general logic to maximize Implosion is to minimize the number of casts while maximizing the number of Wild Imps affected.
The ideal scenario is to have an addon or WeakAura that tracks Wild Imps' energy, but since Legion, a close approximation has been valid: 2 casts of 3 Shards Hand of Gul'dan without any Demonic Core procs (or 3 casts with at least 2 Demonic Core procs) for each Implosion.
It’s worth noting that Hand of Gul'dan Wild Imps spawn staggered with about a 0.4s delay, meaning it is best to use another global cooldown before imploding the most recent set.
When Wicked Maw is talented, ensure you hit 2 Implosions each cycle. To do so, reach 5 shards with 2 Imp sets out before casting Call Dreadstalkers, followed by the first Implosion.
Imp Gang Boss in its current iteration does not influence the Implosion rotation.
Important Notes for Destruction Warlock
Soul Shards
All Warlocks use Soul Shards as their primary resource. Proper management of your Shards is essential to success, as they control the size of your demon horde. Using Soul Shards incorrectly at the wrong time can have a domino effect, reducing your damage output, especially when Summon Demonic Tyrant is coming off cooldown.
Keep a close eye on your Call Dreadstalkers cooldown, as you will always want to have a pair of Soul Shards ready. One key change from Legion is the Soul Shard cost of Hand of Gul'dan; this spell now costs a maximum of 3 Soul Shards. The takeaway is that with maximum Soul Shards, you can now cast Hand of Gul'dan and Call Dreadstalkers consecutively.
If you're talented into additional summons, such as Summon Vilefiend or Grimoire: Felguard, be mindful of their Soul Shard cost when preparing for a Summon Demonic Tyrant cast. Typically, you want to get these summons out early, along with a Call Dreadstalkers cast and 2-3 casts of Hand of Gul'dan, before activating your Demonic Tyrant. Demonic Core management, along with your use of Power Siphon, will determine how many demons are ready for this powerful cooldown.
Managing Demonic Core
Demonic Core is our main proc and almost a secondary resource for the specialization. If you played Demonology in Warlords of Draenor or earlier, you will notice that Demonic Core and Demonbolt are nearly identical to Molten Core and Soul Fire. Demonic Core enables the use of Demonbolt, which in turn allows us to generate a lot of Soul Shards quickly. Demonic Core has a maximum of 4 stacks, making its proper management a necessity for skillful play.
Each time you're preparing for a Summon Demonic Tyrant usage, you should aim to have at least 2 stacks of Demonic Core. This ensures that you can quickly generate Soul Shards to cast as many summons as possible before your Demonic Tyrant. If you're using Power Siphon, it can add an extra pair of Demonbolt to help with a few additional Hand of Gul'dan casts.
If you're frequently using Implosion, you can be more liberal with your Demonic Core stacks. Your damage will benefit significantly more from the increased Wild Imps you can throw at adds rather than having a max-powered Tyrant. However, you still want to ensure that your Tyrant powers up a few waves of undetonated Imps. Don't feel like you need to save every Demonic Core stack; using them for cleave can be more beneficial.
Generally, you do not want to pool more than 2 charges of Demonic Core, as you risk losing potential stacks. However, when you need a burst or a quick switch, don't hesitate to plan ahead and hold more charges if necessary.
Demonology Warlock DPS Gems and Consumables
This section covers your character's optimal gems, food, and flasks.
Best Gems for Destruction Warlock in The War Within
The War Within introduced epic meta gems that scale based on the number of different gem types socketed. This incentivizes players to use their first four gem slots strategically to maximize the effect.
The two preferred meta gems are Culminating Blasphemite (for damage) and Elusive Blasphemite (for utility). Generally, Elusive Blasphemite provides more practical benefits, as the damage boost from Culminating Blasphemite is minimal—approximately 0.3% in a Best-in-Slot setup.
Due to the relatively low stat contributions from gems, the best approach is to use them to balance secondary stats. This often means prioritizing Versatility alongside another secondary stat.
The most commonly used gems in BiS setups include:
- Emerald: Masterful Emerald and Versatile Emerald
- Ruby: Versatile Ruby and Quick Ruby
- Onyx: Deadly Onyx
- Sapphire: Masterful Sapphire
- Amber: Masterful Amber or Versatile Amber
It is highly recommended to use Raidbots to simulate your character’s ideal gem and enchant setup, as optimal choices may vary depending on your gear and stat distribution.
Best Flask for Demonology Warlock in The War Within
You should be drinking the Flask of Alchemical Chaos at all times.
Best Potion for Demonology Warlock in The War Within
Your primary stat-boosting potion should be the Tempered Potion. Use these during high-damage windows, such as when your cooldowns are active or during Bloodlust/Heroism. Alternatively, you can obtain a Fleeting Tempered Potion from Alchemist-spawned Cauldrons.
For survivability, keep a supply of Algari Healing Potions to use when at low health. If there is a Warlock in your group, be sure to grab their Healthstones as well. These should not be macroed together, as they are best used separately. Additionally, Fleeting Algari Healing Potions can be obtained from Alchemist-spawned Cauldrons.
Best Food for Destruction Warlock in The War Within
For optimal performance, you should always eat from a Feast when available. The best options include:
If Feasts are unavailable, consider eating one of the following:
Additionally, if affordable, use Crystallized Augment Runes to boost your primary stat. However, keep in mind that these are expensive and disappear upon death, so use them strategically.
Weapon Runes for Demonology
Algari Mana Oil is the best temporary oil in any situation.
Best Enchants for Demonology Warlock
| Slot | Enchantment |
| Necklace | Magnificent Jeweler's Setting (adds up to 2 sockets to a Ring or Neck) |
| Weapon |
Enchant Weapon - Authority of the Depths (Pure Single Target) Enchant Weapon - Authority of Radiant Power (All around) |
| Chest | Enchant Chest - Crystalline Radiance |
| Bracers | |
| Legs | Sunset Spellthread |
| Boots |
Enchant Boots - Scout's March (Mobility) Enchant Boots - Defender's March (Small Defensive) |
| Rings | |
| Cloak |
Demonology Warlock DPS Gear and Best in Slot
This section will cover everything you need to know about equipping your character correctly.
BiS Gear for Demonology Warlock
| Slot | Item | Source |
| Helm | Spliced Fiendtrader's Transcendence (678) | One-Armed Bandit in Liberation of Undermine/Matrix Catalyst/Great Vault |
| Neck | Semi-Charmed Amulet (678) | Rik Reverb in Liberation of Undermine |
| Shoulder | Spliced Fiendtrader's Loyal Servants (678) | Rik Reverb in Liberation of Undermine/Matrix Catalyst/Great Vault |
| Cloak | Chef Chewie's Towel (678) | Cinderbrew Meadery |
| Chest | Spliced Fiendtrader's Surgical Gown (678) | Sprocketmonger Lockenstock in Liberation of Undermine/Matrix Catalyst/Great Vault |
| Bracers | Consecrated Cuffs (675) with Writhing Armor Banding and Critical Strike + Mastery | Crafted — Tailoring |
| Gloves | King's Malicious Clutches (678) | Darkflame Cleft |
| Belt | Excavator's Safety Belt (678) | The MOTHERLODE!! |
| Legs | Spliced Fiendtrader's Skin Tights (678) | Stix Bunkjunker in Liberation of Undermine/Matrix Catalyst/Great Vault |
| Boots | Cloudstrider Soles (678) | The Rookery |
| Ring #1 | The Jastor Diamond (678) | Chrome King Gallywix in Liberation of Undermine |
| Ring #2 | Miniature Roulette Wheel | One-Armed Bandit in Liberation of Undermine |
| Trinket #1 | Eye of Kezan (678) | Chrome King Gallywix in Liberation of Undermine |
| Trinket #2 | House of Cards (678) | One-Armed Bandit in Liberation of Undermine |
| Weapon | Scalding Queenmaker's Shiv (678) | Cinderbrew Meadery |
| Off-Hand | Vagabond's Torch (675) with Darkmoon Sigil: Ascension and Critical Strike + Versatility | Crafted — Inscription |
Raiding Trinket Tier List for Demonology Warlock
This Trinket Tier List is focused primarily on single-target performance, as this is the most relevant aspect of raiding. If two trinkets perform similarly in single-target scenarios, the one with better AoE or multitarget scaling is ranked higher.
Each tier represents approximately a 0.5% DPS difference, meaning S-Tier trinkets are about 0.5% stronger than A-Tier trinkets, and so forth.
Any trinket not listed here is generally considered inferior to those included.
S-Tier
- Eye of Kezan — The best trinket for all situations.
A-Tier
- House of Cards — strongest raid on use option in a tier with mediocre on use.
- Signet of the Priory — strongest dungeon on use option in a tier with mediocre on use.
B-Tier
- Mug's Moxie Jug — good passive trinket.
- Synergistic Brewterializer — High overall damage choice that requires single target direct damage to trigger.
- Suspicious Energy Drink — Noteworthy option that comes from Delves and punches well above its weight.
C-Tier
- Mister Lock-N-Stalk — Passive spell proc damage trinket that requires switching between single-target and AoE modes for optimal use.
- Geargrinder's Spare Keys
- Flarendo's Pilot Light
- Reverb Radio
- Soulletting Ruby
- Entropic Skardyn Core
- Carved Blazikon Wax
Mythic+ Trinket Tier List for Demonology Warlock
This Trinket Tier List focuses on AoE damage, as a significant portion of Mythic+ revolves around dealing with multiple targets.
Each tier represents approximately a 0.5% DPS difference, meaning S-Tier trinkets provide around 0.5% more damage than A-Tier trinkets, and so on.
Any trinket not listed here is generally considered weaker than those included.
S-Tier
- Eye of Kezan — undisputed best Trinket for all situations.
- House of Cards — strongest raid on use option in a tier with mediocre on use.
A-Tier
- Mug's Moxie Jug good passive trinket.
- Signet of the Priory — strongest dungeon on use option in a tier with mediocre on use.
- Carved Blazikon Wax
B-Tier
- Synergistic Brewterializer — High overall damage choice that requires single target direct damage to trigger.
- Suspicious Energy Drink — Noteworthy option that comes from Delves and punches well above its weight.
C-Tier
- Mister Lock-N-Stalk — A passive spell proc trinket that requires alternating between single-target and AoE for optimal use.
- Geargrinder's Spare Keys
- Flarendo's Pilot Light
- Reverb Radio
- Soulletting Ruby
- Entropic Skardyn Core
Crafted Gear & Embellishments
Spark of Omens and Crafting Strategy
Spark of Omens will continue to be the primary limiting factor when crafting high-end gear. It can be obtained once every two weeks by combining two Fractured Spark of Omens and 250 Valorstones.
At the start of a tier, players can craft two pieces of gear: one from the initial quest and another from the first bi-weekly reward.
Crafting Strategy Guidelines
Your crafting strategy will depend on several factors, including progression speed, available drops, and early loot acquisition. There is no single best crafting path, but here are some general recommendations:
- The best overall combination is Darkmoon Sigil: Ascension (offhand weapon) and Writhing Armor Banding. This setup scales well into multi-target encounters, unlike Elemental Focusing Lens.
- For long-term optimization, the ideal approach is to craft both at the highest item level possible using Sparks. However, this assumes acquiring a Mythic-level main-hand weapon from Mythic+ before entering Mythic Raiding in the second week.
- An alternative approach is crafting both a main-hand and offhand weapon using Sparks while keeping the wrist piece at a lower item level. This provides a greater immediate power spike but requires an extra Spark in the long run. Note that crafted main-hand weapons will eventually need to be replaced by Mythic raid drops due to item level differences.
The War Within Season 2 Tier Set for Demonology Warlock
Wearing 2-piece and 4-piece bonuses from the Rites of the Spliced Fiendtrader's Influence set grants the following effects:
- Warlock Demonology 11.1 Class Set 2pc: Your damaging spells have a chance to trigger Jackpot!, increasing your Haste by 12% for 12 seconds. Casting Summon Demonic Tyrant always triggers Jackpot!
- Warlock Demonology 11.1 Class Set 4pc: Casting Hand of Gul'dan causes your active Dreadstalkers to cast Dreadbite at 50% effectiveness. This damage is increased by 10% for each Soul Shard spent on Hand of Gul'dan.
Both bonuses provide a passive damage increase, meaning they do not require changes to talent choices or playstyle.
Prioritizing the Warlock Demonology 11.1 Class Set 4pc is more beneficial than ensuring the set pieces are in ideal slots. However, the best setup leaves the Hands slot as the off-set piece due to its more favorable stat distribution.
Addons for Demonology Warlock
Generic Addons for Warlocks
- ElvUI
- Weak Auras
- Boss Mods
- BigWigs Bossmods
- Deadly Boss Mods
Name Plates
- KUI Nameplates
- TidyPlates
- Plater
Damage Meters
- Skada
- Details!
Extra AddOns
- Mik's Scrolling Battle Text
- xCT+ Combat Text
- DeathNote
- Doom CooldownPulse
- Angry Assignments
- Exorsus Raid Tools
Macros for Demonology Warlock
Pet Macros
These macros allow you to manage your demon, as playing with your Pet Stance on Assist is the preferred way to play.
- /petattack
This orders your demon to attack your target.
- /petfollow
This orders your demon to follow you.
- /petmoveto
This orders your demon to move to a location specified by you. This macro is especially useful for situations where you need your pet in a predetermined position in order to accomplish a given task — such as an interrupt on a otherwise out of range target — but can also be used to maximize Felguard cleave/Felstorm damage, just be aware that any imparted commands will also make your Dreadstalkers, Vilefiend (if talented) and Tyrant move, resulting in a much bigger loss when used improperly.
Dot Mouseover
- #showtooltip Corruption
- /use [@mouseover,harm] [harm] Corruption
Casts Corruption on current mouseover target if hostile and alive, else cast it on your current target.
Banish Focus
- #showtooltip Banish
- /use [mod:shift,@focus] [] Banish
Cast Banish on focus target by holding also shift, else cast it on your current target.
Soulstone Mouseover
- #showtooltip Soulstone
- /target [@mouseover] Soulstone
- /use Soulstone
- /targetlasttarget
Workaround macro for the current bug related to mouseover dead allies. The Macro itself will target the mouseover in order to cast Soulstone then target the previous target.
Demonic Circle
- #showtooltip
- /stopcasting
- /use [mod:shift] Demonic Circle(Summon); [nomod] Demonic Circle: Teleport(Teleport)
Place the Demonic Circle while holding shift, or teleport to the circle without any modifiers, while cancelling any ongoing casts. This saves you the trouble (and the time!) of interrupting your spell cast manually.
Mortal Coil/Howl of Terror
- #showtooltip
- /use [known:Mortal Coil,@mouseover,exists] Mortal Coil; [known:Mortal Coil] Mortal Coil; [known:Howl of Terror] Howl of Terror
Depending on the talent selected Mortal Coil will be casted on mouseover if available, otherwise on current target. If Howl of Terror is talented, it will be cast instead.
Demonic Strength/Bilescourge Bombers
- #showtooltip
- /use [known:Demonic Strength,@mouseover,harm] [known:Demonic Strength] Demonic Strength; [known:Bilescourge Bombers,@cursor] Bilescourge Bombers
This macro will cast Demonic Strength at mouseover if available, otherwise on your current target. If you talented Bilescourge Bombers, it will cast the ability at your cursor location instead.
Guillotine
- #showtooltip
- /use [known:Guillotine, @cursor] Guillotine
This macro will cast Guillotine at the cursor location, bypassing the targeting reticle.
Mouseover Demonbolt
- #showtooltip Demonbolt
- /use [@mouseover,harm,nodead] [] Demonbolt
This macro will cast Demonbolt on mouseover if it is a valid target, otherwise on the current target.
WeakAuras for Demonology Warlock
WeakAuras is an essential tool for Demonology Warlock and DPS players, offering unparalleled customization to enhance your gameplay. Rather than focusing on specific examples, we recommend exploring Wago.io, where you’ll find an extensive library of WeakAuras to suit your needs.
If you are unfamiliar with WeakAuras, it is an incredibly powerful and widely-used AddOn that allows you to create custom displays for nearly everything in the game. This includes tracking buffs, debuffs, cooldowns, Focus, resources, and much more.
To import a WeakAura, visit Wago.io and select one that fits your preferences. Click the "Copy WeakAura Import String" button to copy it to your clipboard. Next, log into the game and type /wa in the chat box to open the WeakAuras interface. Navigate to the "Import" section, press Ctrl+V to paste the copied string, and click "Import". You’re ready to go!
Mastering WeakAuras and customizing it to your playstyle is highly recommended for any serious raider. With countless options available on Wago.io, you can tailor your interface to optimize your performance and focus on what truly matters in combat.
Demonology Warlock Frequently Asked Questions
How Do I Use Demonic Core?
Demonic Core procs provide great flexibility, allowing you to adapt your gameplay to the needs of the encounter. These stacks effectively act as Soul Shards on demand, enabling you to enhance your AoE damage, optimize cooldown windows, or adjust for burst phases as needed. The timing of usage should align with your strategic priorities in a given fight.
How to Deal with Wild Imps Ninjapulling in Keys?
To prevent Wild Imps and other guardians from causing unintended pulls, you can reduce their formation size by strafing while moving through packs. This keeps the imps closer to you, minimizing the risk of aggro. Additionally, staying mounted whenever possible and dismissing the Felguard in tight areas are practical steps to mitigate this issue.
What Piece is Better, X or Y?
The best way to determine which piece of gear is better is by running simulations tailored to your character. Gear value depends on your unique setup, and what’s an upgrade for someone else might not be one for you. This applies to gear, trinkets, Azerite Traits, and even talents. In situations where a fight demands specific optimizations, tools like Warcraft Logs can show you the most effective setups used by top players.
Why Guillotine Does Not Work?
If Guillotine isn’t working, it’s often because the Felguard is locked in the Demonic Strength animation. Timing conflicts between abilities can prevent Guillotine from activating.
When Should I Cast Implosion?
Implosion should be part of your rotation whenever two or more targets are stacked together. For maximum efficiency, aim to use Implosion every two or three casts of Hand of Gul'dan. The damage dealt by Wild Imps when they implode depends on their remaining energy on the primary target, while secondary targets always take full damage. Avoid using Implosion on single targets unless the target is about to die, as it’s more effective to spend that global cooldown on a resource generator.
Why Demonic Strength Does Not Work?
Demonic Strength may fail to activate if your Felguard is already performing another animation, such as Felstorm or Guillotine. Proper ability management ensures smoother execution.
Which Race is Best for Demonology Warlock?
Racial traits have a minor impact on your overall DPS. If you’re focused on achieving the highest possible output, you can check simulation results for your specific character and gear setup. However, the differences between races are generally small.
How Much of a Specific Stat, Like Haste, is Required?
The optimal amount of secondary stats like Haste varies greatly depending on your gear, traits, and current stat distribution. Guides often suggest a general stat priority based on simulations using equal values of each secondary stat, but these are only starting points. For the most accurate results, use a simulation tool to tailor recommendations to your current gear and character.