Blood Death Knight Tank Guide - Midnight (12.0.1)
In this Blood Death Knight guide, we'll cover everything you need to know to enhance your performance in the game. This includes optimal rotations and strategies, the pros and cons of the specialization, the best gear recommendations, stat optimization, and ways to boost your overall power.

Table of Contents
Blood Death Knight Overview
Blood Death Knight is one of the six available tanking specializations within World of Warcraft, and is centered around clear and precise usage of resources to reactively heal a large part of the damage taken using Death Strike, and using a large array of cooldowns to support yourself and your team.
Blood Death Knight Strengths and Weaknesses
Strengths
- Wide array of cooldowns for all situations: Anti-Magic Shell, Icebound Fortitude, Lichborne, and Vampiric Blood, to name a few.
- Unique Utility: Death Grip, Gorefiend's Grasp and Anti-Magic Zone.
- Immunities: Stun (Icebound Fortitude), Knockbacks (Death's Advance), Charm/Sleep/Fear (Lichborne).
- Two Taunts: Dark Command and Death Grip.
- Cheat Death: Purgatory.
- Utility: ranged interrupt, 90% snare, combat ress, short-duration immunity to magic debuffs.
- Predictable, simple rotation, with options to truly get the maximum out of the spec in the hands of a skilled player.
- Reactive self-healing, based on damage taken.
Weaknesses
- Limited mobility options Death's Advance (requires Death's Echo to get a second charge) and Wraith Walk.
- Designed to take more up-front damage than other tanks and heal it back.
- Mistakes don't punish you immediately making it harder to come back from a resource deficit triggered by the mistakes.
- Cooldown usage and planning can make or break you.
Blood Death Knight Basic Gameplay
The Blood specialization has an engaging play style, using self-healing through Death Strike as a primary source of damage mitigation. As Death Strike works off a constrained resource (Runic Power), clever optimization of all the ways to generate it becomes paramount. Blood also features a versatile and effective defensive and offensive toolkit, which comprises numerous smaller defensive cooldowns than other tanks, aimed at countering certain scenarios. These can be chained as needed during a fight, although we strongly recommend using them as close to on cooldown as possible.
Put together, this specialization is effective in the full range of current content with proper management. Essentially, if you can survive a hit, you will come out stronger after it.
Blood Death Knight 11.2 Changes
Patch 11.2 brings major adjustments to both regular and Hero talents, particularly reworking Frost and Unholy specializations. A new tier set is also introduced with the release of Manaforge: Omega.
Some of the changes are quite negative. Blood feels deprioritized due to a combination of factors: the loss of 3% haste from changes to Unholy Ground, the removal of Abomination Limb, and a significant increase in cooldown alongside reduced strength for Anti-Magic Zone. The removal of Abomination Limb is especially impactful for Mythic+, as Blood now has very limited AoE damage for large pulls.
San'layn players face a substantial nerf to their AoE damage. The aggregation of Pact of the San'layn drops from 50% to 15%, and the spawn condition for The Blood is Life is now tied to Dancing Rune Weapon, preventing the final Infliction of Sorrow proc from properly snapshotting into Blood Beast.
Deathbringer players experience a near-total rework of Exterminate. The first of two scythes now grants only two seconds of Bonestorm without triggering associated talents or reducing the cooldown on Dancing Rune Weapon, making it almost useless in most situations.
Not all changes are negative. The San'layn tier set partially offsets these adjustments in raids, although Mythic+ remains heavily affected, primarily due to the loss of Abomination Limb, which previously contributed ~200% AP damage per target and helped control pulls in instances like Priory of the Sacred Flame.
As part of the Patch 11.2 gearing process, players also lock in a single cloak for the remainder of War Within: Reshii Wraps. This artifact-level cloak provides a minor random damage absorption effect, which has little noticeable impact on gameplay.
Blood Death Knight Leveling Guide for The War Within
Gear Options
When leveling up, always choose the piece of loot with the highest item level. The only exception is if you have a Ring or Necklace with slightly lower item level but two secondary stats instead of one.
Your primary goal is to level up as quickly as possible through the zones, and the best way to achieve this is by equipping the best available gear without going out of your way to obtain it.
Rotation to Level Up as a Blood Death Knight
- Use Death and Decay where you intend to fight; keep both yourself and enemies inside it as long as possible. Cast it on cooldown, but do not overlap them!
- Use Dancing Rune Weapon on cooldown. Aim to be below 7 Bone Shield charges when casting, but it is better to use it than to hold it.
- Use Marrowrend (or Death's Caress if out of melee range) if your Bone Shield is about to expire.
- Use Death Strike if your health is low or if you have more than 75 Runic Power.
- Use Blood Boil if any nearby enemies do not have your Blood Plague disease, or if you are close to having 2 charges of Blood Boil.
- Use Marrowrend if you have 6 or fewer stacks of Bone Shield.
- Use Heart Strike if you have 2 or more Runes.
- Use Blood Boil.
Blood Death Knight Tank Spec, Builds, and Talents
Copy the Blood DK talents, paste them into the game.
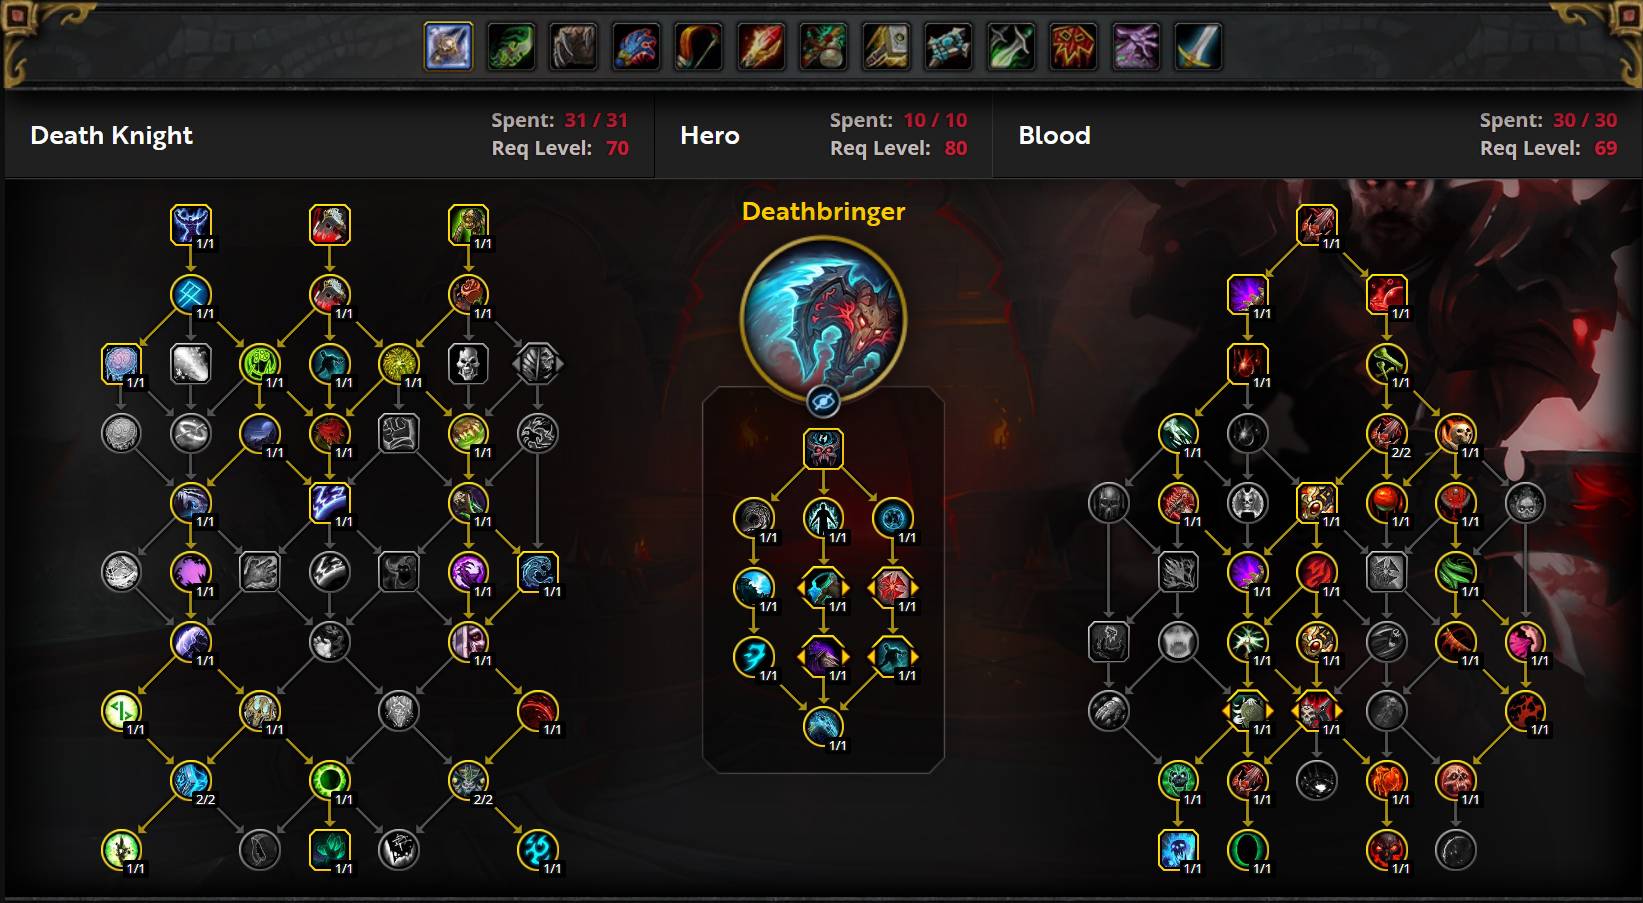
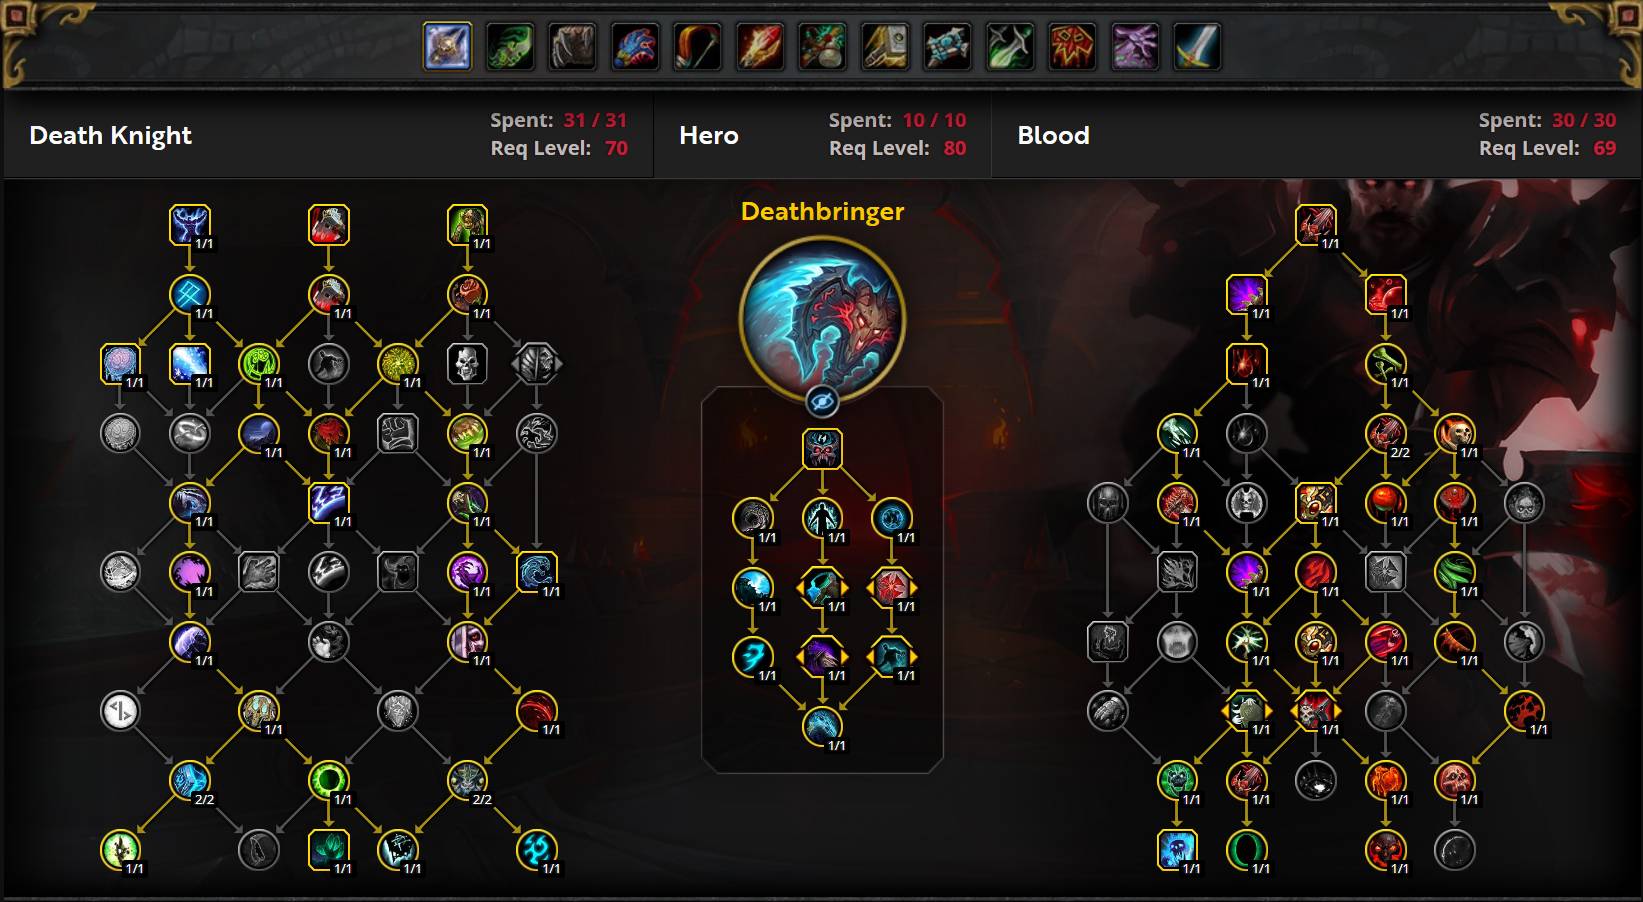
Single-Target Deathbringer Talents
AoE/Mythic+ Deathbringer Talents
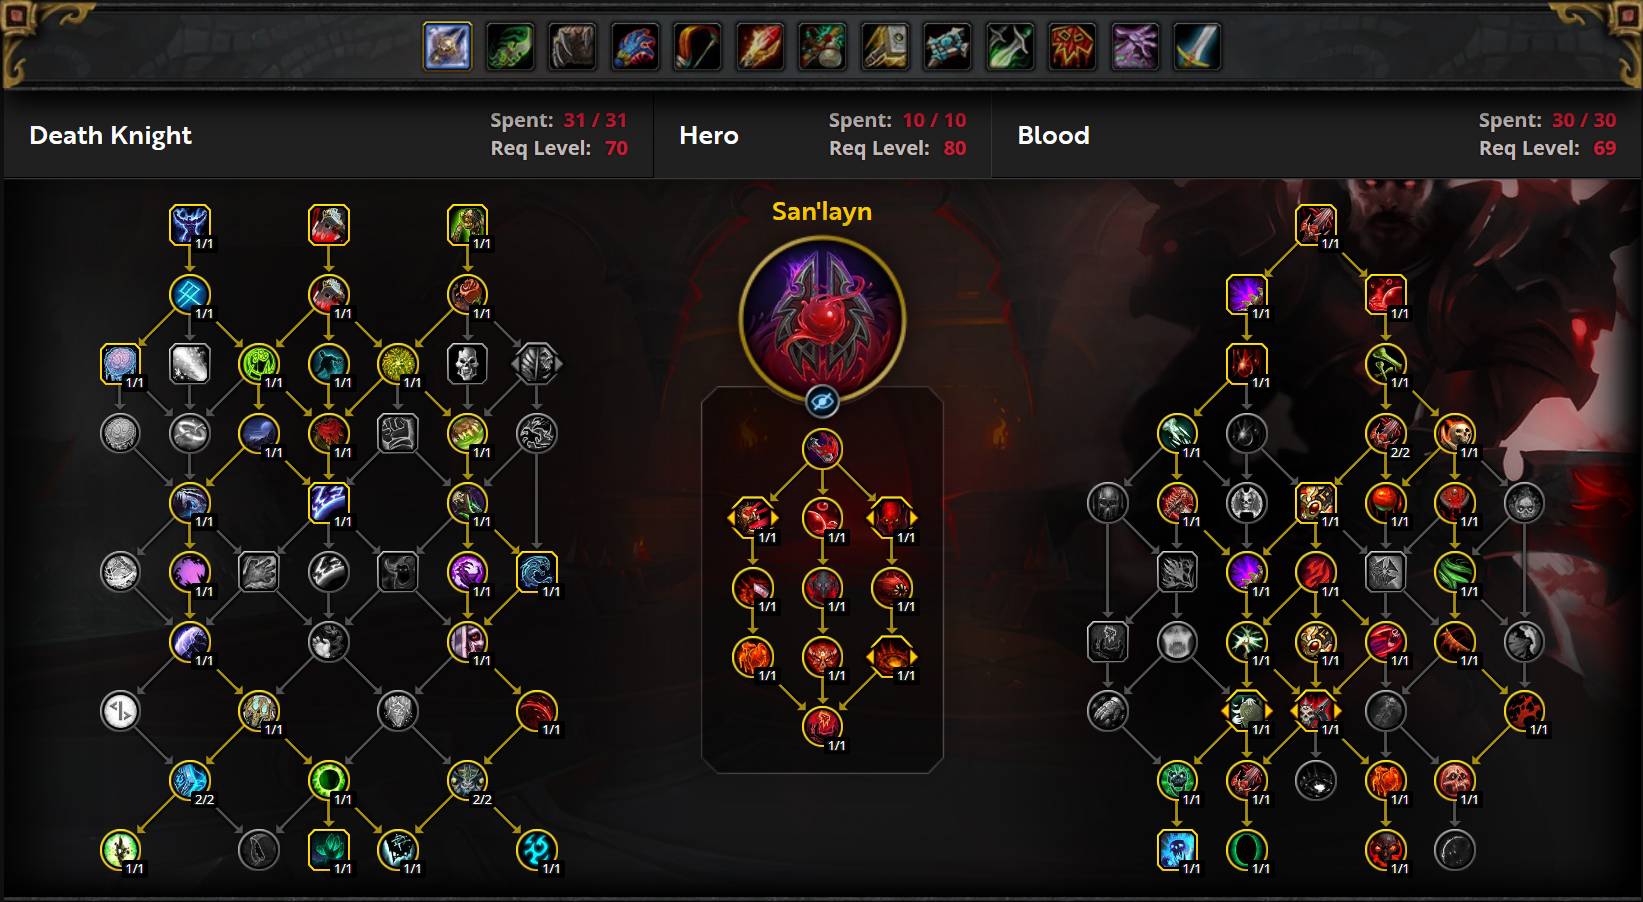
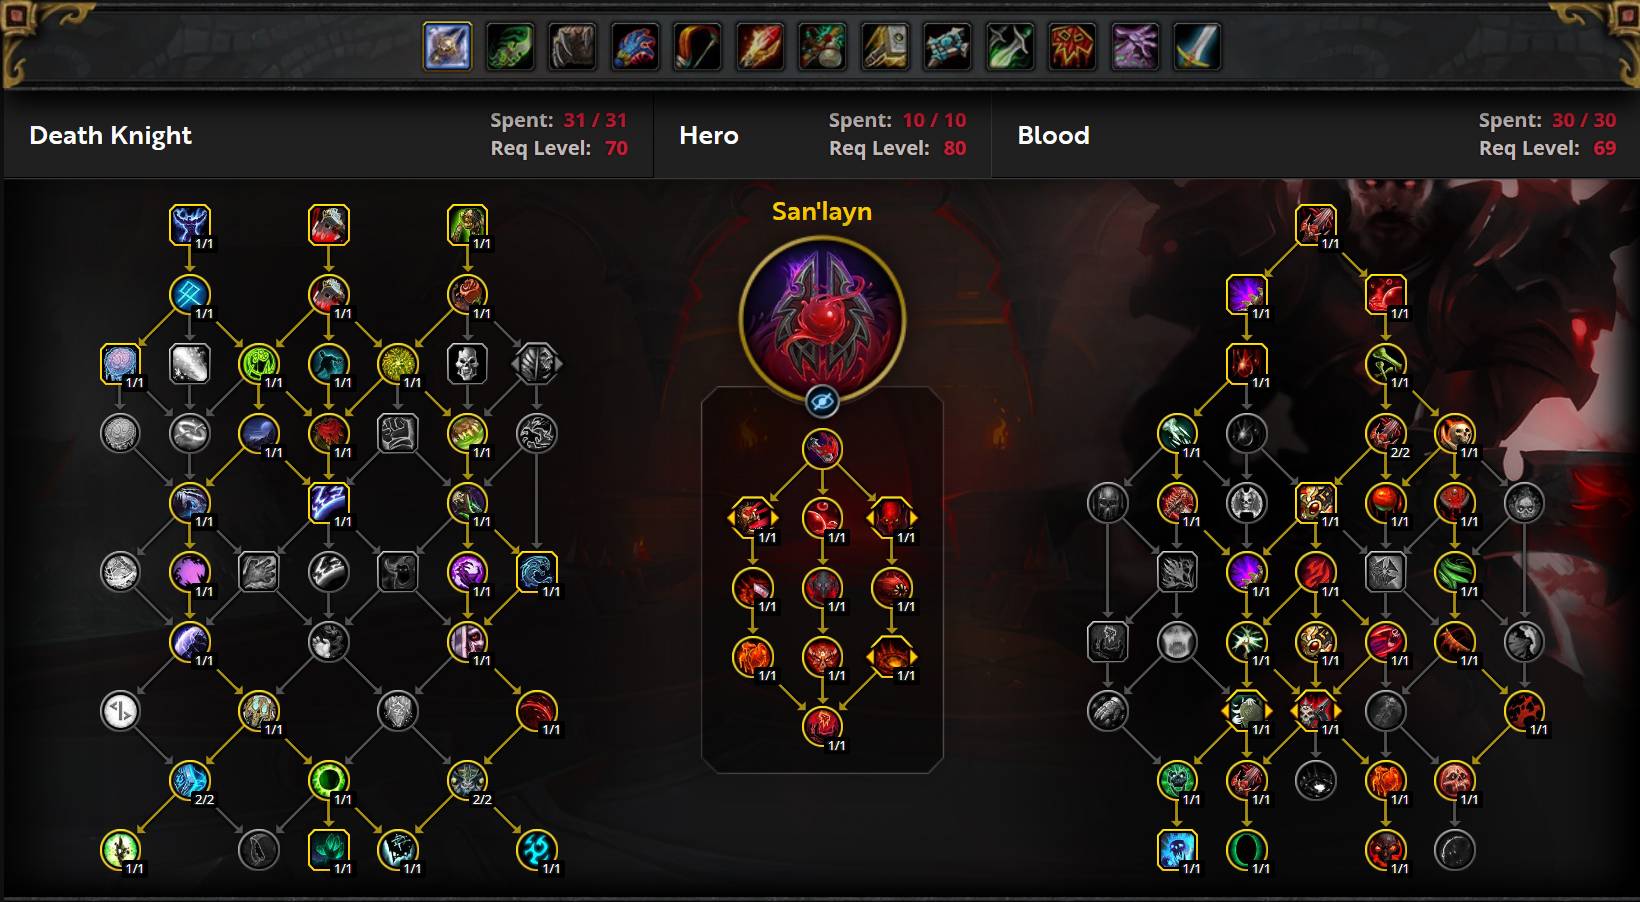
Single-Target San'layn Talents
AoE/Mythic+ San'layn Talents
PvP Talents for Blood Death Knight
Since Battle for Azeroth, players have the option to enable War Mode, which provides the following benefits:
- Activates PvP talents in the outdoor world.
- Increases World Quest rewards by 10% at max level.
- Boosts experience gained while leveling by 10%.
- Earns Conquest Points, which can be exchanged for gear weekly.
Enabling War Mode is recommended to maximize leveling speed and PvE rewards. However, it also exposes you to open-world PvP, increasing the risk of being attacked by other players while leveling or completing World Quests.
PvP Talents (War Mode) for Blood Death Knight
- Death Chain provides a solid damage boost when pulling three or more enemies, though its 30-second cooldown limits its usage.
- Necrotic Aura and Murderous Intent are effective when playing in a group for open-world content but have little value in solo play.
- Dark Simulacrum, Decomposing Aura, Strangulate, and Walking Dead offer limited usefulness in PvE scenarios.
- Last Dance is not recommended, as it reduces the cooldown of Dancing Rune Weapon but results in an extra global cooldown per minute with no real uptime gain.
Best Hero Talents for Blood Death Knight in The War Within
Deathbringer Raiding
Deathbringer is the most effective Hero Talent for raiding during progression or encounters where you are frequently forced out of melee range, as it offers steady and reliable value. However, once you become familiar with a fight, its offensive potential diminishes compared to other options.
Deathbringer Mythic+
Deathbringer is the top Hero Talent choice for Mythic+, offering the best combination of offensive and defensive benefits. However, its defensive strength relies heavily on proper rune management and optimal play.
Deathbringer excels in priority damage, AoE damage, and defensive value, consistently performing well in all three aspects.
San'layn Raiding
San'layn stands out for its lack of button bloat, as it does not introduce any new abilities. However, this simplicity is deceptive, as the specialization is more punishing, more complex, and heavily reliant on maintaining constant melee uptime to fully benefit from Essence of the Blood Queen.
Dancing Rune Weapon activates Gift of the San'layn, providing a significant window of strength. Once it ends, the race to the next Dancing Rune Weapon begins, ushering in a period of resource scarcity.
San'layn Mythic+
San'layn faces an additional challenge in Mythic+; you do not always want to use Dancing Rune Weapon on cooldown. This can result in losing Essence of the Blood Queen stacks and having to rebuild them multiple times throughout a dungeon run.
Offensively, San'layn is unpredictable, as a significant portion of its damage comes from the random proc of The Blood is Life. In some pulls, you will outperform in DPS, while in others, your damage may be closer to that of the healer. The inconsistency becomes even more pronounced at lower key levels, where shorter fights make it difficult to maximize the effectiveness of Blood Beasts, which take a full 10 seconds to explode.
Blood Death Knight Tank Stat Priority
The Basics of Stats for Blood Death Knight
Deathbringer Stats
The general stat priority for Deathbringer Blood Death Knights on armor pieces is as follows:
- Item Level
- Critical Strike, Versatility or Mastery
- Haste
The reason for aiming for ~5% Haste is to enable 3 Blood Boil casts in your Reaper's Mark window, significantly increasing the number of stacks generated. Beyond this point, additional Haste doesn't interact as effectively with the broader Deathbringer kit, so it is better to prioritize other stats.
San'layn Stats
The general stat priority for San'layn Blood Death Knights on armor pieces is as follows:
- Item Level
- Haste
- Critical Strike, Versatility, or Mastery
The reason Haste is prioritized over other stats for San'layn is due to the multiplicative scaling of Haste from Essence of the Blood Queen and the importance of maximizing Rune usage within your Vampiric Blood window.
The benefit of Armor, Strength, and, to a lesser extent, Stamina from higher item level gear generally outweighs the benefit of optimal secondary stats. Do not consistently sacrifice item level to chase Haste (or any other secondary stat!) — outside of rings and trinkets, practically any item providing a 10+ item level increase should be treated as an upgrade.
The War Within enables competent Death Knights to maintain a noticeably higher uptime on Dancing Rune Weapon thanks to the combination of Everlasting Bond and Insatiable Blade, coupled with Tombstone and Bonestorm. While it may not be as spectacular as Shadowlands Season 2, you can expect 50-55% uptime. This massively increases the relative defensive value of Critical Strike, as the bonus parry from Dancing Rune Weapon is additive and has no diminishing returns. This makes every point of avoidance (dodge, parry, miss) 35% more appealing while Dancing Rune Weapon is active, in addition to providing a significant amount of damage reduction against physical damage. It also manifests in single-target situations — those who have progressed bosses such as Sludgefist, Mythic Jailer, or even Echo of Neltharion know the value of avoiding a single swing. While not lethal in itself, avoiding that hit allows resources to be spent more freely and in a more relaxed manner.
Generally, all secondaries are close in value both defensively and offensively, so most gear adjustments should be made by simming rather than chasing specific secondaries. You can use Raidbots' Droptimizer feature to help you discover potential upgrades worth farming by evaluating their value for your character right now, rather than solely justifying an item based on its green text stats.
Getting a Better Understanding of Blood Death Knight Stats
Strength is your primary statistic as a Death Knight. It increases the armor bonus of Bone Shield, boosts your damage, enhances your chance to parry attacks, and provides a small increase to your self-healing through several Leech abilities available to Blood Death Knights.
Mastery increases the size of your Blood Shield, which gives Death Strike a damage-smoothing component. Numerous talents (such as Gloom Ward, Iron Heart, or Bloodshot) impact the value of each point of mastery. This Blood Shield is directly tied to damage taken and works purely off physical damage (this is beneficial in fights with heavy magical damage, as it allows you to be literally immune to physical damage, especially in Mythic+ encounters). It is capped at your max HP before the effect of Gloom Ward. Mastery also increases the damage dealt by all your attacks through Mastery: Blood Shield, which is capped at 50% of the Death Knight's maximum HP before any max HP modifiers (note that Vampiric Blood does not raise this cap).
Critical Strike increases your chance for abilities to deal 100% more damage, and all your Critical Strike chance is converted into parry chance. This is particularly appealing in Mythic+, where most of your damage taken is from parryable auto-attacks. While the chance to parry each individual swing is random, the combined odds across multiple swings from multiple enemies are much more reliable, leading to significantly better odds than on individual swings.
Versatility increases all your damage and healing done, and decreases all damage taken.
Haste increases your attack speed and Rune regeneration, while also reducing your Global Cooldown. This results in a slight compression effect, where the resources you generate and spend are compressed into a shorter interval. While it’s not as essential as some new Death Knights might think, it’s still useful and should not be avoided.
Once you pick Improved Bone Shield, you instantly gain 10% multiplicative haste, making each percentage of Haste effectively 10% better.
Most encounters feature abilities that cannot be mitigated or avoided, and you need a decent amount of health to survive long enough to be healed before another attack lands. As such, a minimum amount of Stamina is essential. This will typically come from the Stamina found on your gear, meaning that item level becomes the determining factor in growing your health pool.
Blood Death Knight Tank Rotation, Cooldowns, and Abilities
Generally speaking, your goal during each fight is to efficiently use your resources (Runes and Runic Power) to generate threat and maintain your survivability. The Blood Death Knight specialization is a builder-spender type, with a limited number of procs and interactions. There are several ways you can be penalized for losing focus and using the wrong ability at the wrong time.
Deathbringer Blood Death Knight Rotation
Opener
The following opener assumes that all cooldowns are available and that you are able to cast two things from range before the pull actually starts:
- Before pull: Pre-place Death and Decay where you will be fighting.
- Before pull: Pull from range with Death's Caress
- Cast Abomination Limb and Raise Dead. You can macro these together.
- Cast Dancing Rune Weapon
- Cast Reaper's Mark
- Cast Blood Boil
- Cast Tombstone
- Cast Consumption
- Cast Marrowrend
- Cast Bonestorm
- Use Soul Reaper
- Use Death Strike
- Use Heart Strike
- Cast Blood Boil
- Use Death Strike
Priority List while Dancing Rune Weapon is Up
- Cast Marrowrend if Reaper's Mark has recently detonated.
- Cast Marrowrend again if you are talented into Painful Death and Reaper's Mark will become available in less than 15 seconds, or another Reaper's Mark is about to detonate (to prevent losing any Exterminate stacks).
- Cast Reaper's Mark if your target is not debuffed by it.
- Cast Marrowrend if you have an Exterminate stack and the target does not have Reaper's Mark.
- If you have a Reaper of Souls proc and Coagulopathy is not about to expire, cast Soul Reaper on the target currently affected by Reaper's Mark (the one that granted you the proc).
- Cast Marrowrend as one of the last three GCDs of Dancing Rune Weapon, but only if Bonestorm is not running. This is extremely important as it guarantees that you will need to spend at most two runes on Marrowrend between Dancing Rune Weapon.
- Cast Consumption when it becomes available, ideally setting it up so it refunds two full runes.
- Cast Death and Decay as long as you do not currently have the effect of Death and Decay active. For the first four seconds after leaving your Death and Decay (or it expiring), Cleaving Strikes grants you all of these buffs.
- Cast Soul Reaper while the target is below 35% HP.
- Maintain yourself at 1+ Bone Shield charges. If you planned for Dancing Rune Weapon properly, this should already happen by itself. If not, or if you made a mistake, use Marrowrend to instantly get back to 10 stacks (12 withReinforced Bones).
- Cast Blood Boil to keep charges rolling.
- Use Bonestorm if the following conditions are true:
- You will gain more than 10 seconds of effective cooldown reduction on Dancing Rune Weapon by casting it.
- You will consume 5 Bone Shield charges.
- You are currently standing in your Death and Decay.
- Use Tombstone if the following conditions are true:
- You will gain more than 20 seconds of effective cooldown reduction on Dancing Rune Weapon by casting it.
- You will consume 5 Bone Shield charges.
- You are currently standing in your Death and Decay.
- Spend Runic Power on Death Strike. Use it when you are above 70 Runic Power (i.e., 2 Death Strikes banked), or to keep Coagulopathy stacks from falling off.
- Use Heart Strike as your filler to consume Runes. You should have three recharging at all times.
Priority List Outside of Dancing Rune Weapon
- Use Marrowrend if your Bone Shield is close to expiring (3 seconds or less), or if you will not be in range of a target before your Bone Shield will expire.
- Cast Marrowrend if Reaper's Mark has recently detonated.
- Cast Marrowrend again if you are talented into Painful Death and Reaper's Mark will become available in less than 15 seconds, or another Reaper's Mark is about to detonate (to prevent losing any Exterminate stacks).
- Cast Reaper's Mark if your target is not debuffed by it.
- Cast Marrowrend if you have an Exterminate stack and the target does not have Reaper's Mark.
- If you have a Reaper of Souls proc and Coagulopathy is not about to expire, cast Soul Reaper on the target currently affected by Reaper's Mark (the one that granted you the proc).
- Cast Death and Decay as long as you do not currently have the effect of Death and Decay active. For the first four seconds after leaving your Death and Decay (or it expiring), Cleaving Strikes grants you all of these buffs.
- Cast Consumption when it becomes available, ideally setting it up so it refunds two full runes.
- Cast Soul Reaper while the target is below 35% HP.
- Use Abomination Limb on cooldown.
- Cast Marrowrend while at 5 or fewer Bone Shield charges, as long as Bone Shield will not expire within the next 10 seconds and Dancing Rune Weapon is not about to come off cooldown.
- Use Dancing Rune Weapon on cooldown.
- Use Tombstone if the following conditions are true:
- You will gain more than 20 seconds of effective cooldown reduction on Dancing Rune Weapon by casting it.
- You will consume 5 Bone Shield charges.
- You are currently standing in your Death and Decay.
- Use Bonestorm if the following conditions are true:
- You will gain more than 20 seconds of effective cooldown reduction on Dancing Rune Weapon by casting it.
- You will consume 5 Bone Shield charges.
- You are currently standing in your Death and Decay.
- Spend Runic Power on Death Strike. Use it when you are above 75 Runic Power (i.e., 2 Death Strikes banked), or to keep Icy Talons stacks from falling off.
- Cast Blood Boil to keep its charges from capping.
- Use Heart Strike as your filler to consume Runes. You should have three recharging at all times.
San'layn Blood Death Knight Rotation
Opener
- Before pull: Pre-place Death and Decay where you will be fighting.
- Before pull: Pull from range with Death's Caress.
- Cast Marrowrend twice to prime Bone Shield charges for the entirety of Dancing Rune Weapon. We have a strong incentive not to cast Marrowrend or Tombstone during it as San'layn in 11.2. Bonestorm is justifiable in Dancing Rune Weapon but leads to one less stack of Coagulopathy going into Dancing Rune Weapon, making it a small threat gain but a damage loss in the opener.
- Cast Blood Boil to pandemic Blood Plague to its maximum value before priming for Dancing Rune Weapon.
- Cast Death Strike.
- Cast Dancing Rune Weapon.
- Cast Blood Boil to apply plague copies from Dancing Rune Weapon and extend your own Blood Plague back to 30 seconds. You will be extending it further only using Vampiric Strike now.
- Cast Vampiric Strike until Coagulopathy has less than two GCDs left on it, then press Death Strike and continue the cycle until there are 5 seconds left on Dancing Rune Weapon.
- Continue casting Vampiric Strike until Coagulopathy has less than two GCDs left on it, then press Death Strike and continue the cycle until there are two GCDs left on Dancing Rune Weapon.
- Press Death Strike.
- Press Vampiric Strike twice. Dancing Rune Weapon fades.
- Press Heart Strike.
- Press Blood Boil.
- Press Death and Decay.
- Press Death Strike.
- Press Bonestorm if at 5+ bones. If not, Marrowrend first.
- Press Vampiric Strike if you have gotten a proc from the previous Death Strike.
- Press Blood Boil.
- Press Death Strike.
- Press Heart Strike.
- Press Blood Boil.
- Press Tombstone if at 5+ bones. If not, press Heart Strike while waiting.
Priority List while Dancing Rune Weapon is Up
- Cast Death and Decay as long as you do not currently have the effect of Death and Decay active. For the first four seconds after leaving your Death and Decay (or it expiring), Cleaving Strikes grants you all of these buffs.
- Cast Soul Reaper while the target is below 35% HP.
- Maintain yourself at 1+ Bone Shield charges. If you planned for Dancing Rune Weapon properly, this should already happen by itself. If not, or if you made a mistake, use Marrowrend to instantly get back to 10 stacks (12 with Reinforced Bones).
- Cast Blood Boil to keep charges rolling.
- Spend Runic Power on Death Strike. Use it when you are above 70 Runic Power (i.e., 2 Death Strike banked), or to keep Coagulopathy stacks from falling off.
- Use Heart Strike as your filler to consume Runes. You should have three recharging at all times.
Priority List Outside of Dancing Rune Weapon
- Cast Dancing Rune Weapon on cooldown.
- Cast Vampiric Strike if you have a proc that enables it. You should weave a Blood Boil cast before it, along with any other non-Death Strike cast options if the remaining duration on your Essence of the Blood Queen stacks allow it.
- Use Marrowrend if your Bone Shield is close to expiring (3 seconds or less), or if you will not be in range of a target before your Bone Shield will expire.
- Cast Death and Decay as long as you do not currently have the effect of Death and Decay active. For the first four seconds after leaving your Death and Decay (or it expiring), Cleaving Strikes grants you all of these buffs.
- Cast Soul Reaper while the target is below 35% HP.
- Cast Marrowrend while at 5 or fewer Bone Shield charges, as long as Bone Shield will not expire within the next 10 seconds and Dancing Rune Weapon is not about to come off cooldown.
- Use Dancing Rune Weapon on cooldown.
- Use Tombstone if the following conditions are true:
- You will consume 5 Bone Shield charges.
- You are currently standing in your Death and Decay.
- Spend Runic Power on Death Strike. Use it when you are above 75 Runic Power (i.e., 2 Death Strike banked), or to keep Icy Talons stacks from falling off.
- Cast Blood Boil to keep its charges from capping.
- Use Heart Strike as your filler to consume Runes. You should have three recharging at all times.
Insatiable Blade, Shattering Bone and Their Impact on Your Rotation
Tombstone
As outlined in the rotation flowchart above, Tombstone plays a crucial role in reducing the effective cooldown of Dancing Rune Weapon throughout The War Within. Additionally, Shattering Bone significantly boosts your damage whenever a Bone Shield charge is consumed, including the five charges used by Tombstone.
Furthermore, this damage is tripled when standing in your own Death and Decay. Several talents, such as Unholy Ground and Sanguine Ground, further enhance Death and Decay by providing 5% increased haste, damage, and healing received. This makes managing its uptime an essential part of your rotation.
Using Tombstone is straightforward. Cast it on cooldown if all of the following conditions are met:
- Dancing Rune Weapon is still on cooldown.
- You have more than 6 Bone Shield charges (dropping to 0 charges for two GCDs is a bigger loss than wasting 2-3 charges with Marrowrend).
- You are currently standing in your own Death and Decay.
Bonestorm
Bonestorm follows a similar logic to Tombstone: it should be prepared in advance rather than used opportunistically. Keeping both in sync is critical, as one fuels the other. During the pull, you will cast one Marrowrend while Dancing Rune Weapon is active to enable Bonestorm. Every subsequent minute, Tombstone will be fueled by the bones "borrowed" for Bonestorm.
The usage conditions for Bonestorm are nearly identical to those for Tombstone, as it also triggers both Shattering Bone and Insatiable Blade.
Use Bonestorm on cooldown if the following conditions are met:
- Dancing Rune Weapon is still on cooldown.
- You have more than 6 Bone Shield charges (avoiding a drop to 0 charges for two GCDs is more important than wasting 2-3 charges with Marrowrend).
- You are currently standing in your own Death and Decay.
It is also worth noting that Bonestorm refunds 10 Bone Shield charges despite only costing 5 to activate, making it an extremely efficient temporary investment in Bone Shield charges.
Taunting
Dark Command is your main taunting ability. It works on a single-target and has an 8-second cooldown.
Death Grip grabs your target and moves it to your location. It also has the effect of taunting the target and interrupting spellcasting. The movement effect does not work against most raid bosses.
Survival Cooldowns for Blood Death Knights
Anti-Magic Shell absorbs up to 30% of your maximum health in magic damage over 5 seconds. It should be used to mitigate incoming magic damage while also generating Runic Power.
Dancing Rune Weapon increases your chance to parry attacks by 35%, significantly boosting both your damage and resource generation. Use it strategically in situations where you can take advantage of both its offensive and defensive benefits.
Vampiric Blood increases your maximum health and amplifies healing received by 30% for 10 seconds. It is best used proactively before taking heavy damage or reactively when you are at low health and at risk of dying.
Icebound Fortitude reduces all damage taken by 30% for 8 seconds. This ability should primarily be used proactively in anticipation of high-damage situations, such as major boss mechanics.
Blood Death Knight Tank Gems and Consumables
Consumables for Blood Death Knights
Best Phials for Blood
Use Flask of Alchemical Chaos as your primary phial for general use. If you prefer a simpler option that provides a single secondary stat, you can use Flask of Tempered Aggression or Flask of Tempered Versatility instead.
Mythic+ Phial Swap Strategies
If you are actively pushing Mythic+ keys and have no budget concerns, swapping phials mid-run can provide a significant advantage for specific encounters. Plan your swaps in advance to maximize their effectiveness. Recommended phials include:
- Phial of Icy Preservation – Ideal for encounters with predictable, large, one-hit tankbusters. This phial applies its full effect if you have the correct debuff at the moment of impact. Ensure you are above 50% health when the tankbuster lands to benefit from a 6% damage reduction.
- For all other situations, continue using Flask of Alchemical Chaos.
Best Weapon Augments and Potions for Blood Death Knight
Algari Mana Oil serves as a balanced choice, offering both defensive and offensive benefits. For maximizing raw damage, you should compare simulations between Algari Mana Oil and either Ironclaw Whetstone or Ironclaw Weightstone.
For combat potions:
- Use Potion of Unwavering Focus for pure single-target encounters.
- For multi-target or general encounters, opt for a Tempered Potion alongside Flask of Alchemical Chaos.
For in-combat healing, use Invigorating Healing Potion. Since healing potions do not share a cooldown with Healthstones, you can use both independently if a Warlock is present.
Best Food for Blood Death Knight
If a Feast is not available, use The Sushi Special or Everything Stew for your food buff.
If available, prioritize using a Feast of the Midnight Masquerade or Feast of the Divine Day for an optimal buff.
Augment Runes for Blood Death Knight
If you can afford it, use Draconic Augment Runes to increase your primary stat. Since these runes are limited in supply, use them strategically and stockpile them when possible.
Additionally, through the Patch 10.2 Emerald Dream Zone and the Dream Wardens faction, you can obtain the Dreambound Augment Rune, which provides a permanent stat increase.
Best Gems for Blood Death Knights
You should use a Culminating Blasphemite in your first available gem socket, and fill every other with Versatile Ruby.
Best Enchants for Blood Death Knights
| Slot | Enchantment |
| Necklace | Magnificent Jeweler's Setting (adds up to 2 sockets to a Ring or Neck) |
| Weapon | Rune of the Fallen Crusader in all content. |
| Chest | Enchant Chest - Crystalline Radiance |
| Bracers | |
| Legs | Stormbound Armor Kit |
| Boots | |
| Rings | |
| Cloak |
Blood Death Knight Tank Gear and Best in Slot
This section will cover everything you need to know about equipping your character correctly.
BiS Gear for Blood Death Knight
| Slot | Item | Source |
| Helm | Hollow Sentinel's Stonemask (723) | Tier Set: Catalyst / Vault / Raid |
| Neck | Duskblaze's Desperation (723) | The Soul Hunters in Mythic Manaforge Omega |
| Shoulder | Hollow Sentinel's Perches (723) | Tier Set: Catalyst / Vault / Raid |
| Cloak | Reshii Wraps with Haste (730) | Reshii Wraps |
| Chest | Hollow Sentinel's Breastplate (723) | Tier Set: Catalyst / Vault / Raid |
| Bracers | Everforged Vambraces (720) | Crafted |
| Gloves | Hollow Sentinel's Gauntlets (723) | Tier Set: Catalyst / Vault / Raid |
| Belt | Everforged Greatbelt (720) | Crafted |
| Legs | Halkias's Towering Pillars (723) | Halls of Atonement |
| Boots | Hollow Sentinel's Greatboots (723) | Catalyst |
| Ring #1 | Signet of Collapsing Stars (723) | Tazavesh: So'Leah's Gambit |
| Ring #2 | High Nerubian Signet (723) | Ara-Kara, City of Echoes |
| Trinket #1 | Tome of Light's Devotion (723) | Priory of the Sacred Flame |
| Trinket #2 | Unyielding Netherprism (723) | Fractillus in Mythic Manaforge Omega |
| Weapon | Maw of the Void (723) | Nexus King Salhadaar in Mythic Manaforge Omega |
Best Trinkets for Blood Death Knight in The War Within Season 3
Raiding Trinket Tier List for Blood Death Knight
This Trinket Tier List is for trinkets that are used for Single Target/Raiding Purposes.
S-Tier
A-Tier
- Astral Antenna
- Araz's Ritual Forge
- Improvised Seaforium Pacemaker
- Ara-Kara Sacbrood
- Eradicating Arcanocore
B-Tier
C-Tier
Mythic+ Trinket Tier List for Blood Death Knight
This Trinket Tier List is for trinkets that are used for AoE Purposes in M+/Delves/Raiding.
S-Tier
A-Tier
B-Tier
C-Tier
The War Within Season 3 Tier Set for Blood Death Knight
With the launch of Season 3, Blood Death Knights gain bonuses from the Hollow Sentinel's Wake, which change based on hero talent choice:
San'layn
- Death Knight San'layn 11.2 Class Set 2pc: Vampiric Strike increases the remaining duration of Blood Plague on its main target by 3 additional seconds. Essence of the Blood Queen now grants 0.5% mastery per stack, tripling during Gift of the San'layn.
- Death Knight San'layn 11.2 Class Set 4pc: Infliction of Sorrow deals 50% bonus damage, and Vampiric Strike causes Dancing Rune Weapon to deal 20% bonus damage for 8 seconds, stacking.
Deathbringer
- Death Knight Deathbringer 11.2 Class Set 2pc: Casting Reaper's Mark instantly grants two empowered stacks of Exterminate.
- Death Knight Deathbringer 11.2 Class Set 4pc: Exterminate deals 20% bonus damage, and Reaper's Mark can stack up to 55 times. Its detonation also grants 10% critical strike chance for 8 seconds.
Addons for Blood Death Knight
Generic Addons for Death Knights
- ElvUI
- Boss Mods: Deadly Boss Mods or Bigwigs
- GTFO
- Parrot or Mik's Scrolling Battle Text
- Weak Auras
- Recount / Skada / Details!
- Method Raid Tools
- Clique
- Compact Runes
Specific Addons for Blood Death Knights
- Currently, we do not believe that you need any additional addons to play your specialisation to its full potential.
Macros for Blood Death Knight
Generic Macros for Death Knights
Raise Ally
- #showtooltip Raise Ally
- /cast [@mouseover,help][@target]Raise Ally
This macro casts Raise Ally on your mouseover target, if they are a friendly player. Otherwise, it casts Raise Ally on your current target.
Mind Freeze
- #showtooltip Mind Freeze
- /cast [@focus,harm,nodead][] Mind Freeze
This macro allows you to interrupt your focus target, if you have one, and if not to simply interrupt your current target.
Specific Macros for Blood Death Knights
Gorefiend's Grasp
- #showtooltip Gorefiend's Grasp
- /cast [mod:shift,@focus,exists][@mouseover,exists,nodead][@player] Gorefiend's Grasp
If you have your cursor over a valid target to center Gorefiend's Grasp on, this macro will cast Gorefiend's Grasp at your cursor. By holding shift, it will instead cast Gorefiend's Grasp on your focus target. Otherwise, it will center your Gorefiend's Grasp on yourself.
Death and Decay
- #showtooltip Death and Decay
- /cleartarget
- /cast [@cursor] Death and Decay; [mod:ctrl, @player] Death and Decay
- /targetlasttarget
This will drop Death and Decay where your cursor is at, skipping the entire targeting reticule in the process and saving you 200-500ms in the process. Holding down CTRL will instead drop it at your feet.
Blessing of Protection Cancelaura Macro
- /cancelaura Blessing of Protection
This macro is very useful to have. It allows you to cancel a Blessing of Protection that may have been cast on you. It is important because while you are under the effect of Blessing of Protection, mobs will not attack you and instead will just attack the next person on the aggro list (often a DPS player), though taunting a mob will still force it to attack you for 3 seconds.
Re-Control Pet
- /target pet
- /run PetDismiss()
- /use Control Undead
- /petassist
WeakAuras for Blood Death Knight
WeakAuras is an essential tool for Blood Death Knight and Tanks, offering unparalleled customization to enhance your gameplay. Rather than focusing on specific examples, we recommend exploring Wago.io, where you’ll find an extensive library of WeakAuras to suit your needs.
If you are unfamiliar with WeakAuras, it is an incredibly powerful and widely-used AddOn that allows you to create custom displays for nearly everything in the game. This includes tracking buffs, debuffs, cooldowns, Focus, resources, and much more.
To import a WeakAura, visit Wago.io and select one that fits your preferences. Click the "Copy WeakAura Import String" button to copy it to your clipboard. Next, log into the game and type /wa in the chat box to open the WeakAuras interface. Navigate to the "Import" section, press Ctrl+V to paste the copied string, and click "Import". You’re ready to go!
Mastering WeakAuras and customizing it to your playstyle is highly recommended for any serious raider. With countless options available on Wago.io, you can tailor your interface to optimize your performance and focus on what truly matters in combat.
Blood Death Knight Frequently Asked Questions
What Race is Best for Blood Death Knights?
Horde players may find Blood Elves to be the optimal choice due to the strength of Arcane Torrent, which provides a valuable AoE silence, particularly useful in Mythic+ dungeons. For Alliance players, Night Elves and Dwarves stand out. Night Elves offer Shadowmeld, which can be used to avoid mechanics or redirect spells, while Dwarves bring Stoneform, which purges debuffs and provides a minor defensive boost.
Should I Play Defensively or Offensively?
For Blood Death Knights, the majority of your toolkit does not require you to choose between offense and defense, as core gameplay like maintaining Bone Shield stacks, spending resources optimally, and managing Blood Boil charges remains constant. The distinction lies in how you use your cooldowns. Planning your defensive cooldowns in advance for specific mechanics is key to survival. This might involve using external cooldowns, swapping trinkets for defensive options, or adjusting talents like trading Hemostasis for Red Thirst to reduce Vampiric Blood's cooldown.
When aiming for a more offensive approach, switching to DPS-oriented trinkets or optimizing your talent setup for damage can yield significant results. Always adapt based on encounter needs.
How Much Haste Should Blood Death Knights Have? / Is There a Haste Cap for Blood Death Knights?
There are no specific Haste caps or thresholds for Blood Death Knights, unless you are utilizing specialized builds like Deathbringer. Secondary stats are close in value, making item level upgrades generally more impactful than focusing on particular secondary stats. Trinkets and rings are exceptions, where their unique effects may warrant prioritization over item level.
Can I Sim Myself? Should I?
SimulationCraft provides a reliable tool for evaluating the impact of your gear, talents, and conduits on your damage output. However, it cannot account for defensive decisions or survivability in encounters. While simulations can identify the highest damage potential, always consider the demands of the fight and balance your choices to ensure survivability alongside damage.


Digital Aura Portal - FZCO
Building A1, Dubai Digital Park, Dubai Silicon Oasis, Dubai, United Arab Emirates Premises Number 72647 - 001
Business registration number: 70647