


+15 More
Digital Aura Portal - FZCO
Building A1, Dubai Digital Park, Dubai Silicon Oasis, Dubai, United Arab Emirates Premises Number 72647 - 001
Business registration number: 70647
gamer-choice.com © 2026
Digital Aura Portal - FZCO
Building A1, Dubai Digital Park, Dubai Silicon Oasis, Dubai, United Arab Emirates Premises Number 72647 - 001
Business registration number: 70647
The one whose name was once whispered by the very forests of Lordaeron is undoubtedly dead now. However, his warriors, the Death Knights, remain—at least on the surface. In this Frost Death Knight Guide, we will offer an in-depth look at the changes the Death Knights have undergone in the upcoming expansion, along with the fundamentals of their gameplay.

Table of Contents
Frost Death Knight is a melee DPS spec that has high burst and cleave capabilities. It can wield both two-handed weapons as well as one-handed weapons. It also has a good raid cooldown in the form of Anti-Magic Zone.
Strengths
Weaknesses
Frost Death Knight is a spec that is all about managing your resources and making the most out of your cooldown windows. To maximize your damage as a Frost Death Knight, you need to be able to position yourself well, especially while using talents like Breath of Sindragosa and Glacial Advance.
Frost received a major overhaul in Patch 11.2, including numerous new, removed, and updated talents. Additionally, new tier sets are now Hero-Talent specific, meaning there is a separate set for Rider of the Apocalypse and Deathbringer rather than one set per specialization.
The guide has been updated to reflect the new talent trees and recommended builds. The rotation has been revised to accommodate the rework, and the gear page now includes updated BiS gear as well as new pieces, including the Reshii Wraps cloak.
The Frost playstyle has changed in several key ways. Frostscythe is now the primary AoE Rune-spending ability, replacing Obliterate when fighting multiple targets. Breath of Sindragosa has been redesigned, requiring an upfront cost of 60 Runic Power and being extended by Killing Machine and Rime procs. This integrates smoothly into the new rotation and synergizes strongly with Obliteration and Empower Rune Weapon. Additionally, Rime now triggers off Frost Strike and Glacial Advance, with Glacial Advance now baseline.
When selecting a Runeforge, ensure you apply the correct runes based on your weapon setup:
Alternatively, you can choose to use Rune of Unending Thirst instead of Fallen Crusader if you prefer a healing and speed boost after defeating enemies.
For leveling, we recommend using a Two-Handed weapon for better performance.
When leveling up, you should always choose the piece of loot with the highest item level. The only exception to this rule is if you have a Ring or Necklace with a slightly lower item level but 2 secondary stats on it instead of 1.
Bloodforged Armor provides a solid defensive upgrade, while Deathchill helps with crowd control.
All other talents are either less impactful or offer lower damage throughput.
Copy the Frost DK talents, paste them into the game.
In this section, we rank the best PvP talents for leveling and open-world content.
Due to these benefits, enabling War Mode is recommended to optimize leveling speed and maximize rewards at max level. However, it also makes you vulnerable to open-world PvP, meaning you may be "ganked" while leveling or completing World Quests.
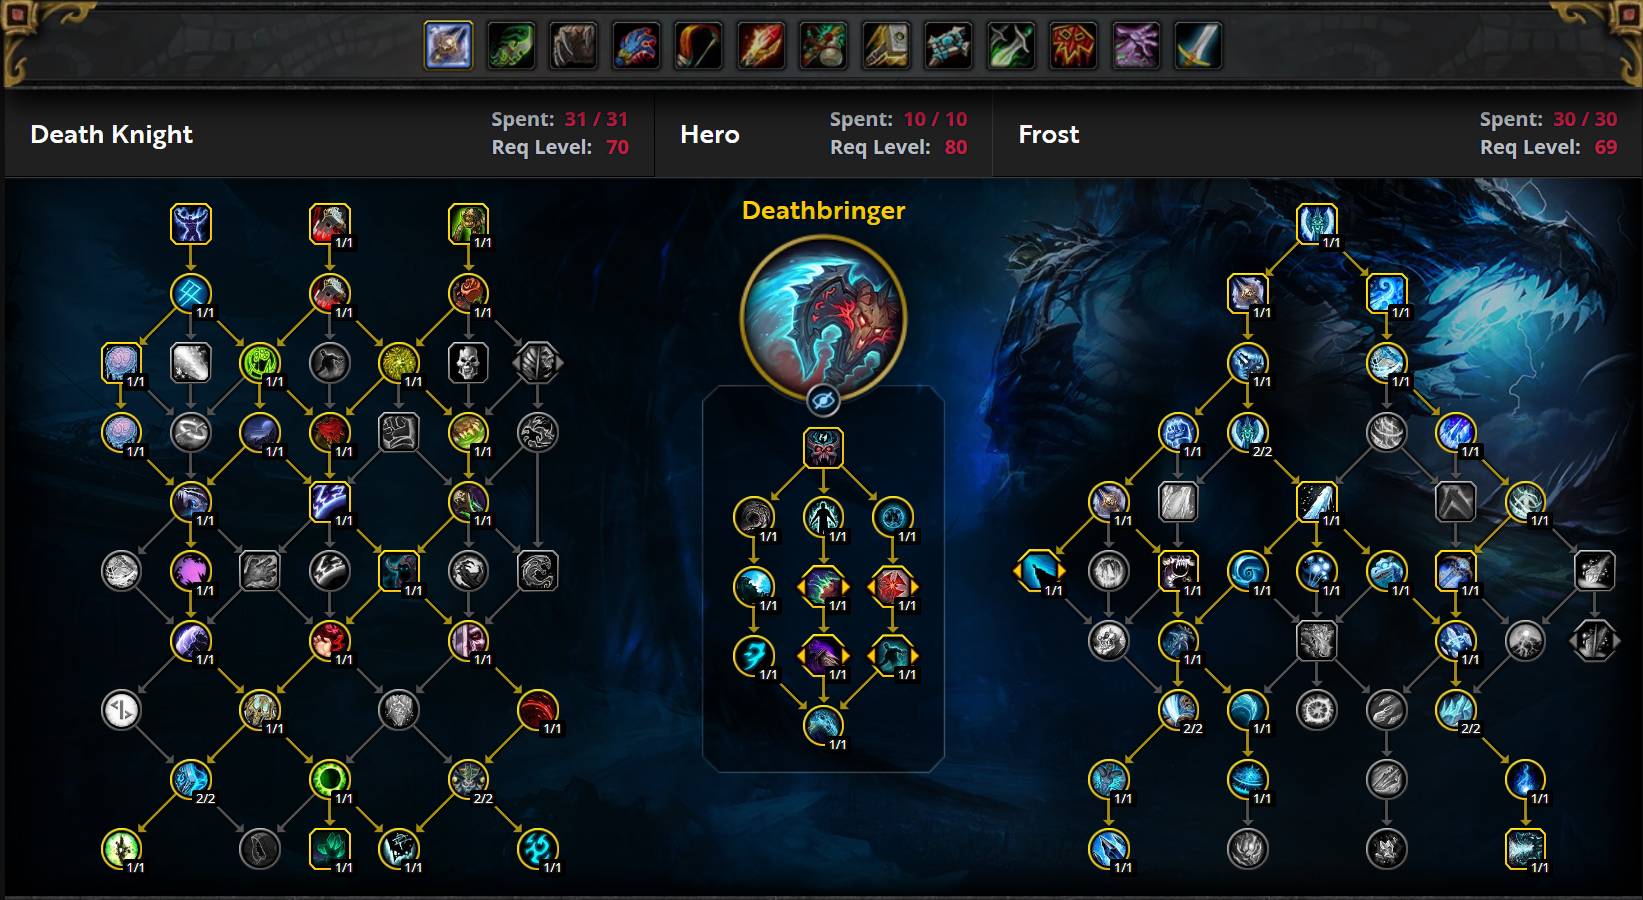
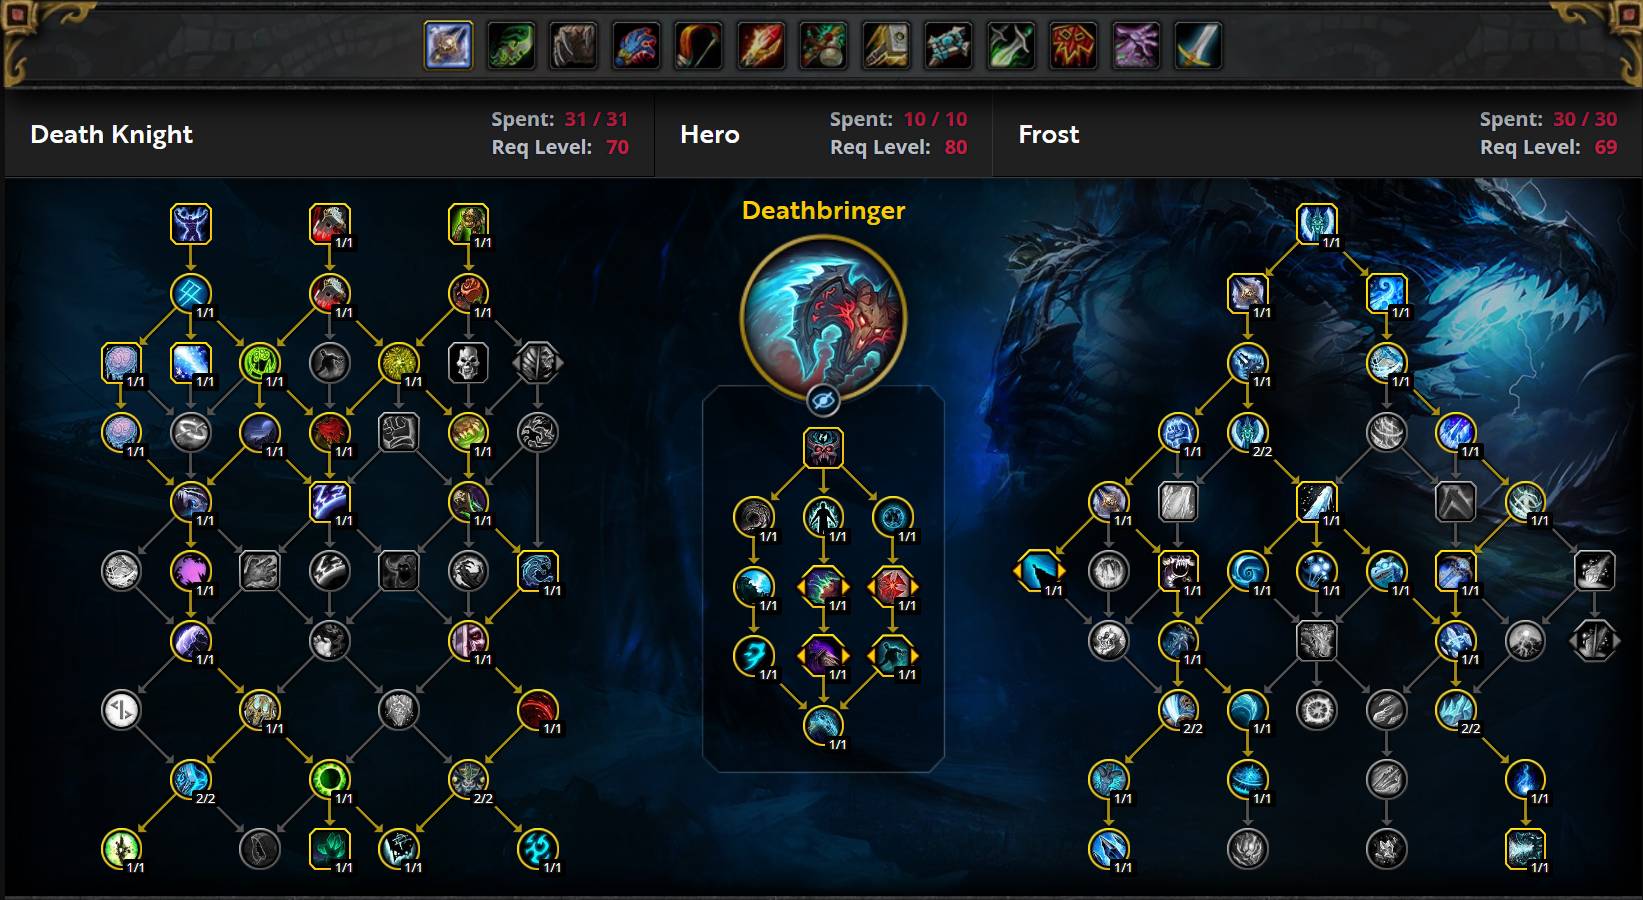
Deathbringer is the preferred hero talent for builds centered around Breath of Sindragosa. This ability rapidly stacks Reaper's Mark, triggering massive damage explosions—sometimes multiple times within the Pillar of Frost window.
We utilize Reaper's Mark with every Pillar of Frost activation to maximize its strength bonus during the explosion. Additionally, it synergizes with Wave of Souls, further amplifying our burst damage.
This setup is optimal before acquiring the new tier set and remains effective in encounters with strong cleave potential.
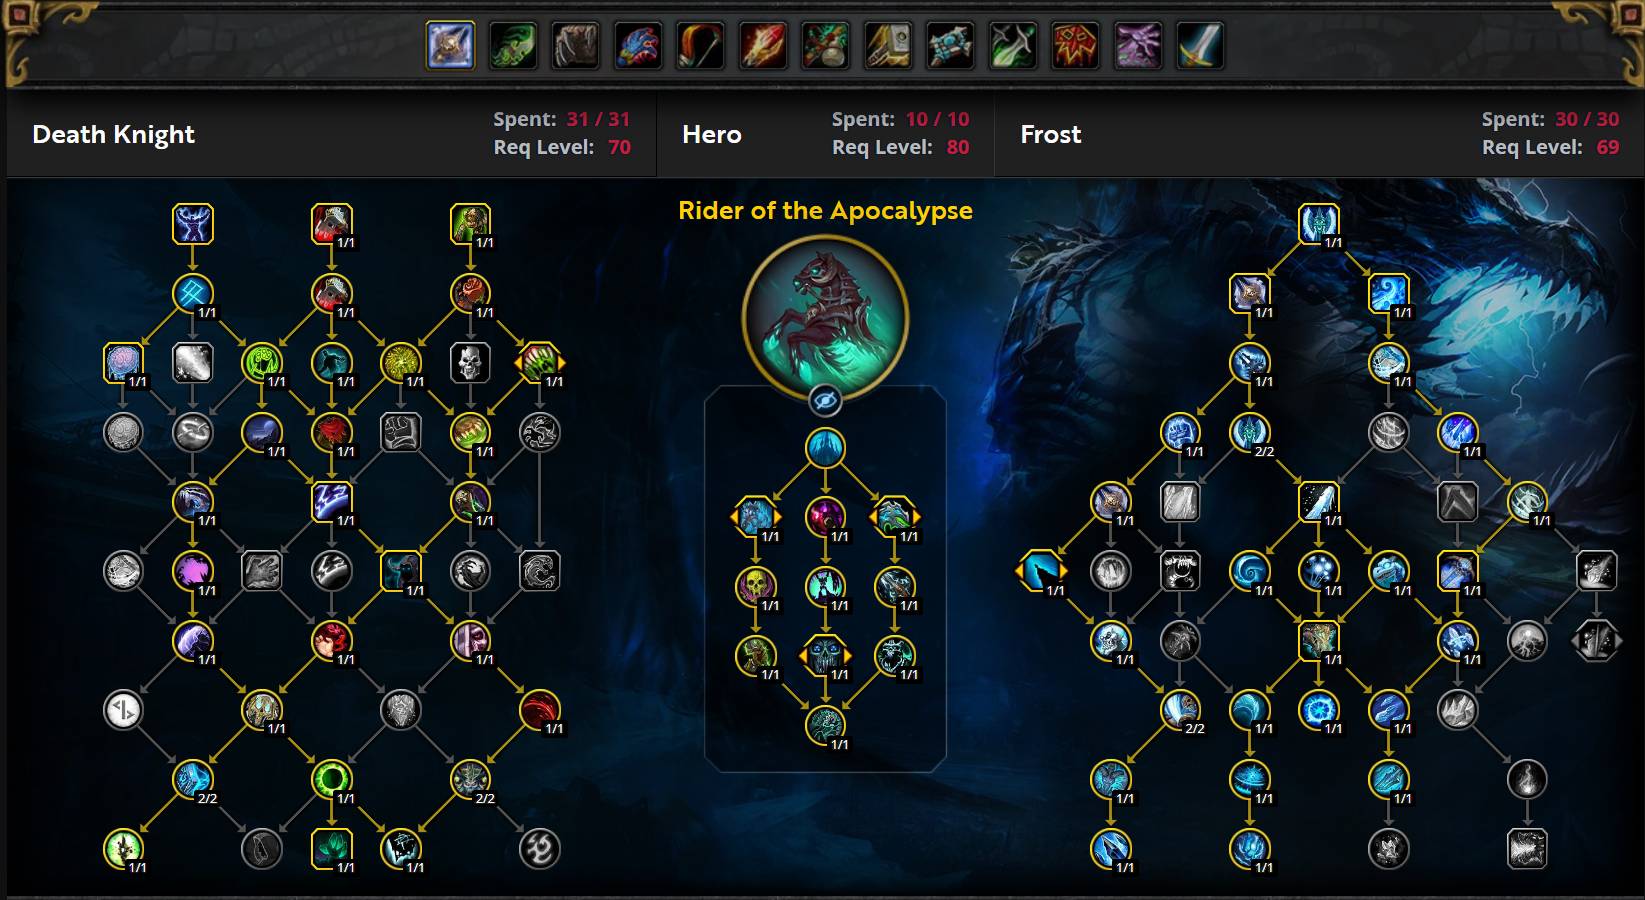
Rider of the Apocalypse synergizes effectively with Shattering Blade builds, benefiting significantly from Hungering Thirst. Additionally, the usual downside of using Frostwyrm's Fury—an "empty" GCD during Pillar of Frost—is less impactful in this build compared to Breath of Sindragosa.
This setup becomes the strongest single-target build once the new tier set is obtained, making it the preferred choice for encounters that primarily focus on single-target damage.
For Mythic+, Deathbringer is the preferred Hero Talent build when using Breath of Sindragosa. Breath of Sindragosa excels in Mythic+ due to its strong cleave potential, making it a highly effective choice for dealing sustained AoE damage.
This build becomes even more valuable in higher keystone levels, where enemy packs survive longer, allowing Breath of Sindragosa to deliver sustained pressure throughout the encounter.
Rider of the Apocalypse is the preferred choice for builds utilizing Shattered Frost. Similar to its performance in Raid, this Hero Talent tree provides strong benefits while minimizing the impact of global cooldowns spent on casting Frostwyrm's Fury.
Additionally, Rider of the Apocalypse delivers its damage quickly, making it particularly effective in lower Mythic+ keys where enemies die faster. Lastly, if you prefer using a Two-Handed weapon, this is one of the few viable Hero Talent options that synergizes well with 2H builds.
The Deathbringer build is relatively straightforward in its execution. Grim Reaper performs approximately 2% better than Reaper of Souls, while Dark Talons outperforms Reaper's Onslaught by a significant 8% in all situations. This substantial gap is primarily due to the desynchronization of Pillar of Frost with Reaper's Mark.
The Rider of the Apocalypse build is quite straightforward when it comes to talent choices. Fury of the Horsemen is generally stronger than A Feast of Souls by around 0.5% or more, making it the default pick in all situations.
The Frost Death Knight has a consistent stat priority regardless of the build. Critical Strike is our top priority in all cases, as it significantly boosts our damage. This is due to several abilities benefiting from Critical Strike auto attacks. However, it is important not to focus too much on this fact, as we scale well with the main stat and other secondary stats as well. The general stat priority is as follows:
Haste and Critical Strike have great synergy with the Frost Death Knight's kit, as several abilities are based on Critical Auto Attacks (which themselves scale with Critical Strike and Haste). For example, Killing Machine, Icy Death Torrent, and The Long Winter all scale with the number of critical auto attacks you can generate. The exact distribution of stats depends heavily on your build. Breath of Sindragosa loves Critical Strike, so you should stack as much of it as possible for that build. On the other hand, Shattering Blade builds require a better balance between Critical Strike, Mastery, and Haste.
Strength is your primary stat, and you should prioritize it in all your upgrades. It provides Attack Power, which determines the damage of your abilities.
Haste increases your attack speed and Rune regeneration rate while reducing the global cooldown. It also increases the number of Killing Machine procs through faster attacks.
Critical Strike boosts your chance to critically hit with all spells and abilities. Crits deal double damage by default, and several effects can further increase crit damage, making crits even stronger. Crit also increases the number of Killing Machine procs by increasing critical auto attacks!
Mastery, through Mastery: Frozen Heart, increases your Frost damage, which makes up a significant portion of your total damage.
Versatility increases all your damage and healing done while reducing all damage taken.
Here we will go over everything you will need to know to optimally play your spec for Raiding and Mythic+ scenarios.
Your AoE rotation is almost identical to your single-target rotation, with the primary difference being when Glacial Advance is used as your Runic Power spender. Death and Decay is also utilized differently, serving as your main source of cleave since Obliterate can hit up to three targets when standing in it. In AoE situations, you generally do not need to worry as much about Runic Power, and it's acceptable to cap it while prioritizing Rune Spenders.
Optimizing your AoE damage focuses on leveraging Death and Decay within your Obliteration windows effectively! For a more detailed discussion, see the Obliteration priority in AoE further down this page.
The goal here is to weave your abilities to both generate and consume the maximum number of Killing Machine procs! You can naturally gain Killing Machine procs, so be prepared when they occur to avoid overcapping. It's important to ensure you have enough resources before entering the Obliteration window. This generally means saving some Runic Power and Runes about 5 seconds before the window. Typically, entering with 2 or more Runes and 30 or more Runic Power is sufficient. You can have less Runic Power if you have a proc of Rime.
Breath of Sindragosa is a unique cooldown that provides a very different playstyle compared toObliteration. With Heroism / Bloodlust, you can expect an average duration of 45+ seconds, and around 30+ seconds without Heroism / Bloodlust. There are exceptions where you may not receive enough Runic Empowerment or Murderous Efficiency procs, which could shorten the duration. Additionally, mechanics may force you out of range, which can disrupt your uptime on Breath of Sindragosa.
The Breath of Sindragosa rotation is all about managing your Runic Power generation throughout your Breath. Your Runic Power drains at a rate of 17 per second, and you want to ensure this does not turn into a Runic Power deficit for long periods! The very first point to consider is the type of ability you use during your Breath. Never use an ability that costs Runic Power, as it will significantly reduce the duration of your Breath. Instead, you will primarily use Obliterate, Remorseless Winter, and Howling Blast with procs of Rime.
The War Within offers the Culminating Blasphemite epic gem, which provides a solid increase in Strength while also boosting your Crit with each unique gem color you equip. Making the most of this effect can be worthwhile, but it depends on your current stats and talents. The best gems to use, in the following priority, are:
You should be drinking the Flask of Alchemical Chaos at all times.
Your stat potion should be Tempered Potion. Use these when you will do the most damage with your abilities, likely during your cooldowns and/or Bloodlust / Heroism. You can also obtain Fleeting Tempered Potion from Cauldrons that can be spawned by Alchemists.
You should keep a stock of Invigorating Healing Potion to use when at low health. If you have a Warlock in the group, grab their Healthstone and use it as well. Do not macro these together, they are best used separately! You can also obtain Fleeting Invigorating Healing Potion from Cauldrons that can be spawned by Alchemists.
You should be eating from a Feast at all times, either Feast of the Divine Day, Feast of the Midnight Masquerade, or Hearty Feast of the Midnight Masquerade.
If Feasts are not available, eat Outsider's Provisions, Beledar's Bounty, Jester's Board, or Empress' Farewell instead.
In addition, if you can afford it, you should use Crystallized Augment Runes to increase your primary stat. Augment Runes are expensive and disappear on death, so use them wisely!
| Slot | Enchantment |
| Necklace | Magnificent Jeweler's Setting (adds up to 2 sockets to a Ring or Neck) |
| Weapon | Rune of the Fallen Crusader in all content. |
| Chest | Enchant Chest - Crystalline Radiance |
| Bracers | Enchant Bracer - Chant of Armored Avoidance |
| Legs | Stormbound Armor Kit |
| Boots |
Enchant Boots - Defender's March (Stamina) Enchant Boots - Scout's March (Movement Speed) |
| Rings | |
| Cloak |
Frost Death Knights can utilize powerful Runeforges on their weapons instead of normal enchants. Choosing the right enchants is crucial for optimizing your DPS! Here are the best enchants for the different viable builds:
This section will cover everything you need to know about equipping your character correctly.
| Slot | Item | Source |
| Helm | Hollow Sentinel's Stonemask | Tier Set: Catalyst / Vault / Raid |
| Neck | Salhadaar's Folly | Nexus King Salhadaar |
| Shoulder | Hollow Sentinel's Perches | Tier Set: Catalyst / Vault / Raid |
| Cloak | Reshii Wraps | Reshii Wraps |
| Chest | Hollow Sentinel's Breastplate | Tier Set: Catalyst / Vault / Raid |
| Bracers | Everforged Vambraces | Blacksmithing |
| Gloves | Breached Containment Guards | Forgeweaver Araz |
| Belt | Girdle of Somber Ploys | The Dawnbreaker |
| Legs | Hollow Sentinel's Stonekilt | Tier Set: Catalyst / Vault / Raid |
| Boots | Interloper's Plated Sabatons | The Soul Hunters |
| Ring #1 | Logic Gate: Alpha | Plexus Sentinel |
| Ring #2 | Band of the Shattered Soul | Dimensius The All Devouring |
| Trinket #1 | Araz's Ritual Forge | Forgeweaver Araz |
| Trinket #2 | Astral Antenna | Loom’ithar |
| Weapon | Charged Claymore (Crit Haste) with Ascendance | Blacksmithing |
This Trinket Tier List is single-target biased, as this tends to be the most important aspect of Raiding. Other aspects of the trinkets are also baked into the rankings, such as their ease of use.
This Trinket Tier List is more AoE focused as Mythic+ values AoE damage significantly more. We still look for a good balance between Single Target and AoE though! You can either choose to run one active and one passive or potentially double passive to get a more balanced damage profile.
Our Season 3 Tier Set is now specific to the Hero Talents we run, with unique effects for both Rider of the Apocalypse and Deathbringer. The sets are strong with the following raw cumulative values:
You only need 4 pieces out of 5 to get both set bonuses. We recommend you get all items except for the Gloves, due to their Versatility stat. Check out the BiS List for more information.
This macro casts Raise Ally on your mouseover target, if they are a friendly player. Otherwise, it casts Raise Ally on your current target.
This macro allows you to interrupt your focus target, if you have one, and if not to simply interrupt your current target.
This macro bakes in a ton of off-gcd spells and abilities into a single button. Replace the "trinket" here with whichever trinket you want to use. The "!" before Breath is added to prevent unintentionally canceling its effect by double-tapping the macro. When using this in the opener, press it twice to trigger the Reaper's Mark. The 2 Runes from Breath don't come quickly enough to be used on the Mark straight away, but can be used an instance later.
Maximising the value of Obliteration means fully utilising all the available GCDs you have during the window. Since Pillar of Frost is off the GCD, we want to macro it with a GCD-button to start using your abilities ASAP in the window. When playing Deathbringer, this means always using your Pillar with Reaper's Mark as they have the same Cooldown (with the standard talents). The macro looks like the one below:
If you are not playing Deathbringer, you will need more Macros. Essentially, you want to create separate ones for Frostwyrm's Fury, Frost Strike, Glacial Advance, Obliterate, Howling Blast and Soul Reaper. Each macro represents a specific scenario where the corresponding ability is your "initiator" ability:
This macro will cast Death Grip on your mouseover target.
This macro instantly casts Anti-Magic Zone at your cursor's location. It is useful for activating the Zone a tiny bit more quickly by spamming this macro button. It also generally helps in placing it effectively.
Controlling an Undead creature in dungeons is a nice way to add some minor extra damage, as well as control a specific mob for however long you want. It does need re-controlling every 2 minutes, and this macro is perfect for that! It will target your pet, dismiss it, and then instantly control it again.
WeakAuras is an essential tool for Frost Death Knight and DPS players, offering unparalleled customization to enhance your gameplay. Rather than focusing on specific examples, we recommend exploring Wago.io, where you’ll find an extensive library of WeakAuras to suit your needs.
If you are unfamiliar with WeakAuras, it is an incredibly powerful and widely-used AddOn that allows you to create custom displays for nearly everything in the game. This includes tracking buffs, debuffs, cooldowns, Focus, resources, and much more.
To import a WeakAura, visit Wago.io and select one that fits your preferences. Click the "Copy WeakAura Import String" button to copy it to your clipboard. Next, log into the game and type /wa in the chat box to open the WeakAuras interface. Navigate to the "Import" section, press Ctrl+V to paste the copied string, and click "Import". You’re ready to go!
Mastering WeakAuras and customizing it to your playstyle is highly recommended for any serious raider. With countless options available on Wago.io, you can tailor your interface to optimize your performance and focus on what truly matters in combat.
Two-Handed Frost remains a competitive option in The War Within. While generally a few percentage points behind Dual-Wield builds in terms of performance, it can still achieve strong results with proper execution and gear optimization.
Dual-Wield tends to outperform Two-Handed in Mythic+ content due to the talent synergies that favor Dual-Wield setups. For example, abilities like Icy Death Torrent work particularly well with the faster weapon speeds and increased proc rates of Dual-Wield builds.
When using Might of the Frozen Wastes, the effective proc rate of Killing Machine is increased to approximately 100% for Two-Handed weapons. In contrast, Dual-Wield maintains a 50% proc rate but gains around 38% more natural procs due to the additional attacks from having two weapons equipped.