Digital Aura Portal - FZCO Building A1, Dubai Digital Park, Dubai Silicon Oasis, Dubai, United Arab Emirates Premises Number 72647 - 001 Business registration number: 70647
Welcome to The War Within Assassination Rogue Guide! In this detailed guide, we’ll cover everything you need to know about Assassination Rogue mechanics to enhance your skills and ensure a smoother in-game experience. We hope you’ll find plenty of valuable insights below. Without further ado, let’s dive into the world of the Rogue!
Table of Contents
Assassination Rogue Overview
Assassination Rogue deals damage through the application and empowerment of poison and bleed effects. The damage toolkit of Assassination is somewhat limited, mainly focusing on dealing single-target damage and spreading DoT effects on multiple enemies while sporting a very strong 2-minute cooldown burst. As with the other Rogue specializations, Assassination offers phenomenal defensive and crowd-control abilities that allow them to soak and survive mechanics that most other classes cannot while controlling enemies to limit the amount of damage the group or tank can take in a Mythic+ environment.
Majority of AoE burst damage is tied to Caustic Spatter, which can be a blessing or a curse.
Assassination Rogue Basic Gameplay
Assassination Rogue is a spec that utilizes a Combo Point system and spreads its damage over time effects to generate additional resources while maintaining a couple of high-impact buffs and debuffs to deal sustained DPS. A large portion of its damage will be dealt every 2 minutes with the use of many different cooldowns simultaneously.
Generating additional resources is a core component of the Spec, so making sure to maintain both Garrote and Rupture at all times is of vital importance due to Venomous Wounds. Combo Points are generated by using either Mutilate on single-target or Fan of Knives on AoE. Excess Combo Points that are not used on Rupture can be spent on Envenom to deal instant damage and to increase the passive damage your poisons provide. Shiv offers some minor burst damage potential on a low cooldown, while Kingsbane offers a slightly stronger burst every minute. Deathmark is our 2-minute cooldown, and synchronizing all the other cooldowns alongside it allows Assassination to deal some incredible burst DPS.
Assassination Rogue Changes in Patch 11.2
Patch 11.2 brings various changes and bug fixes to the core Rogue kit along with several Assassination-specific updates. These adjustments primarily aim to improve overall DPS and bring Fatebound into a more competitive state. This Hero Talent had been underperforming since the expansion’s launch, but with these changes, Fatebound is finally in a more playable position.
Hero Talent Shifts
The biggest shift for Fatebound comes from the new Tier Set bonuses, which effectively turn Assassination into a 90-second cooldown spec instead of a 2-minute one. This provides much-needed flexibility in encounters where a 2-minute DPS profile isn’t ideal. Meanwhile, Deathstalker simply becomes stronger at what it already excelled at once its Tier Set is acquired—an improvement, but not a transformative one.
That said, a key issue remains: Fatebound significantly lags behind Deathstalker outside of pure single-target fights. In AoE or Cleave scenarios, Deathstalker quickly pulls ahead, leaving Fatebound best suited for extended single-target encounters.
Rogue Class Changes
Cold Blood: Cooldown now begins immediately upon use with a 15-second max duration. This change improves cooldown syncing, particularly for Fatebound.
The Single-Button Assistant and Assisted Highlight now recommend more appropriate poisons based on your talents, favoring Wound Poison in PvP.
Fatebound Coin: Tails and Lucky Coin damage increased by 17%.
Fixed an issue where Fatebound Coin: Heads damage was lower than intended.
Fixed an issue where talents modifying flip chances didn’t always function correctly. This should result in an overall damage increase.
Assassination-Specific Changes
Assassination received multiple buffs, including an Aura buff (increasing nearly all damage except melee swings, procs, and trinkets), as well as targeted improvements to:
There was also a nerf to Crimson Tempest. Overall, these changes raise single-target output while maintaining strong AoE, though more of the AoE power now comes from Caustic Spatter and multi-dotting rather than heavy reliance on Crimson Tempest.
If you’re returning after a break and want to catch up on the biggest changes since the expansion’s launch, check out the additional resources provided. It won’t take long.
Assassination Rogue Leveling Guide for The War Within
Rogue is often regarded as one of the most challenging classes to level in World of Warcraft. That said, it's still fully capable of handling the leveling journey — even if it may take a bit longer than other classes. Once you reach max level, you'll quickly outpace your peers and be glad you chose Rogue!
One of Rogue's biggest strengths while leveling is the ability to avoid unnecessary combat. With clever use of Blind, Vanish, Sap, and other crowd control abilities, you can often loot quest items and then vanish without needing to fight.
Whenever Evasion is off cooldown, it's a good time to pull multiple mobs and avoid all incoming damage. Crimson Vial has a short cooldown, so use it frequently to heal between pulls. Running Crippling Poison will help you kite enemies while they slowly die to your Damage over Time effects, allowing for smooth transitions between targets.
Leveling Gear for Assassination Rogue
While leveling, always prioritize gear with the highest item level. The only exception is if a ring or necklace has two secondary stats instead of one — in that case, it's often the better pick even at slightly lower item level.
If you're using Heirlooms, aim for pieces with Critical Strike and Haste to improve the flow and responsiveness of your gameplay while leveling.
Assassination Rogue Talents for Leveling
Talents are passives or abilities that enhance or modify your character's gameplay. While many talents provide passive bonuses that don’t change your playstyle significantly, others act as key power spikes you should prioritize as you progress toward max level.
As you level up, some core abilities will be replaced with spec-specific versions. For example, at Level 22, Eviscerate is replaced with Envenom. Additional abilities will either be learned automatically or unlocked through talent choices. If you're following a level-by-level path from a Talent Calculator, you'll receive timely advice on how to integrate new abilities into your rotation.
Assassination Rogue PvP Talents for Leveling
System Shock – Casting Envenom with at least 5 Combo Points on a target affected by your Garrote, Rupture, and a lethal poison deals Nature damage and slows the target by 90% for 2 seconds. While not mandatory to always use 5 Combo Points, it's a nice burst of extra damage, especially on fleeing enemies.
Creeping Venom – Your Envenom applies Creeping Venom, dealing Nature damage over 4 seconds. The effect refreshes if the enemy moves, making it easy to maintain by simply repositioning yourself.
Control is King – Cheap Shot grants 15 seconds of Slice and Dice, while Kidney Shot restores Energy. This makes your crowd control abilities even more valuable, letting you maintain DPS buffs or generate resources.
In The War Within, players can choose to enable War Mode, which offers several advantages:
Activates PvP talents in outdoor zones
10% increased World Quest rewards at max level
10% additional experience while leveling
Grants Conquest Points, which can be exchanged for weekly gear
With these benefits, enabling War Mode is generally recommended for faster leveling and more rewards at max level. Keep in mind, however, that doing so also makes you vulnerable to open-world PvP and the occasional gank while questing.
Assassination Rogue PvP Talents for Leveling
System Shock – Casting Envenom with at least 5 Combo Points on a target affected by your Garrote, Rupture, and a lethal poison deals Nature damage and slows the target by 90% for 2 seconds. While not mandatory to always use 5 Combo Points, it's a nice burst of extra damage, especially on fleeing enemies.
Creeping Venom – Your Envenom applies Creeping Venom, dealing Nature damage over 4 seconds. The effect refreshes if the enemy moves, making it easy to maintain by simply repositioning yourself.
Control is King – Cheap Shot grants 15 seconds of Slice and Dice, while Kidney Shot restores Energy. This makes your crowd control abilities even more valuable, letting you maintain DPS buffs or generate resources.
Best Hero Talents for Assassination Rogue in The War Within
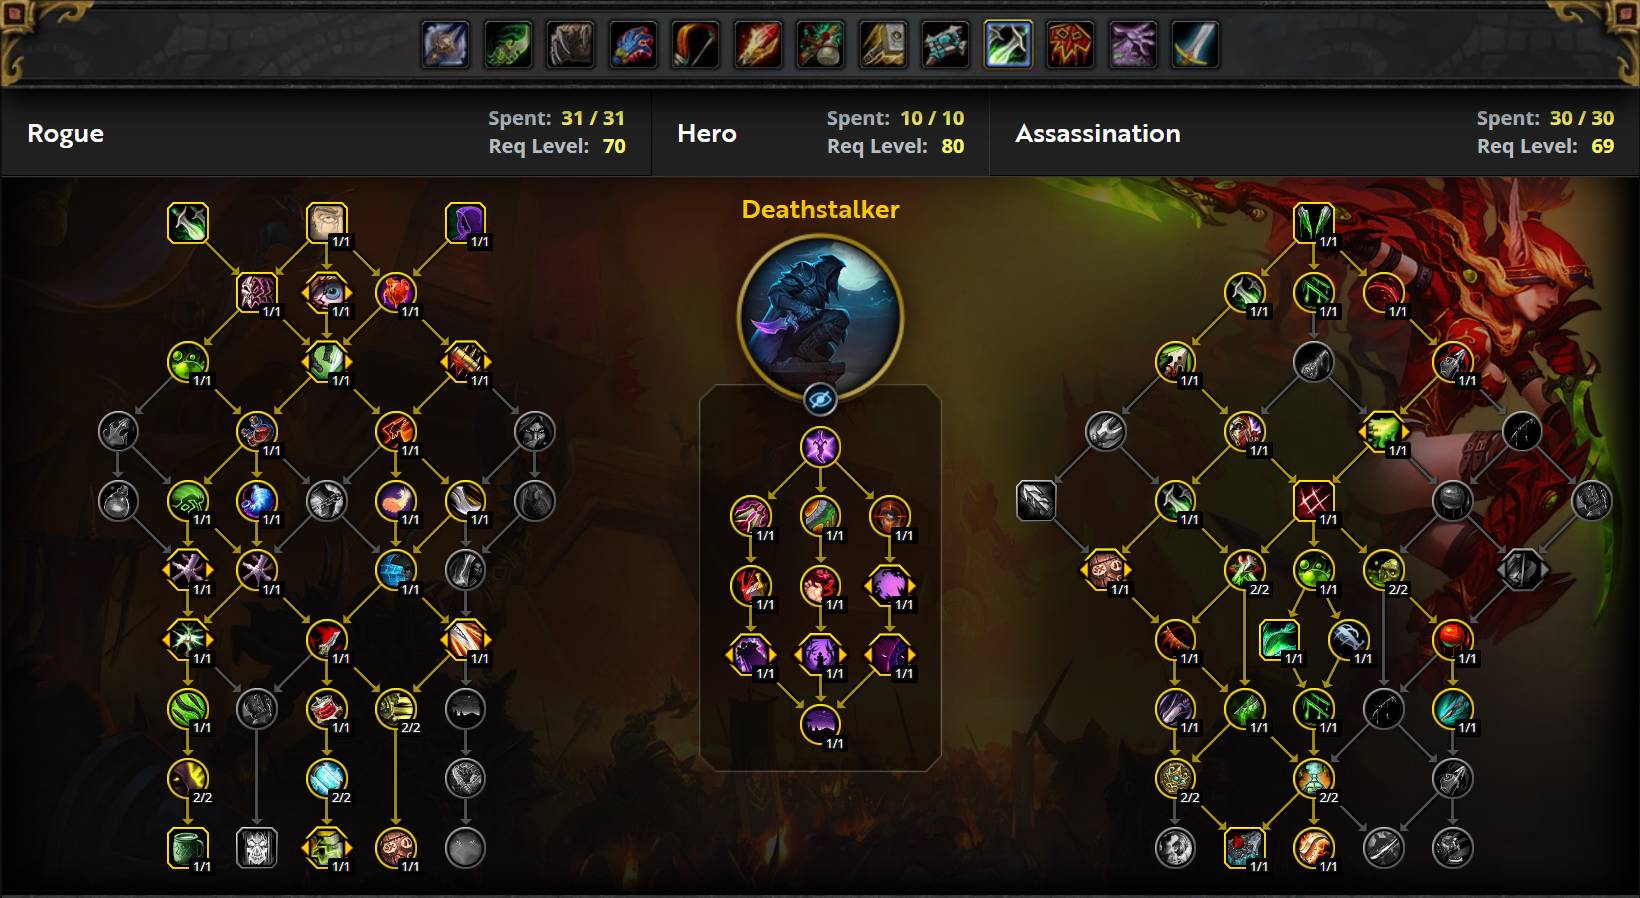
Deathstalker
Deathstalker is the more involved Hero Talent Tree for Assassination Rogues, introducing Plague-themed Shadow and Nature damage into your rotation. It enhances several core abilities and adds some rotational complexity. Its key mechanic revolves around applying Deathstalker's Mark and maintaining it through Darkest Night, significantly boosting both your Energy regeneration and direct damage output.
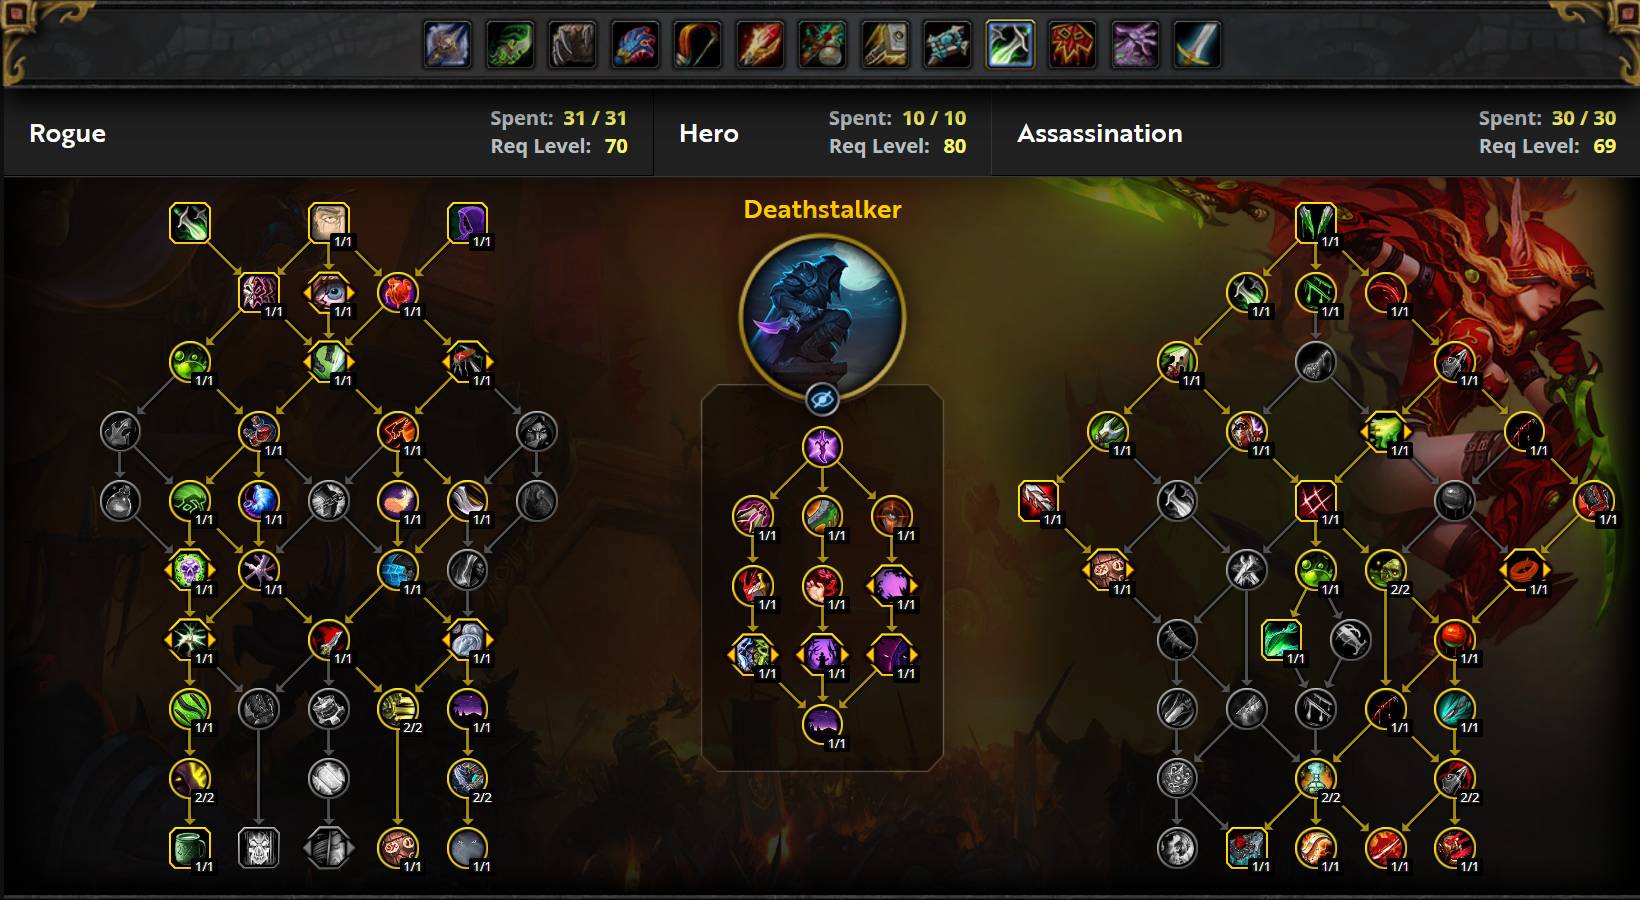
Fatebound
Fatebound offers a more passive playstyle for Assassination Rogues. It centers around "flipping coins" whenever you use a damaging finisher. Repeatedly flipping the same side of the Fatebound Coin increases your damage output, while certain talents help you influence or guarantee the result. While thematically unique, it lacks some of the raw power of Deathstalker.
Raiding Hero Talents for Assassination Rogue
In raid environments, Fatebound underperforms compared to Deathstalker. The main reason is that Envenom, one of your primary damage abilities, receives substantial buffs from the Deathstalker tree. Fatebound's generic damage boosts simply can't match the throughput provided by Deathstalker. Choose Fatebound only if you really enjoy its theme and can accept a minor DPS loss.
Mythic+ Hero Talents for Assassination Rogue
Deathstalker is the clear choice for Mythic+ content due to its strong funnel-damage capabilities and valuable enhancements to Fan of Knives, Crimson Tempest, and Rupture. While Fatebound still offers some bonuses, Deathstalker's synergy with AoE and sustained damage makes it the optimal pick for dungeons at any keystone level. You can still opt for Fatebound, but expect a noticeable drop in DPS performance.
Assassination Rogue DPS Stat Priority
The Basics of Stats for Assassination Rogue in The War Within
For raiding and Mythic+, the secondary stat priority for Assassination Rogue is as follows:
Critical Strike
Mastery
Haste
Versatility
All secondary stats are very close in performance. As a result, item level generally takes priority due to the higher Agility it provides. An exception to this rule applies to Rings and Necks, which do not offer Agility and may require more careful consideration.
At higher item levels, diminishing returns on secondary stats can impact their value. Since all secondaries are relatively equal, it's strongly recommended to sim your character regularly. This helps determine the best item choices from sources like the Great Vault or dungeon drops.
Getting a Better Understanding of Assassination Rogue Stats
Agility is your primary stat and should be prioritized on all gear upgrades. It increases your Attack Power, directly scaling your ability damage.
Mastery boosts the damage dealt by poisons and bleeds through Mastery: Potent Assassin. It also enhances the effectiveness of Nature-based abilities like Shiv, Poison Bomb, and Envenom.
Critical Strike raises your chance to land critical hits. It also generates extra Combo Points via Seal Fate, enhancing your resource generation.
Versatility provides a flat increase to all damage dealt and a reduction to damage taken, offering both offensive and defensive value.
Haste increases your attack speed and Energy regeneration. It also accelerates the tick rate of your Damage over Time effects, contributing to more Energy through Venomous Wounds.
Assassination Rogue DPS Rotation, Cooldowns, and Abilities
Deathstalker Single Target Ability Priority List for Assassination Rogue
This is a general priority list for using your abilities. It is not meant to be followed in a strict step-by-step fashion. Instead, it provides a guideline for what to prioritize during moment-to-moment gameplay.
Often, you'll be faced with multiple choices on which abilities to use. This list highlights which ones are typically more important, helping you make better decisions in real-time combat scenarios.
Use Kingsbane on cooldown. Make sure to sync it with all the other buffs.
Use Shiv as follows: Use one charge right after Deathmark, then extend the debuff with a second charge. Once Deathmark is over, cast another Shiv before using your next Darkest Night empowered Envenom. Without Deathmark active, only use one Shiv charge in the last 8 seconds of Kingsbane.
Cast Envenom with 5+ Combo Points. Cast it with 7 CP when Darkest Night is active.
Cast Ambush to generate Combo Points whenever it is usable.
Cast Fan of Knives to generate Combo Points on 2+ targets. This becomes 3+ targets when talented into Blindside.
You will never cast Slice and Dice manually. It will naturally be maintained whenever you cast Envenom as a regular part of your rotation, thanks to Cut to the Chase.
If Rupture is about to fall off, it can be reapplied with any number of Combo Points to maintain uptime. It is best to apply it with 5+ Combo Points, however, for maximum Energy efficiency and rotational fluidity.
You have three choices for your non-lethal Poison: Crippling Poison, Atrophic Poison, and Numbing Poison. For raiding, you should use Atrophic Poison, unless your raid wants you to slow a specific group of targets. For Mythic+, choose the Poison that best suits your tank's needs. Crippling Poison allows your tank to kite enemies more easily, whereas Numbing Poison slows their attack speed. Atrophic Poison reduces the damage the group takes from enemy attacks and spells.
Notable Mechanics for Assassination Rogue
Snapshotting
The damage buff from Improved Garrote is removed when you overwrite the empowered bleed by re-applying an unempowered one. Therefore, it is best to let the DoT run its full duration before refreshing it. This bonus damage is duplicated during Deathmark.
Pandemic
When you refresh Rupture, Garrote, Crimson Tempest, Envenom, or Slice and Dice before they expire, the remaining duration is added to the newly applied effect, up to 30% of the newly applied base duration. This mechanic is called "Pandemic".
Example — You can safely refresh a 5-Combo Point Rupture when it has 7.2 seconds or less remaining because its base duration is 24 seconds. Deeper Stratagem allows for 6 Combo Point Ruptures, which last 28 seconds. 6-Combo Point Ruptures can be refreshed safely when they have 8.4 seconds or less remaining. With Sanguine Stratagem and 7 maximum Combo Points, this changes to 9.6 seconds.
Safe Pandemic refresh timing is based on the newly applied base duration, not the original length of the effect. Therefore, a 2 Combo Point Rupture can benefit from full Pandemic if it is refreshed by a 5-7 Combo Point Rupture.
Academic Information for Assassination Rogue
The Interaction Between Combo Points and Energy
As an Assassination Rogue, many of your abilities require Energy to be utilized. Your baseline rate of Energy regeneration is 10 Energy per second. However, you can generate more Energy through the following means:
Current Haste rating (Haste and Haste-enhancing buffs);
Higher Energy generation allows for higher uptimes on Envenom, which awards much higher DPS over an extended encounter.
It is very important to avoid resource overflow. Capping Energy and overcapping Combo Points (unless caused by Seal Fate procs) is an egregious error. Special care should be taken to avoid wasting precious resources. "Pooling" higher levels of Energy, however, can be very beneficial (provided you do not overcap), as it allows you to store resources in anticipation of a window of burst damage. This can help reduce the patchiness of your debuff/buff uptimes, which will result in more consistent and smoother damage output.
Combo Point generation is increased by Seal Fate, which causes your critical hits with melee Combo generators to add Combo Points to your target per critical hit. This means Mutilate can generate up to 4 Combo Points (5 as Fatebound) if the main hand and the off-hand both critically strike. Fan of Knives can generate the maximum number of Combo Points with a single cast if it critically strikes 6 or more targets. You should never cast a Combo Point generator at or above 5 Combo Points, unless it is Garrote or Poisoned Knife (as neither of these benefits from Seal Fate), or if you need to hit 7 Combo Points to trigger Darkest Night. Do not use Poisoned Knife to reach maximum Combo Points unless you are out of range of the boss and in danger of hitting the Energy cap.
Pooling Energy and Combo Points
It can be very beneficial to "pool" your Energy and Combo Points, which involves auto-attacking while your Energy regenerates. The advantage this provides is variable, meaning that pooling does not always result in damage gained. Situations where pooling Energy and Combo Points is beneficial include:
Before the cooldown on Shiv recharges, to allow for immediate use and optimized burst;
Before an important add spawns so that you can apply as much instant pressure as possible;
To assist with Envenom uptime by clipping two Envenoms or finishers so that the buff does not drop;
An encounter-specific buff or damage phase is imminent.
Pooling Energy is not a magical DPS gain by itself. It allows you to slightly adjust the timing of your abilities so that you fit more attacks during periods of increased damage, provided you can properly identify when such periods are going to happen.
Kingsbane
Kingsbane is a talent that applies a DoT effect that increases in strength for every lethal poison application. It is incredibly powerful, and large parts of our burst will rely on maximizing its damage output.
Try to maintain a 100% Envenom and Shiv uptime during its entire debuff duration.
Assassination Rogue DPS Gems and Consumables
Best Gems for Assassination Rogue in The War Within
Your gem choices depend heavily on your current gear. Each secondary stat can often be your highest performing stat depending on the items you have equipped, so the optimal selection of gems and ring enchants may vary. We strongly suggest simming yourself using Raidbots to determine the best gems for your specific character.
For one socket, you should use Culminating Blasphemite. Alternatively, Elusive Blasphemite is an option, offering a minor DPS decrease (less than 1%) but providing a noticeable movement speed bonus, which can be a worthwhile trade. In other sockets, aim for gems that optimize your secondary stats, such as Masterful Ruby, Deadly Onyx, Masterful Sapphire, or Deadly Emerald. Fill any remaining sockets with Masterful Ruby or whichever stat combination simulates best for you.
Don't forget, you can use the Magnificent Jeweler's Setting to add up to two extra sockets to your rings and amulet.
Best Flask for Assassination Rogue in The War Within
Best Potion for Assassination Rogue in The War Within
Your primary stat potion should be Tempered Potion. These are most effective during periods of high damage output, such as when your cooldowns are active or during Bloodlust or Heroism. Additionally, you can obtain Fleeting Tempered Potion from Alchemist Cauldrons.
Keep some Invigorating Healing Potion on hand for emergencies when your health is low. If you’re in a group with a Warlock, also grab their Healthstone as an alternative. Be sure to use these separately, not in a macro. You can also obtain Fleeting Invigorating Healing Potion from Cauldrons as well.
Best Food for Assassination Rogue in The War Within
If you can afford it, consider using a Crystallized Augment Rune to boost your primary stat further. Augment Runes are expensive and are lost upon death, so be strategic about their use.
Best Enchants for Assassination Rogue in The War Within
There are a number of good trinkets available for Assassination Rogue in Season 3, from a variety of different sources. Some relevant ones to look for are:
Deathstalker: Araz's Ritual Forge – The only viable high-ilvl on-use trinket from raid this season, this is a must play for any Assassination Rogue. No other trinket comes remotely close to this one.
Fatebound: Lily of the Eternal Weave – This will be your on-use item if you end up playing Fatebound, as your 90-second on-use trinket.
Fatebound: Unyielding Netherprism – This On-Use trinket can be stronger than Lily, but you will only use it every 3 minutes alongside your Deathmark, instead of every 90 seconds. It also doesn't provide a big boost on pull, but for any pure single-target boss where you do not need the burst in P1, this trinket is very good. Whether or not this trinket outshines Lily, depends heavily on the fight duration, i.e. having a 4-minute or 7-minute fight, or if there are good damage amp phases that you can line up with its use every 3 minutes. In those cases this trinket is phenomenal.
Astral Antenna – Astral Antenna is a great passive trinket that you can grab from the Manaforge Omega as well. You have to pick up a small orb to receive its effect, and it slowly travels towards you as well.
Improvised Seaforium Pacemaker – A strong option to Astral Antenna, that does not suffer any of its shortcomings, and is usable in both Raid and Mythic+.
Ara-Kara Sacbrood – A solid alternative passive bonus trinket, that can be farmed in Mythic+.
The War Within Season 3 Tier Set for Assassination Rogue
If given a choice, try to prioritize the Helmet, Shoulder, Gloves, and Legs slots for this. However, getting the Chest to complete one of the bonuses is still better than any other gearing choice, and you will ultimately play all five pieces anyway.
Addons for Assassination Rogue
Generic Addons for Rogues
ElvUI
Weak Auras
Boss Mods
BigWigs Bossmods
LittleWigs Bossmods (for dungeons)
Deadly Boss Mods
Name Plates
Plater Nameplates
TidyPlates
Details (Damage Meter)
Extra AddOns
Mik's Scrolling Battle Text
Death Note
Doom CooldownPulse
Angry Assignments
Specific Addons for Assassination Rogues
Currently, no additional addons are needed to play an Assassination Rogue to its full potential.
WeakAuras for Assassination Rogue
WeakAuras is an essential tool for Assassination Rogue and DPS players, offering unparalleled customization to enhance your gameplay. Rather than focusing on specific examples, we recommend exploring Wago.io, where you’ll find an extensive library of WeakAuras to suit your needs.
If you are unfamiliar with WeakAuras, it is an incredibly powerful and widely-used AddOn that allows you to create custom displays for nearly everything in the game. This includes tracking buffs, debuffs, cooldowns, Focus, resources, and much more.
To import a WeakAura, visit Wago.io and select one that fits your preferences. Click the "Copy WeakAura Import String" button to copy it to your clipboard. Next, log into the game and type /wa in the chat box to open the WeakAuras interface. Navigate to the "Import" section, press Ctrl+V to paste the copied string, and click "Import". You’re ready to go!
Mastering WeakAuras and customizing it to your playstyle is highly recommended for any serious raider. With countless options available on Wago.io, you can tailor your interface to optimize your performance and focus on what truly matters in combat.
Assassination Rogue Frequently Asked Questions
What Stats Do I Want for Mythic+ as an Assassination Rogue?
For Mythic+ content, Critical Strike, Mastery, and Haste are key stats.
Mastery enhances your cleave and AoE damage.
Critical Strike significantly boosts Seal Fate, generating more Combo Points.
Haste speeds up DoT ticks and increases resource generation.
Is There a Haste Cap for Assassination Rogue?
No, there is no required Haste breakpoint for Assassination Rogues. Additionally, there is no point where Haste becomes useless in single-target situations.
Is Haste Good for Assassination Rogue?
Haste affects bleed and poison ticks, making them occur more frequently. This also enhances Venomous Wounds, increasing Energy regeneration. However, since Energy generation is already high, Haste ranks third in priority after Critical Strike and Mastery.
Which Race is the Best for Assassination Rogue?
Racial DPS differences are minor, so the best race often depends on preference.
Horde: Tauren, Troll, and Blood Elf provide the best overall DPS boosts.
Alliance: Human, Dwarf, and Gnome are strong choices for optimized performance.
What Stats Do I Want for Raid as an Assassination Rogue?
For raiding, prioritize Critical Strike and Mastery.
Mastery is the most effective stat for increasing poison and bleed damage.
Critical Strike enhances Seal Fate, improving Combo Point generation and increasing overall uptime on finishers.