


+15 More
Digital Aura Portal - FZCO
Building A1, Dubai Digital Park, Dubai Silicon Oasis, Dubai, United Arab Emirates Premises Number 72647 - 001
Business registration number: 70647
gamer-choice.com © 2026
Digital Aura Portal - FZCO
Building A1, Dubai Digital Park, Dubai Silicon Oasis, Dubai, United Arab Emirates Premises Number 72647 - 001
Business registration number: 70647
Weapon cases are some of the most coveted loot spawns in ARC Raiders. It's no surprise, as they offer the possibility of obtaining Rare and Epic weapons, which can significantly improve your chances of success in future raids and indirectly increase your chances of finding even better loot. While a higher-rarity weapon doesn’t guarantee an automatic win in a gunfight, weapons like Tempest, Vulcano, and Renegade are often more dominant in combat, even in their basic forms. This is especially noticeable now that the Kettle and Stitcher weapons have been nerfed. With this change, using higher rarity weapons is becoming more valuable, as Common weapons simply won't cut it in most encounters. In light of this, we’ve decided to create an ARC Raiders Weapon Case Guide, where we will cover weapon case locations across all available maps.
Although finding weapons is an excellent way to skip the grind for crafting materials, some of the best weapons, like Tempest and Vulcano, can be quite hard to come by. However, if you have a blueprint, crafting them becomes much easier. You can check out our Gamer Choice Blueprints service to buy any blueprint you need at a very affordable price!

Buy ARC Raiders Items
Get Weapons, Blueprints, and Keys in ARC Raiders

Be sure to also explore our other ARC Raiders guides:
With 5 maps currently available in the game, we’ve discovered over 140 weapon case locations. In this article, we will break down the locations of weapon crates in ARC Raiders. While Dam Battlegrounds has the highest number of case spawns, Spaceport is the most efficient map to farm them due to its well-structured loot routes, taking you through all the watchtowers and several key areas. Other maps may not have as many loot crates, but they still provide great opportunities to farm valuable weapons. For example, Stella Montis, with its 18 confirmed spawns, offers high-quality loot in return. Here’s how the weapon case locations break down across each map:
Weapon Case Locations by Map:
Before we get into the specifics of each weapon crate location, please note that we won’t be providing screenshots of the exact locations. Instead, we will give you detailed instructions on how to find them. Additionally, some crates are clustered together, so we’ll describe them in groups based on proximity. Let’s get started with the crate locations for each map.
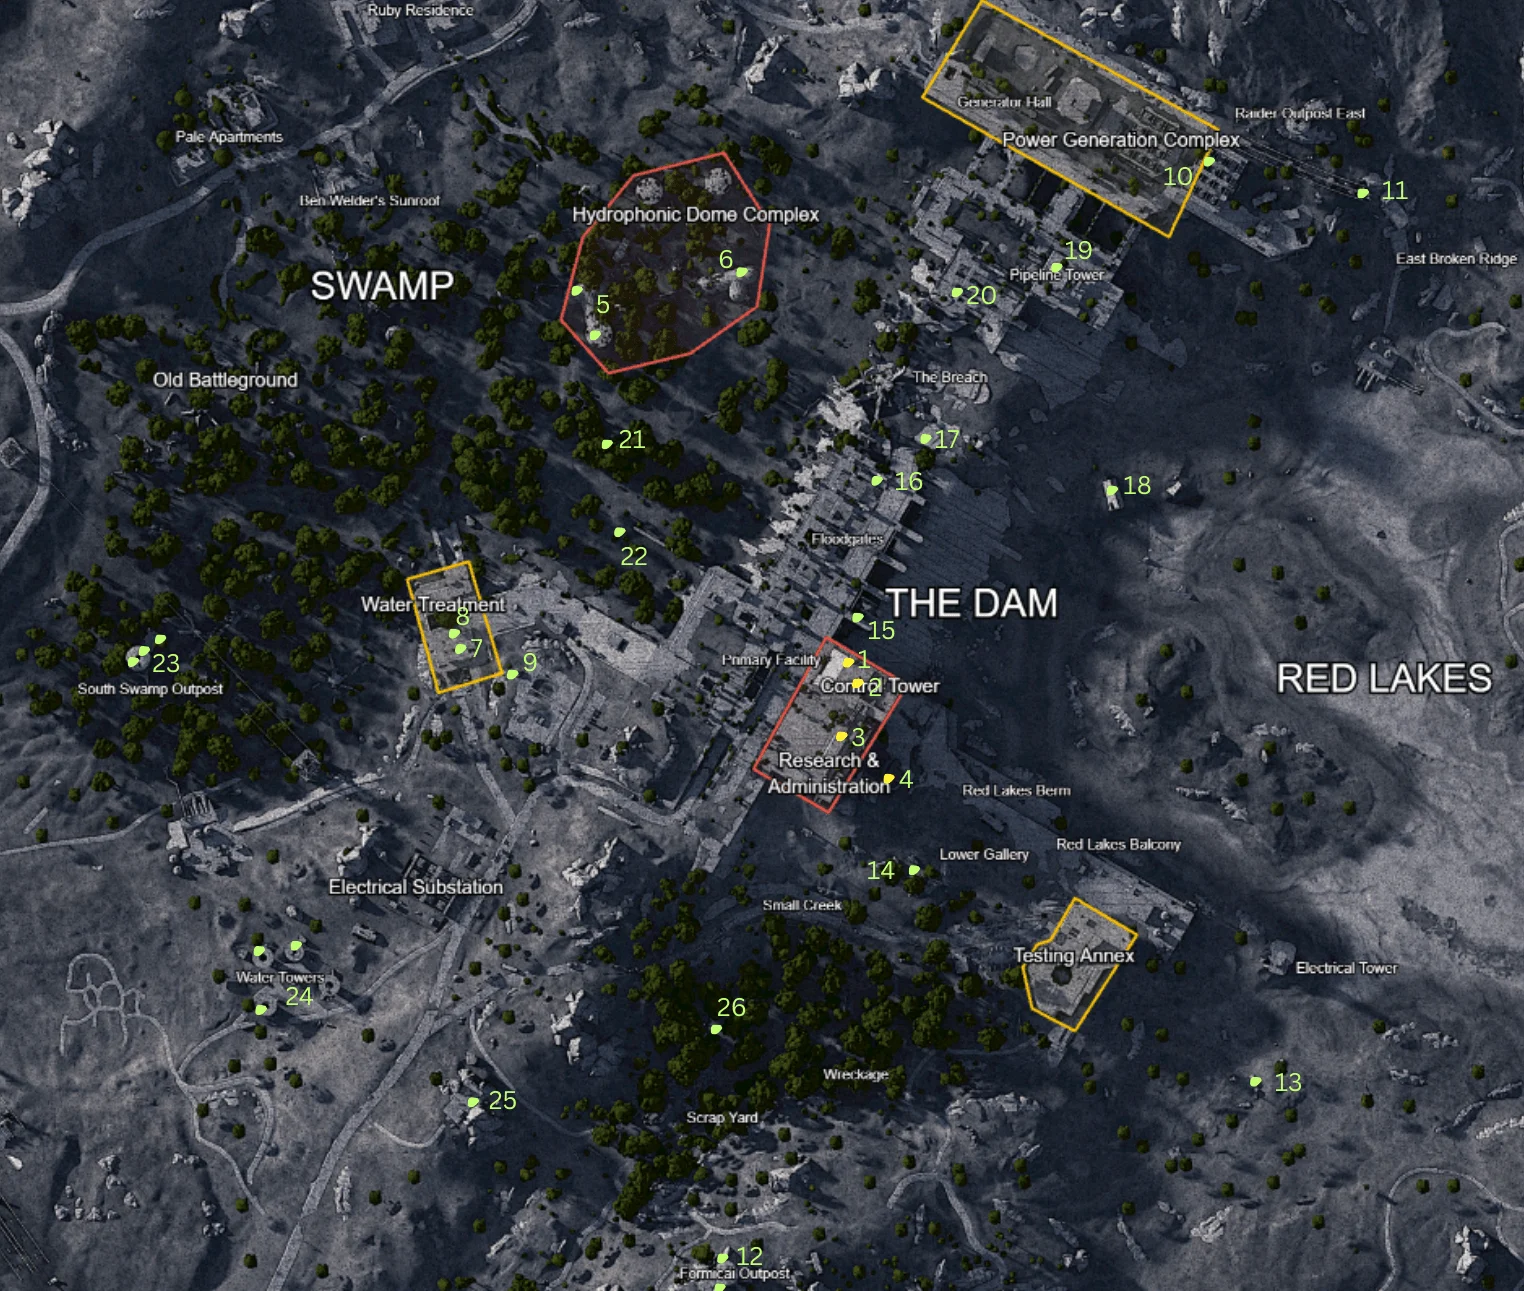
Dam Battlegrounds is the first map most players experience in ARC Raiders. It offers a straightforward layout with few ARCs patrolling the area, making it an ideal place to learn the game mechanics. This map also has the largest number of weapon case spawns, so you’re likely to find several crates during your raids—especially in less-traveled areas. We’ll begin by covering the colored loot zones, followed by the more common case locations. Below is a table listing all the weapon case locations in Dam Battlegrounds:
| Map Number | Location | Description |
|---|---|---|
| 1 | Control Tower Key Room | Near the consoles opposite the entrance, and two might spawn to the left of the stairs, near the lockers. |
| 2 | Control Tower Lower Floor | On the first floor of the Control Tower / Research & Administration, find a barricaded door leading to the elevator shafts that take you to the top of the Control Tower. Don't go there, instead turn left into the door that leads to the room with stairs. Go down the stairs and look under them. Beneath one of the shelves, you'll find a weapon crate. |
| 3 | Research & Administration | Go through the main entrance and go up the elevator shaft to the second floor. Turn left and go through the corridor until you see a couch at the end of it. Behind it is a weapon case. |
| 4 | Red Lakes Balcony Sewer Entrance | Find a big sewage drainage leading to the Red Lakes, right under the Control Tower back entrance, where a Leaper occasionally spawns. Go straight until you see a ruined sewer with scaffolding. Turn left from the leftmost small sewage drain, and you'll find a weapon crate there. |
| 5 | Hydroponic Dome Complex Southwest Building | One can be found lying on the ground in the westmost part of the building. Another can spawn on the ground next to the dirty pools of water, left of the console with a PC on it. |
| 6 | Hydroponic Dome Complex Eastern Building | Go inside from the south entrance and turn right when you see scaffolding with cloth on it. You'll find the weapon crate on the scaffolding shelf. |
| 7 | Water Treatment Key Room | Open the room, and you'll see it on the console or beneath it. |
| 8 | Water Treatment Lab Room | If you enter the building from the south entrance, turn right and go through the alarm gate. On your left, you'll see a large table. On it, a weapon crate may spawn. |
| 9 | Water Treatment Elevator Pipes | On top of the pipes closer to the Water Treatment facility, you might find a weapon crate. |
| 10 | Power Generation Complex | From the Field Depot, go Northwest to reach the power generation units. Look to your right. Behind the second power unit, next to the wooden pallet. |
| 11 | Broken Highway East of the Raider Outpost | At the very end of the broken highway, you can slowly walk backwards and drop down. When dropping down, press the Jump button, and your character will climb into a small space under the highway with a weapon case in it. |
| 12 | Formicai Outpost | One spawns inside the tower, and another will require you to do a bit of parkour. Climb to the top of the scaffolding inside the same room. Look around, and you'll see two tanks and behind them a scaffolding with a weapon crate on it. |
| 13 | Truck East of Testing Annex | A little raider camp to the east of Testing Annex and to the south of Electrical Tower. You'll find a weapon crate in the back of a broken truck. |
| 14 | Camp between R&A and Testing Annex | Southwest of the Field Depot, you may find a raider camp. If you go up the tower, you might jump onto one of the structures from there, and on top of it, there will be a weapon case. |
| 15 | Control Tower Floodgates | It is easier to find it if you reach the R&A building from the Northwest. You'll find an entrance with stairs behind it that lead down. At the end of them, you'll find a platform with a console that activates the drawbridge. Once the bridge lowers, cross it and open the barricaded room to your left. |
| 16 | South of the Breach | When heading towards the Floodgates from the Breach's side. Go into the doorway underneath the Floodgates and turn left. In the corner of this location, you'll find a weapon crate. |
| 17 | Broken Bridge to Floodgates | Same as in the previous case, head towards the Floodgates, but this time don't go into a doorway. Look under a large, broken section of the bridge leading to the Floodgate catwalks. |
| 18 | Broken Floodgate Building | One of the broken Floodgate towers is lying in the dirt east of the Breach area. Inside it, you'll find a weapon case. |
| 19 | Pipeline Tower Roof | To reach the top, bring a zipline. Find the pipes and follow them to get to the weapon case. Another case can spawn on the very top of the roof area. |
| 20 | Rusted Catwalk Bridge | Southwest of the Pipeline Tower, you'll find a broken, rusted bridge facing the Breach. You can get up there by stairs. At the end of it, you'll find a case. |
| 21 | Treehouse and a Car | This one's gonna be hard to explain. It's hidden well. From the southern Hydroponic Dome Complex building, go south. If you draw the line, it's right under letter P in Hydroponic. You'll find a treehouse with a car that serves as a stairway. |
| 22 | Southeast of the Treehouse | Head Southeast until you find a large concrete rectangle. South of it, you'll find a small clearing with a crate just lying there. |
| 23 | South Swamp Outpost | This place can spawn three weapon chests. One of the cases can be found on the couch inside it. Another one can be found underneath the stairs leading to the outpost's first floor. The final one is on the rooftop. You can reach it by going up the stairs. |
| 24 | Water Towers | The roof of each Water Tower has a chance to have a weapon crate there. You can't reach it normally, so you'd need a Zipline to reach each of them. |
| 25 | Formicai Hills Radio Tower | Right between Water Towers and Formicai Outpost, you may find a radio tower that's unmarked on the map. You can go up to the tower from the east side of the hill. Outside of the only small building there, you may find a weapon case. |
| 26 | East of the Wreckage | Find the Wreckage on the map and go East. You'll find a small rusted container, on top of which you might find a weapon case. |
To maximize your chances of farming cases, we recommend heading to the lesser-known locations, as these tend to have fewer players and a higher chance of finding untouched crates. Popular spots, such as the Floodgate Drawbridge, are often looted quickly, so it’s best to avoid those unless you spawn early. Explore quieter areas for the best loot and a safer experience.
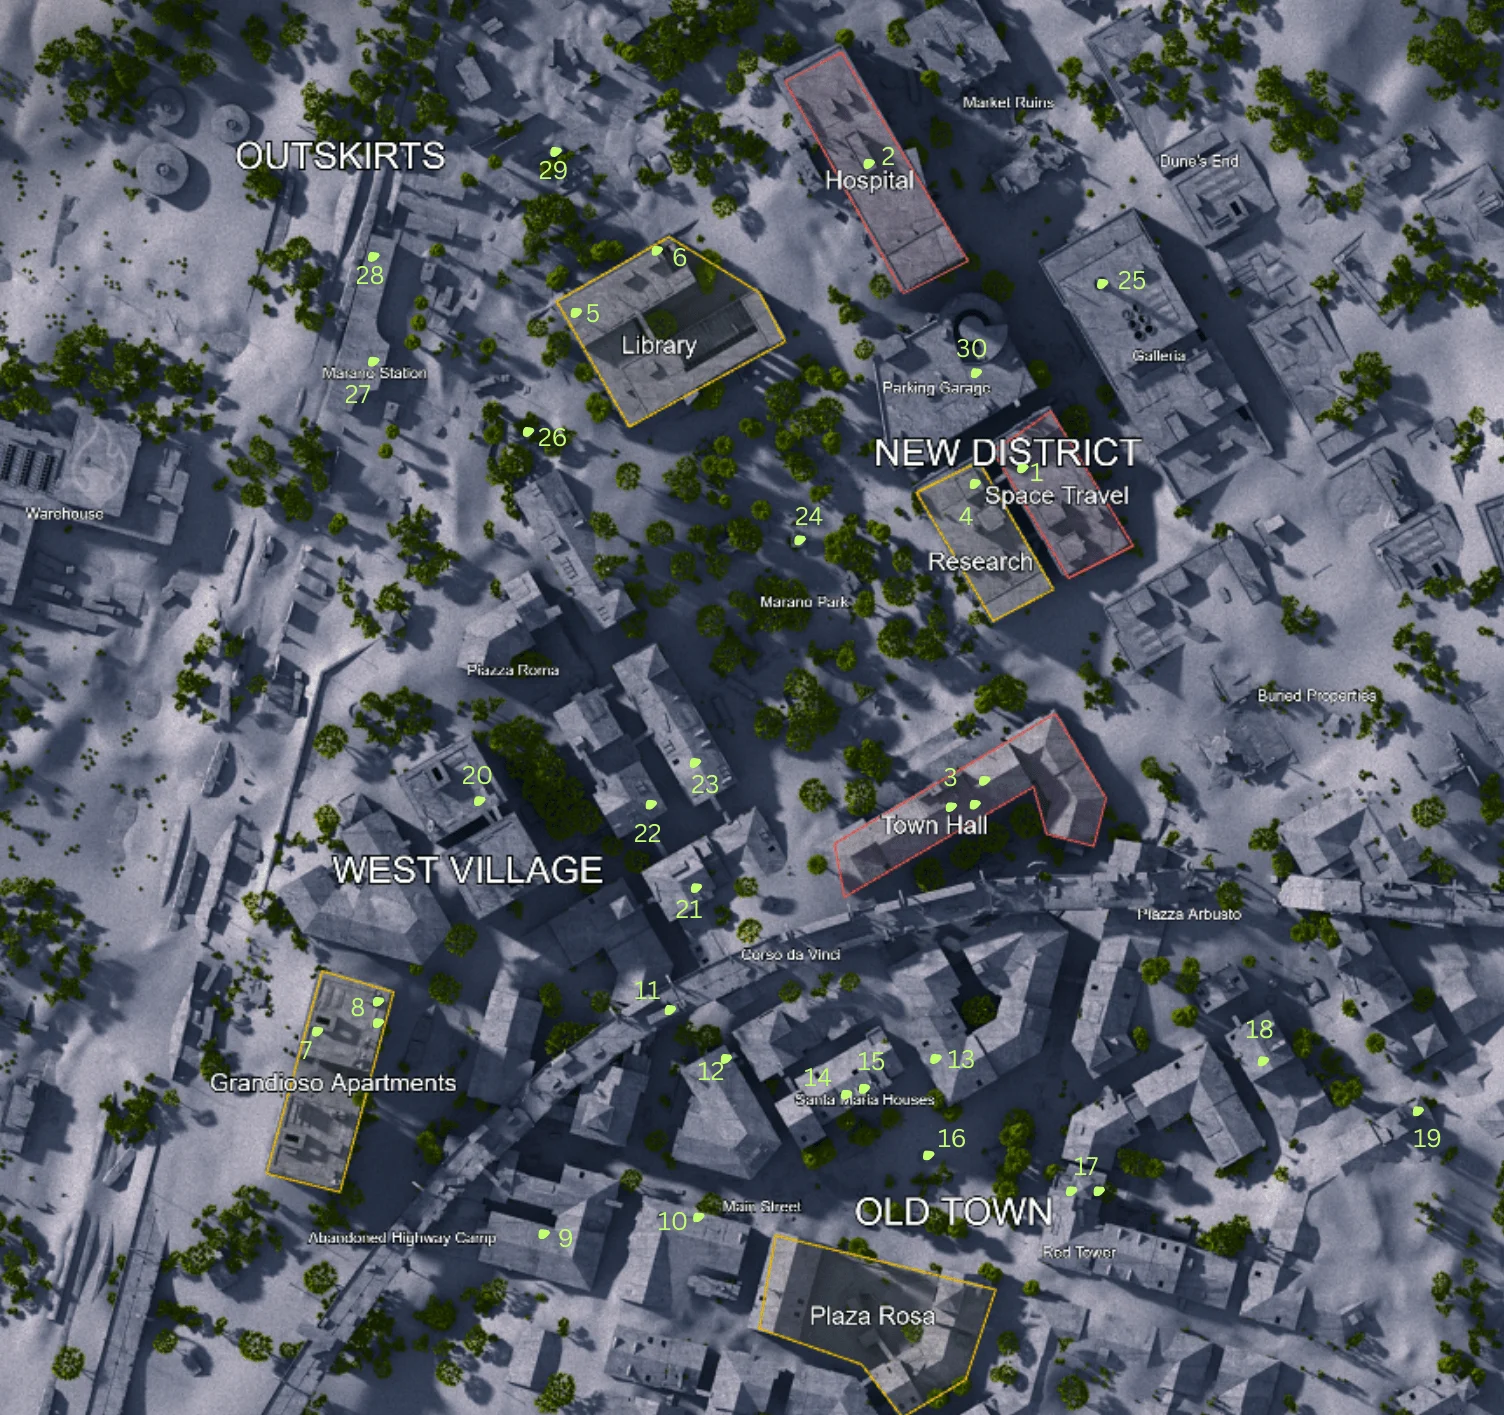
Buried City is another map packed with weapon cases. While it has many well-known case locations, you’ll mostly need to rely on your luck to snag the loot. The majority of the cases are concentrated in the southern part of the map, particularly around the Old Town area. Check out the table below for all the weapon case locations in Buried City:
| Map Number | Location | Description |
|---|---|---|
| 1 | Space Travel JKV Key | Head to the fourth floor of Space Travel and open the locked door. |
| 2 | Hospital Rooftop | Use a Zipline to get there from the Galleria rooftop. Inside the only building on top of it, you'll find a case. |
| 3 | Town Hall | You'll need a key to get inside this building. One crate is opposite the entrance. Another one can be found on the top floor, above the old electrical unit. The final case can be found to the left of the previous one, on the couch. |
| 4 | Rooftop of Research | Find a way to reach the rooftops, and you'll find a crate next to the ventilation shaft. |
| 5-6 | Library Rooftop | Both of the cases here spawn on the rooftop. One can be found on the East side, and another on the North. |
| 7 | Northern Grandioso Rooftop | Go up the rappel in the elevator shaft and then go up the stairs. Head outside and turn right. You'll find one weapon case next to a ventilation unit or on top of the roof exit. |
| 8 | Grandioso Apartments Locked Room | Go to the very first floor through the elevator shaft. Turn right from it and go through the doorway. Open the door, and you may find not one but two cases inside. |
| 9 | Building Right to Abandoned Highway Camp | One of the more popular places to loot at the start of the round. Reach the northern part of this building's roof, then look down. You'll see an open window to the second floor. You need to make a jump to get in. |
| 10 | Main Street Locked Door | You'll need a key to open this building on Main Street. The case usually lies on the mattress. |
| 11 | Corso Da Vinci Highway | Head southeast down the highway, and you'll find a truck. In its trunk is the weapon crate. |
| 12-15 | Santa Maria Houses | This whole area is full of cases. First is on the east of the location. Enter from the street, turn right until you see the stairs. On the platform above them. The second crate is west of the location. Find a window connected to a bridge on the top floor of the building. Turn right immediately when you enter. The last two can be found inside the Santa Maria Houses. One of them is in the room below the attic, marked 14 on the map. Then go out of this room into a sand-filled area, drop down, and turn around. |
| 16 | Old Town Fountain | Find the fountain in the middle of the Old Town map location. The case is in it. |
| 17 | Red Tower Cases | One of them can be found outside, on the platform beneath the tower. Another one is inside the building, reachable through a broken wall. It'll be above the stairs, next to the lockers. |
| 18-19 | Piazza Arbusto | One of the cases is in the building opposite the Pharmacia. Head through the broken wall from the south of the building and turn left. Next to the railing. Another one is further down South, in the belltower of sorts. Climb to the roof, and you'll find it no problem. |
| 20 | West Village | Building to the North of the Grandioso has a zipline you can use. While ziplining, you'll see a platform to your left. Jump on it, and you'll find a secret room with a weapon case. |
| 21 | North of Corso da Vinci | Going northside from the Corso da Vinci, you'll see a building with a hole in the wall. Go inside, walk up the stairs, and turn left into the kitchen area. On top of the kitchen table. |
| 22 | Further up North | Walk between the buildings from the place we've just been to. Jump into the first open window you'll see to your left, and right there is a weapon crate. |
| 23 | Attic in the Opposite Building | Go up to the attic of the building opposite 22. The crate is right next to the zipline. |
| 24 | Marano Park Fountain | Same as with the Old Town fountain. Just check it, and you won't miss it. |
| 25 | Galleria | Zipline needed. A big sign with the Galleria logo on it. You need to get there for one of the quests. Aim the Zipline slightly above the sign, as the placement is a little tricky. |
| 26 | Magazine Shack | Southwest of the Library, you may find a small magazine shack. Behind it, you'll find a weapon case. |
| 27 | Marano Station Sign | Climb to the roof using the abandoned trains, and next to the sign is the case. |
| 28 | Marano Station Barricaded Door | Further North you'll find a barricaded door. Open it, and you'll find the case. |
| 29 | Marano Station Bus | Northeast of the barricaded door, you'll find a broken bus. The case is on the panel. |
| 30 | Parking Garage Raider Camp | Open a barricaded door leading to the elevator shaft. Jump down, and you'll find yourself in a raider camp. Look around, and you'll find the weapon case. |
While there are plenty of weapon cases in Buried City, the competition is fierce. Some locations are easy to access but highly contested, so it’s crucial to be quick and strategic. Notable cases to look out for are the ones near Marano Park Sign, the Piazza Arbusto belltower in the southern part of the map, and the crates located north of Corso da Vinci. These spots are less frequented, giving you a better chance of success. Avoid the barricaded door at Marano Station and the Parking Garage camp, as these tend to be less rewarding.
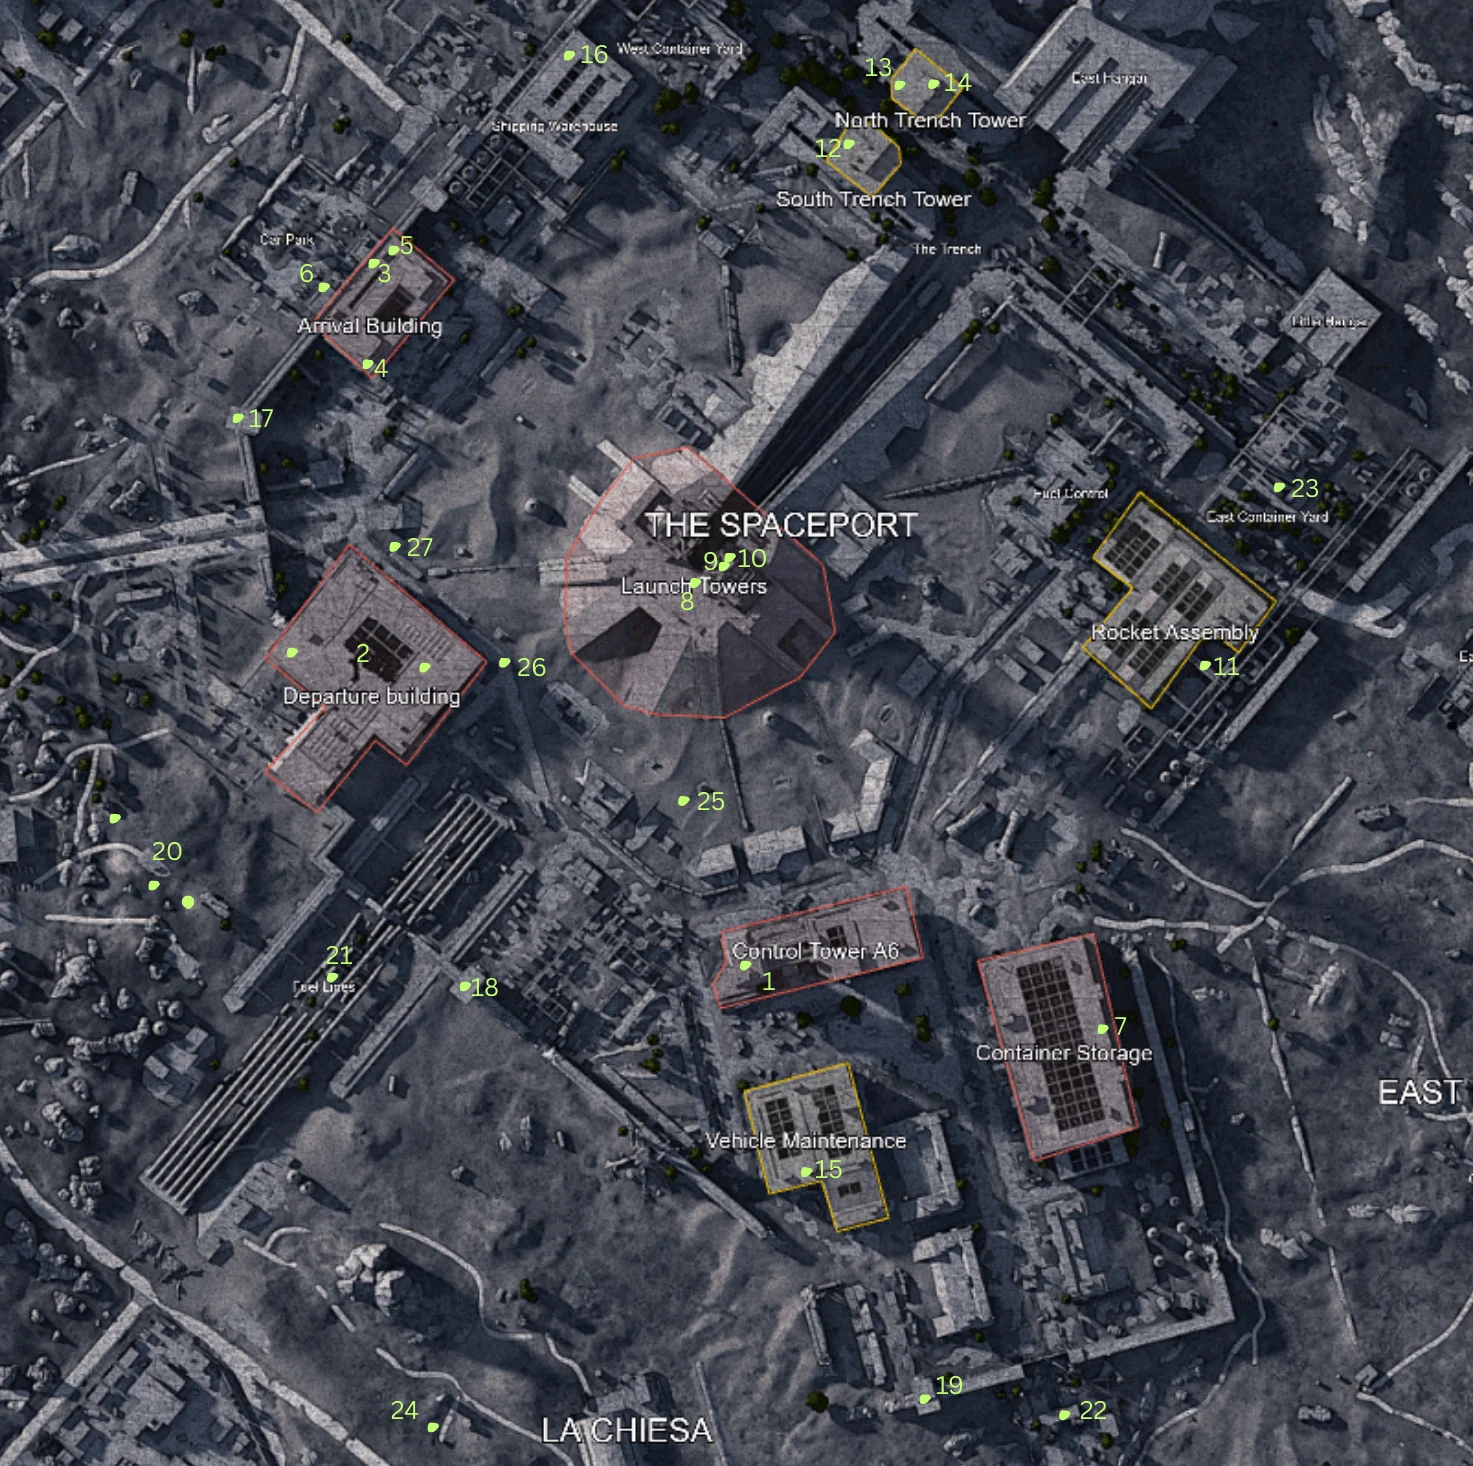
Spaceport is the best map for farming weapon cases in ARC Raiders. It offers a high density of weapon crates with clearly marked loot routes, making it an excellent place to farm. However, these locations are heavily contested, and players will often engage in PvP battles over the loot. Check out the following table for all the Spaceport weapon case locations:
| Map Number | Location | Description |
|---|---|---|
| 1 | Control Tower A6 | Key required. Open the door and rappel up the elevator shaft. You'll find a crate near one of the control panels. |
| 2 | Departure Building | One crate can be found inside the shower area, not far from the reception area. Another can be found on one of the tables on the second floor of the building, or in one of the cubicle tables. |
| 3-6 | Arrival Building | One is on the roof, which you can get to by using a ladder outside, closer to the Shipping Warehouse area. Another one is on the top floor, behind the barricaded door in the southern part of the building. The third one can be found at the bottom of the elevator shaft opposite the barricaded door. The final one is on the ground floor, in the southern, barricaded room that faces the Car Park. Tucked in a corner between two servers. |
| 7 | Container Storage | Locked behind a door, you'll have no problem finding it once inside. |
| 8-10 | Launch Towers | At the bottom of the Launch Towers, behind one of the walls. Two other crates are at the top of the Launch Towers. Ride the east tower elevator zipline to the top and look around. In one of the corners of the communication tower. Another one can spawn at the very top of the Launch Towers. It'll either be under the stairs or close to the railings facing the rocket shaft. |
| 11 | Rocket Assembly | Climb onto the pipes outside of the building on the eastern side. |
| 12-14 | South & North Trench Towers | Two of the weapon cases require a key to open the towers and are located on the second floor. The third one is located at the top of the ventilation shaft in the North Trench Tower. |
| 15 | Vehicle Maintenance | On the second floor, in the southeast part of the building, in the office overlooking the first floor, right on the couch. |
| 16 | Shipping Warehouse | Behind the closed door. Near one of the walls. You won't miss it. |
| 17 | Watchtower Between Arrival and Departure | Get to the upper room. Can spawn anywhere inside. |
| 18 | Watchtower West of A6 Towe | Same as before, get to the top floor. |
| 19 | Watchtower South of Vehicle Maintenance | Same idea, always go for the top floor. |
| 20 | Hidden Bunker Crates | Only active during, you guessed it, the Hidden Bunker event. Best places to look for the Vulcano blueprint. |
| 21 | Fuel Lines | East of the nearby Field Depot, a vertical cylindrical pipe. You'll need to climb inside. |
| 22 | Security Terminal South of Container Storage | One of the small security booths, it will lie on the ground. |
| 23 | East Container Yard | At the end of the lower container yard, between the two catwalks east of the raider hatch. |
| 24 | West of La Chiesa | Near one of the spheres. |
| 25-27 | Spaceport Tunnels | You can find the entrances to the tunnels everywhere around the Launch Towers areas. We recommend starting at one end of the tunnel and moving forward until you reach the other end. The cases are usually inside the rooms with consoles, and one of them is at the southeastern end of the tunnel, in a small camp. |
Although Spaceport has fewer lootable areas, its case density compensates for this, ensuring you’ll come across plenty of opportunities to get weapons. Some of the best spots to loot are the Fuel Lines crate, the East Container Yard crate, and the Spaceport Tunnels. If you’re feeling bold, consider looting the Arrival Building, Departure Building, and the watchtower between them for a riskier but rewarding experience.
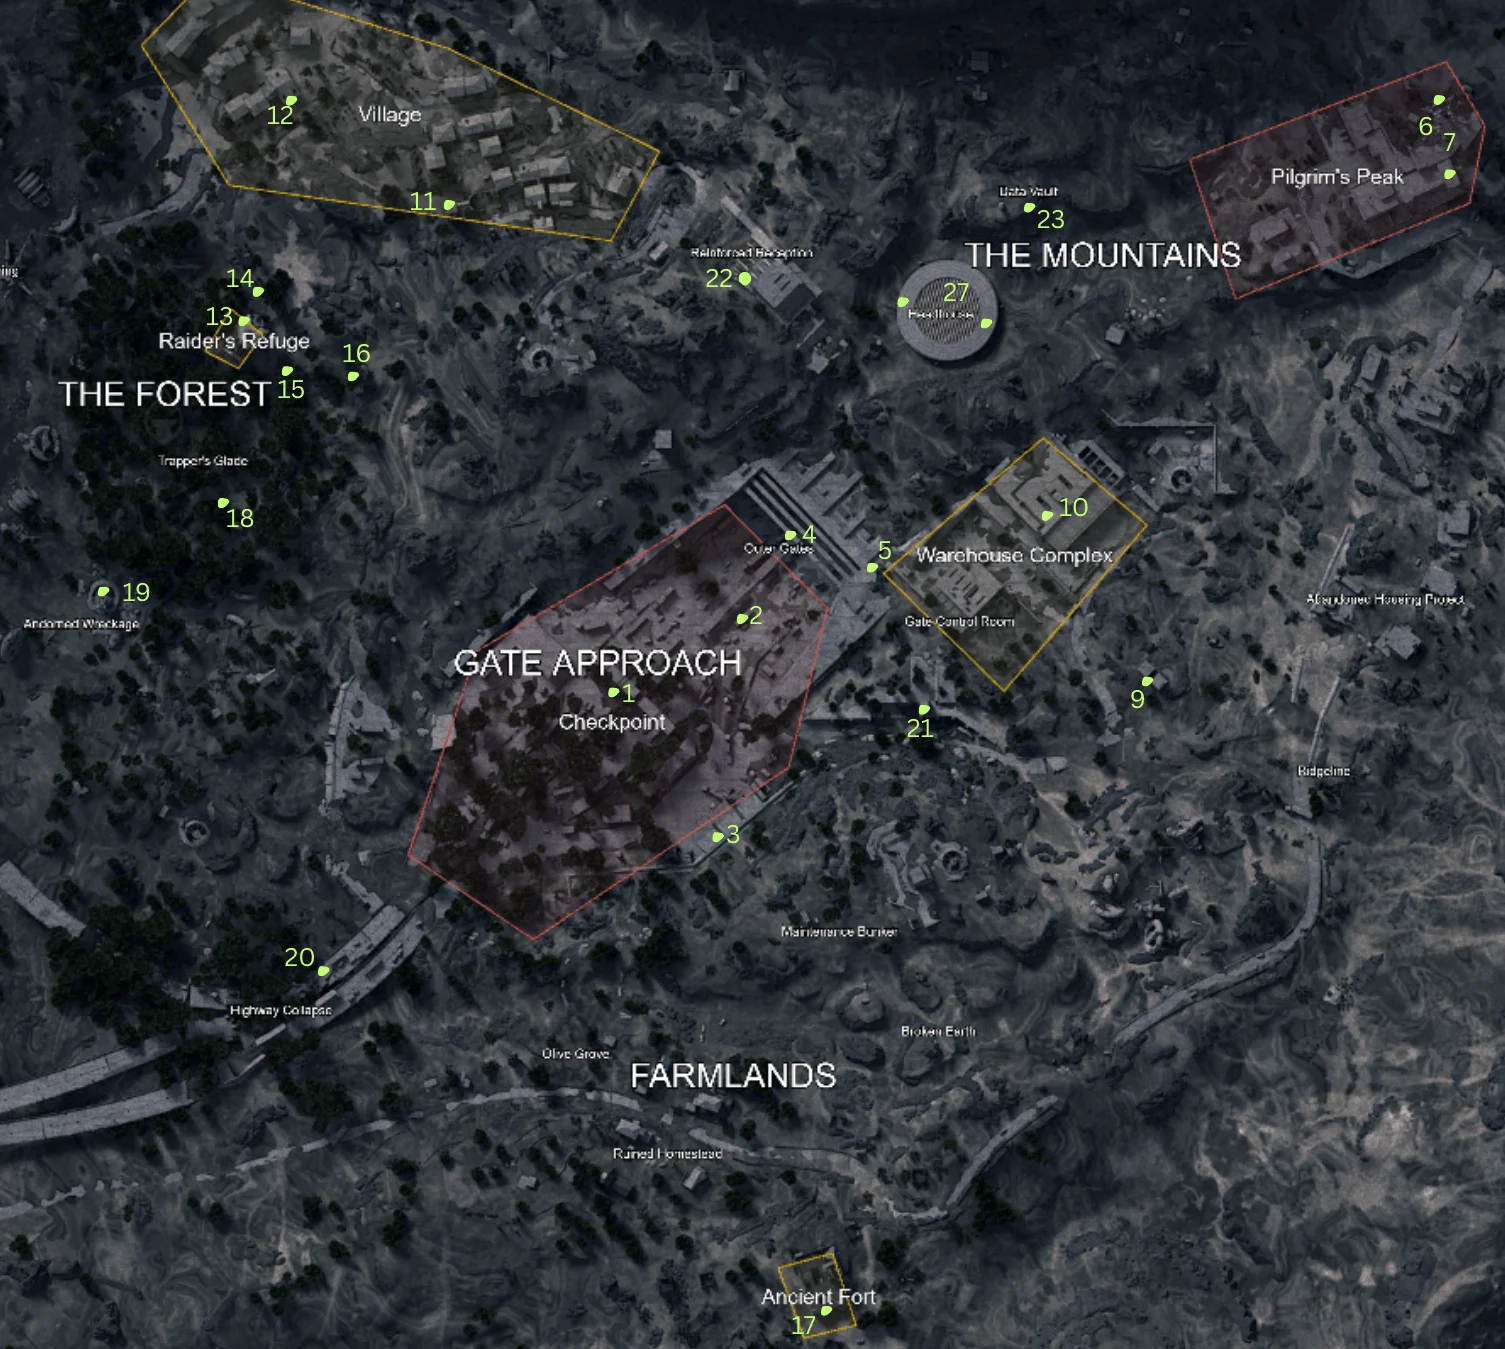
Blue Gate is an intriguing map with its scattered weapon case locations. Due to the map’s expansive layout and numerous locked rooms or puzzles, it’s not as simple to quickly farm cases like Spaceport. However, if you know where to look, you can find plenty of loot without too much hassle. Take a look at the table below for the Blue Gate weapon case locations:
| Map Number | Location | Description |
|---|---|---|
| 1 | Checkpoint Between Rails | On your way to the underground complex, you may find a rail separating two broken roads with cars on them. Between them, you'll find a case. |
| 2 | Inside the Bus at Checkpoint | Further down the road, you'll find a broken bus, inside of which is a crate. |
| 3 | Truck Trunk | Southeast of the Checkpoint area, a truck is parked under the shelter. Crate's on its trunk. |
| 4 | Concrete Beams | Above the Underground entrance area, there are concrete beams that you can zipline to from below. On one of the couches is a weapon crate. |
| 5 | Vent above the Underground Complex | If you go North from the concrete beams, you'll find a ladder. Go down and turn left to go through the door. Advance through the corridor until you find a stairway with a zipline in the center. Go to the very bottom of it, and you'll find a weapon crate hidden under the stairs. |
| 6 | Top of the Pilgrim's Peak | Zipline up to the very top of the Pilgrim's Peak tower. You'll find a crate near the couch. |
| 7 | Pilgrim's Peak Locked Door | Obviously, requires a key. Open the door, and the crate is there. |
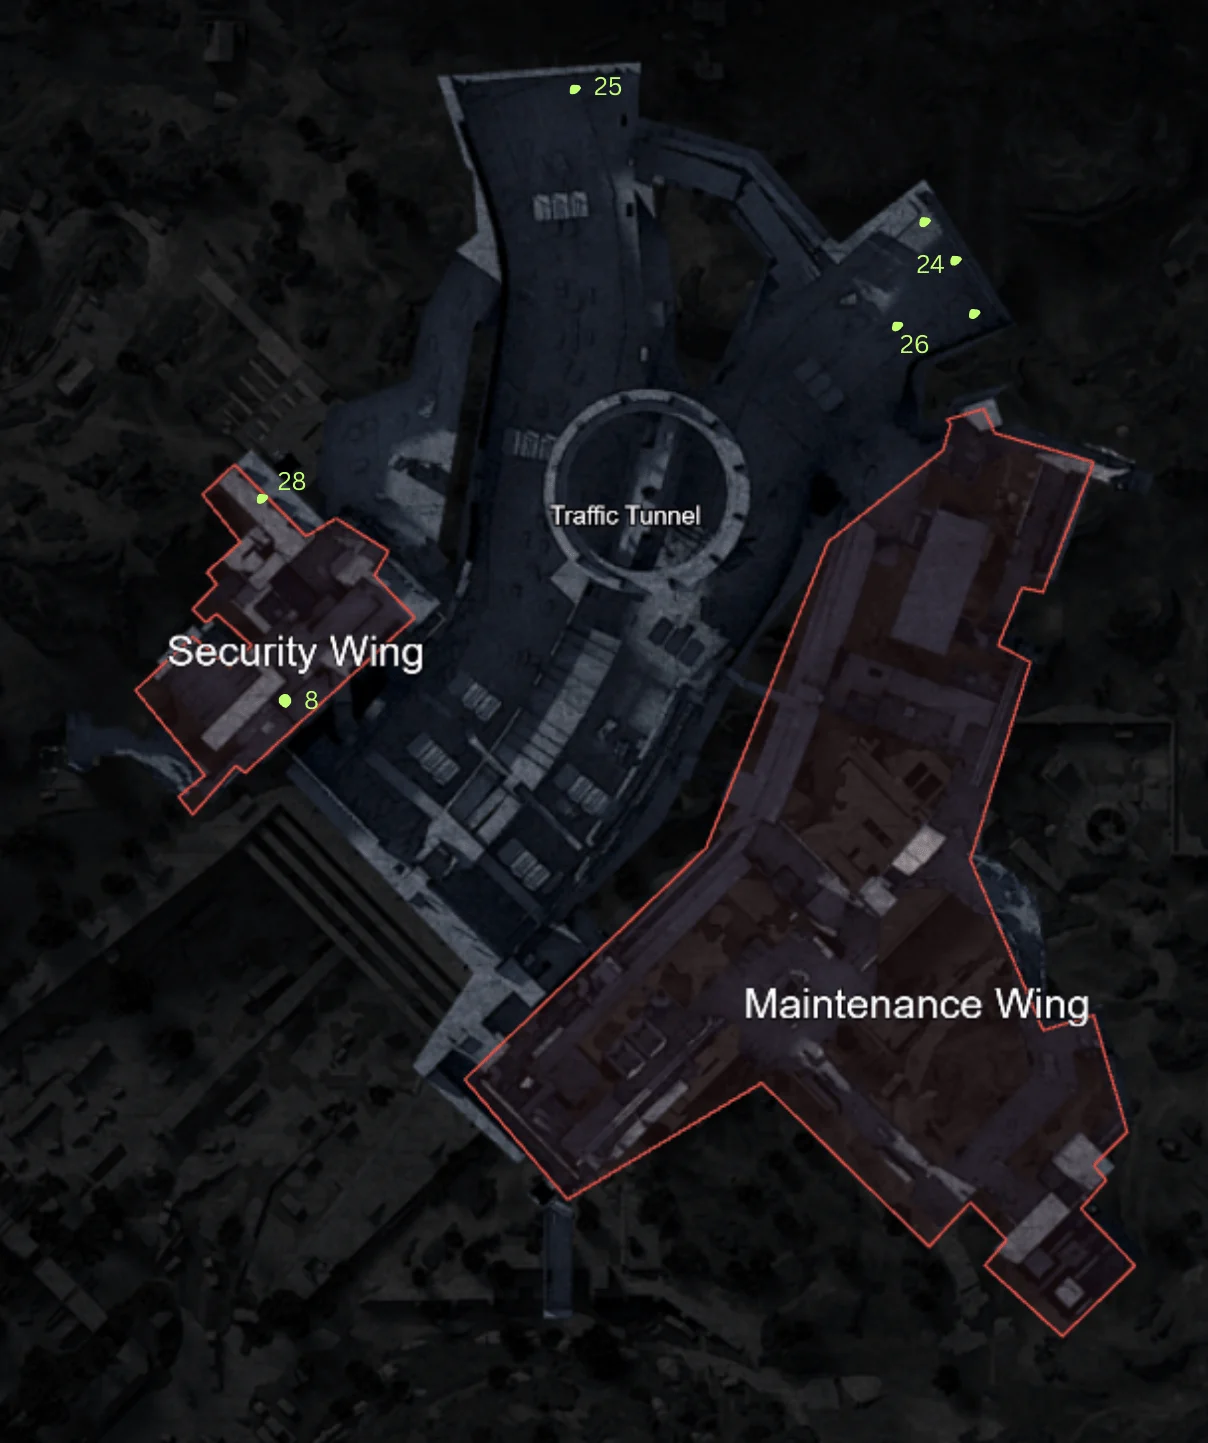
| 8 | Security Wing | Requires a Comms Tower Key. A weapon case and some other really decent loot can be found here. |
| 9 | Maintenance Wing in the Vent | To get to this place, you'll need to find an unmarked zipline entrance. Refer to the map above to understand where you need to go. Just go down the zipline and look around. The weapon crate that spawns here can be pretty tricky to get, but they almost always spawn here. |
| 10 | Warehouse Complex Middle Walkway | Go up to the top floor and find the middle walkway. At the end of it. |
| 11 | Village Belltower | At the very South of the location, you'll need a Zipline to get there, which makes it a very unreliable place to loot, since weapon crates aren't guaranteed to spawn. |
| 12 | Village Locked Room | A locked building in the eastern part of the Village. It doesn't spawn there often, but that's from our experience. |
| 13 | Raider's Refuge Second Floor | Use the ladder to climb to the belltower and then drop down into a small camp. The case should be there. |
| 14 | Hidden in the Bushes | North of the Raider's Refuge, hidden inside the bushes, watch closely. |
| 15 | East of the Refuge | One of the cellars with the potential location of the buttons that activate the locked Refuge door. |
| 16 | Further to the East | Inside another cellar, where you can find one of the buttons to activate a Raider's Refuge door. |
| 17 | Ancient Fort Cellar | Requires solving the puzzle. Find the Fuel Cells scattered around the area and place them in the battery slots in the Ancient Fort to open it. |
| 18 | Trapper's Glade South | One of the shack's ruins has a crate on top of it. |
| 19 | Adorned Wreckage Top | Climb to the top of the large construction in the Adorned Wreckage. The crate should spawn there. Watch out for Leaper that frequently spawns here. |
| 20 | Highway Collapse Bus | Above the location name is a bus where you can find a weapon case. |
| 21 | Tower South of the Gate Control Room | At the top of the ladder. The tower is above the Underground entrance. |
| 22 | Reinforced Reception Rib | You can find a weapon crate tucked between two ribs of the building. |
| 23 | Data Vault | Head down the stairs and turn right. This location is frequently guarded by a turret. The crate usually spawns below it. |
| 24 | End of the Right Tunnel | In the Traffic Tunnel, if you go to the very end of the right road, you'll reach a dead end. There are three possible crate spawns here, so look around. |
| 25 | End of the Left Tunnel | Same story here, reach the end of the Traffic Tunnel, and you might find a weapon case. |
| 26 | Patrol Car inside the Tunnels | Most Patrol Cars contain weapon crates inside them. |
| 27 | Headhouse Rims | Reach the Headhouse and go inside. Look to the outer rims right above the Trafic Tunnel of this circular structure, and you might find one or even two crates on them. They're sometimes guarded by turrets. |
| 28 | Inside the Mantikor Room | This room can be accessed through Reinforced Reception. Go down the elevator shaft and look around to find Fuel Cells. Bring them to the Mantikor Room. You'll need three Cells to open the door. Be very careful, since anyone can take them out and lock you inside this room. |
Blue Gate is a fun map to explore, with plenty of hidden secrets to uncover. However, the large map size means you can’t easily jump from one loot crate to the next, and it’s more challenging to traverse. That said, this map is still worth farming due to the high-quality loot in the weapon cases. The ARCs on this map tend to be more of a threat than the other players, so be mindful of your surroundings.
Stella Montis, the latest map added to ARC Raiders, has only 18 confirmed weapon case spawns. Its labyrinthine design makes it a challenging map to navigate, but with enough practice, you can memorize the routes and make it a profitable farming spot. The Night mode of Stella Montis is a treasure trove of high-tier loot, including Epic weapons and blueprints. Here are the Stella Montis weapon case locations:
| Map Number | Location | Description |
|---|---|---|
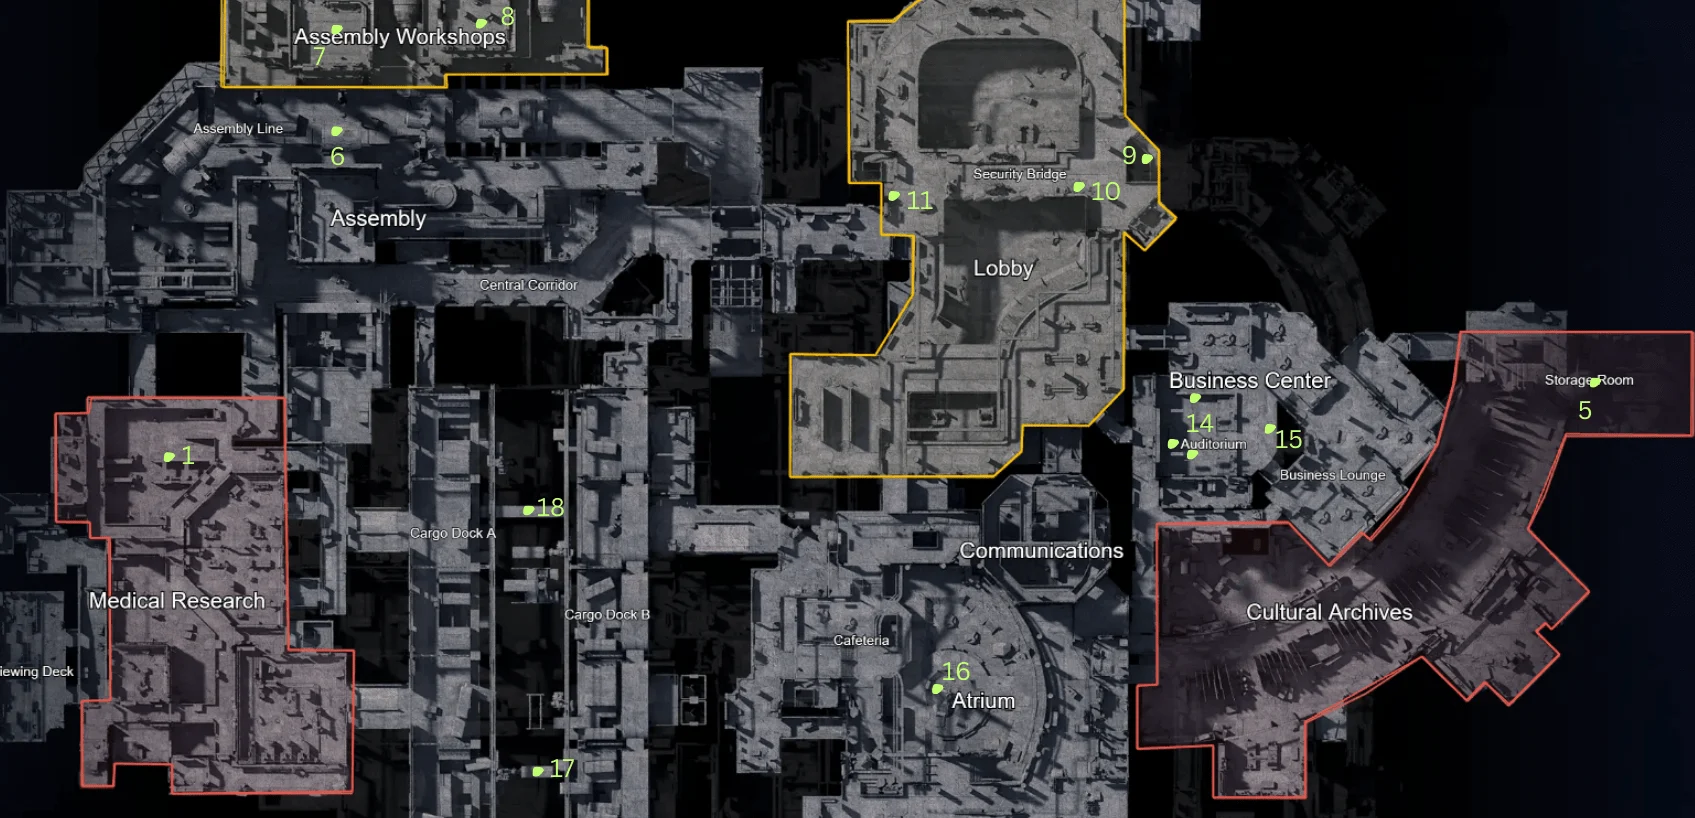
| 1 | Medical Research | It's right on top of the server things in the northern part of the area. Be careful with other Raiders and Shredders. |
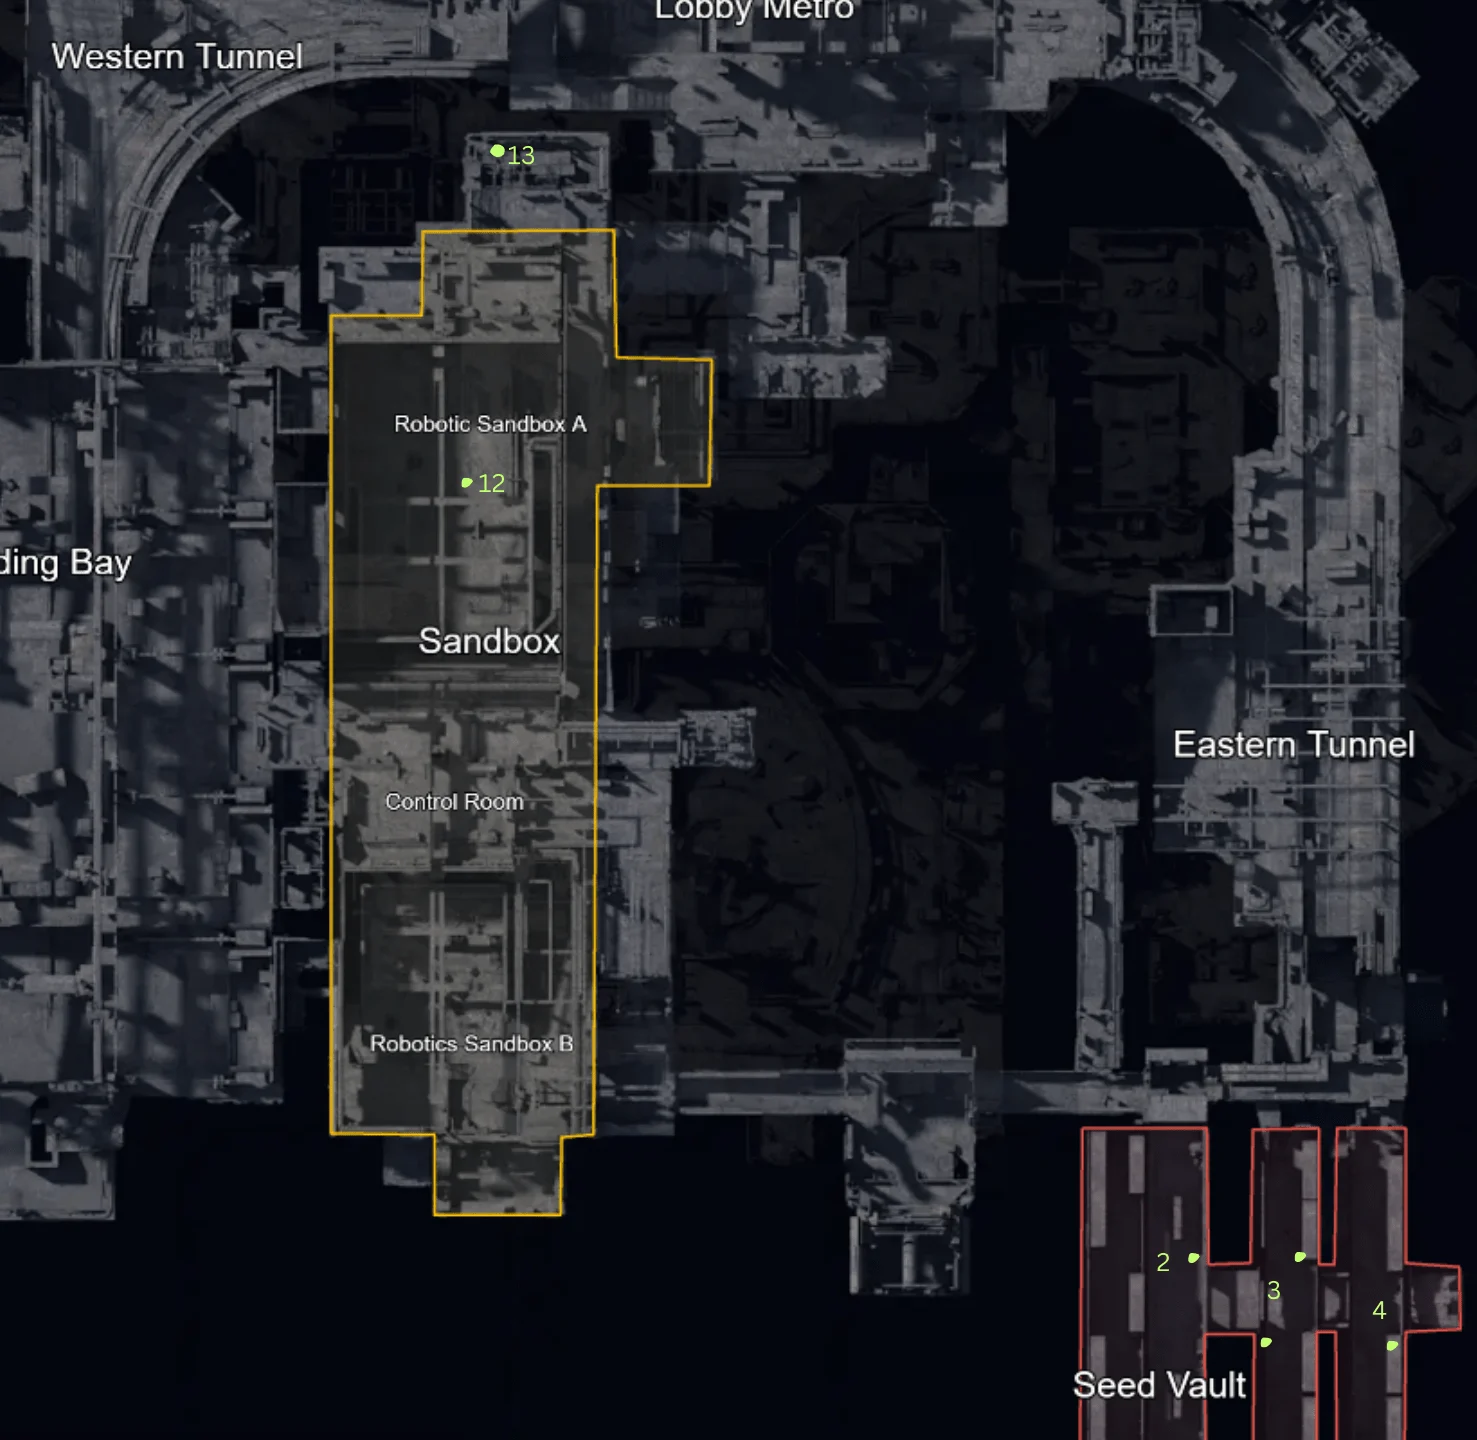
| 2 | Seed Vault Left Hallway | First, you need to open the door with a Fuel Cell. Find them nearby. Then, when you enter the area, hug the left wall, and you should quickly find a weapon crate. |
| 3 | Seed Vault Central Hallway | In the middle of the area, right outside the door from the left hallway. |
| 4 | Seed Vault Right Hallway | In the middle of the area again, you'll see if it spawned in when going through the large door. |
| 5 | Cultural Archives | In the Storage Room, locked away with a keycard. |
| 6 | Assembly Workshops Hanged Thruster | Inside the thruster. You can get there either by parkouring, it's easier to do from the second floor of the left Assembly Workshop. Alternatively, you can use a slow elevator right beneath it, but it's riskier. |
| 7 | Assembly Left Workshop | Speaking of the second floor. You might find a weapon crate just lying on the floor there. |
| 8 | Assembly Right Workshop | In the same place as the left Assembly Workshop. |
| 9 | Lobby Under the Stairs | Go down to the first floor of the Lobby where you'd use the Security key to unlock the room. Under the stairs is the crate spawn. |
| 10 | Lobby Security Bridge | The right side of the Security Bridge has a weapon crate lying in the open. |
| 11 | Lobby Security Bridge Left Side | Cross the bridge and go left to the door, where you can find a weapon crate. |
| 12 | Sandbox | If you go from the Assembly and continue down the path, you'll see a sand-covered area with Rovers. The crate lies in the middle of the area, but it's always flooded with Shredders. |
| 13 | North of the Sandbox | There's a locked room you need to open. You can find three Fuel Cells nearby. It's reminiscent of the Mantikor room on the Blue Gate. |
| 14 | Auditorium | There are a few possible weapon crate spawns here. One is behind the teacher's desk or in front of it, and another one is next to one of the walls of the location. |
| 15 | Business Center East | Another crate spawns under the Astraventuro poster, to the East of the Auditorium. |
| 16 | Atrium Star Statue | Get to the second floor of the Atrium and look at the statue. You may find a crate sitting on top of it. |
| 17 | Between Cargo Docks | A weapon crate can be found on one of the containers in the South of the area, between Cargo Dock A and B. |
| 18 | Rails Between Cargo Docks | One crate can be seen lying on the railcar. |
The weapon cases in Stella Montis are some of the most dangerous to access, but the loot is often worth the risk, especially at night. If you’re not hostile towards other players, you might find yourself in a friendly lobby, allowing you to loot in peace. If you’re going for high-quality loot, be sure to visit during the Night mode for the best chances of finding Epic guns and blueprints.

Buy ARC Raiders Coins
Secure ARC Raiders Coins fast and upgrade your loadout!
No, weapon case spawns are not guaranteed in every raid. The exact spawn rate hasn’t been officially disclosed, but from player experience, some cases appear to spawn more consistently than others.
Spaceport is widely considered the best farming map because many weapon cases are clustered close together, allowing you to move efficiently from one location to the next.
Based on current knowledge, existing weapon case locations remain the same across seasons and patches. Developers may introduce additional spawns in the future, but previously placed crates have not been relocated.
Yes, weapon cases can drop Rare and high-tier weapons, especially during Dynamic Events when both spawn rates and loot quality are improved.
Since most players prioritize weapon cases, spawning early gives you a strong advantage if you rush them immediately. If you spawn later, your best bet is to target less contested or hidden locations instead.
Yes, Dynamic Events impact weapon case behavior. During these events, cases tend to spawn more often and typically contain higher-quality loot compared to standard raids.